My husband took a bite of this salted caramel apple crisp, stopped chewing, and just looked at me. Not in a dramatic way—more like he was processing something. He finished that bite, then quietly asked if he could have the leftovers for breakfast. That’s not something he ever says. I mean, he’s a guy who eats cold pizza straight from the box without a second thought, but he’d never requested dessert for breakfast before. That moment told me everything I needed to know about this recipe.
Honestly, I wasn’t even trying to create anything special that day. I had a bag of apples sitting on the counter that were starting to look a little sad. You know the ones—still perfectly fine to cook with, but nobody’s reaching for them as a snack anymore. I also had a half-empty jar of salted caramel sauce from a baking project I’d abandoned mid-week. (Classic me.) So I just started throwing things together, hoping for the best. The oat crumble came together in a bowl without much thought. The apples got tossed with a little sugar and lemon juice because that’s what you do.
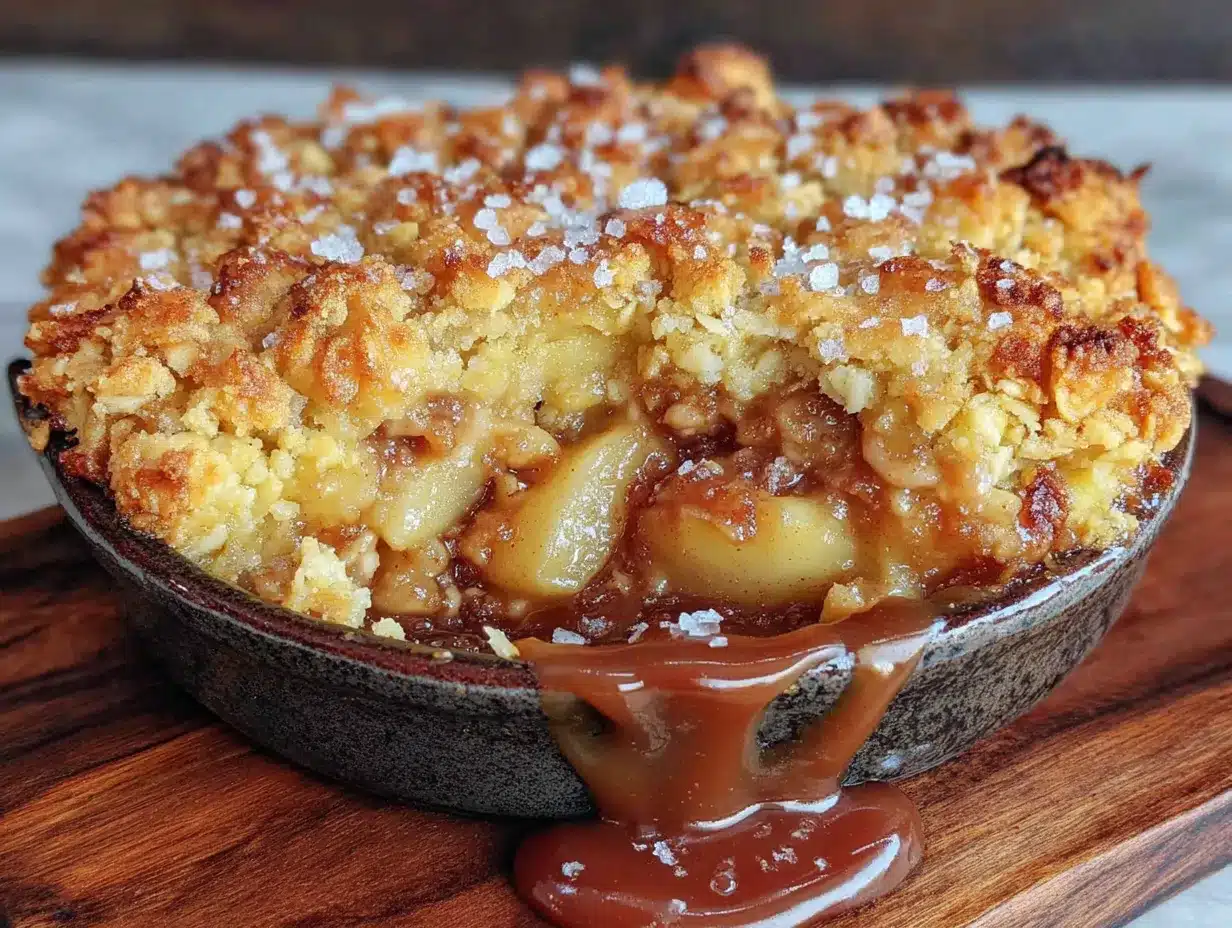
What came out of the oven was honestly ridiculous. The apples had softened into this jammy, buttery filling that was sweet but not cloying. The oat crumble on top was golden and crunchy in all the right places. And that salted caramel sauce had melted into everything, creating these little pockets of gooey, salty-sweet goodness that made every spoonful feel like a discovery. It was the kind of dessert that makes you slow down and actually taste what you’re eating. I knew I had to write it down before I forgot what I did.
This recipe has become my go-to for fall gatherings, cozy Sunday afternoons, and those nights when you just need something warm and comforting. It’s simple enough for a weekday treat but impressive enough to serve to company. And honestly? It might just change how you think about apple crisp.
Why You’ll Love This Recipe
Let me tell you why this particular apple crisp stands out from the dozens of other recipes floating around the internet. I’ve tested this thing more times than I care to admit, and every tweak was intentional.
- Quick & Easy: You can have this in the oven in under 20 minutes. No complicated steps, no fancy equipment, and no waiting around. Perfect for those evenings when you suddenly remember you promised dessert.
- Simple Ingredients: Apples, oats, butter, brown sugar, flour, and salted caramel sauce. That’s pretty much it. You probably have most of these in your kitchen right now.
- Perfect for Any Occasion: This works for Thanksgiving dessert, a cozy weekend brunch, or just a Tuesday night treat. It’s versatile like that.
- Crowd-Pleaser: I’ve served this to kids, grandparents, picky eaters, and dessert snobs. Everyone goes back for seconds. Every single time.
- Unbelievably Delicious: The combination of tender, caramelized apples with a crunchy oat topping and ribbons of salted caramel is pure comfort food magic. It’s the kind of dessert that makes you close your eyes after the first bite.
What makes this version different from the rest? It’s the salted caramel, honestly. Most apple crisp recipes rely on plain sugar and butter for sweetness, but the caramel adds a depth of flavor that’s hard to beat. The salt balances everything out so it doesn’t taste one-dimensional. Plus, the oat crumble has a secret ingredient—a tiny pinch of cinnamon and nutmeg that makes the whole kitchen smell like a bakery. I’ve tried making this with just plain oats and sugar, and it’s just not the same. Trust me on this one.
What Ingredients You Will Need
This recipe uses simple, wholesome ingredients to deliver bold flavor and satisfying texture without the fuss. Most of these are pantry staples, so you might not even need a grocery trip.
For the Apple Filling
- 6 medium apples (about 2 pounds or 900g), peeled, cored, and sliced into ¼-inch thick pieces—I prefer Honeycrisp or Granny Smith for their balance of sweetness and tartness
- ¼ cup (50g) granulated sugar (adds sweetness and helps the apples caramelize)
- 2 tablespoons (15g) all-purpose flour (thickens the juices as the apples cook)
- 1 tablespoon (15ml) lemon juice (freshly squeezed—adds brightness and prevents browning)
- 1 teaspoon vanilla extract (pure, not imitation—trust me on this)
- ½ teaspoon ground cinnamon (adds warmth and depth)
- ¼ teaspoon ground nutmeg (freshly grated if you have it—makes a difference)
- Pinch of salt (balances the sweetness)
For the Oat Crumble Topping
- 1 cup (90g) old-fashioned rolled oats (not quick oats—they get mushy)
- ½ cup (60g) all-purpose flour (you can substitute with oat flour for a gluten-free option)
- ½ cup (100g) packed light brown sugar (adds moisture and that deep caramel flavor)
- ½ teaspoon ground cinnamon (I recommend Saigon cinnamon for extra warmth)
- ¼ teaspoon salt (use flaky sea salt if you have it—the texture is lovely)
- 6 tablespoons (85g) unsalted butter, cold and cut into small cubes (this is key for a crumbly texture)
For the Salted Caramel Swirl
- ½ cup (120ml) store-bought or homemade salted caramel sauce (I love the Trader Joe’s brand for convenience, but any good-quality one works—just make sure it’s thick, not runny)
- Flaky sea salt for finishing (Maldon is my favorite—the crunch is perfect)
Ingredient Selection Tips: For the apples, look for firm apples that hold their shape during baking. Granny Smith is my go-to because the tartness cuts through the sweetness beautifully. If you prefer a sweeter filling, use Honeycrisp or Fuji. Avoid Red Delicious—they turn into mush. For the oats, stick with old-fashioned rolled oats. Quick oats will give you a softer, less satisfying crumble. And please, please use cold butter for the topping. It’s the difference between a crumble that’s light and crisp versus one that’s dense and greasy.
Equipment Needed
You don’t need a ton of fancy equipment for this recipe, which is part of why I love it. Here’s what you’ll need:
- 9×13-inch baking dish (or a 2-quart casserole dish—glass or ceramic works best)
- Large mixing bowl (for the apple filling)
- Medium mixing bowl (for the oat crumble)
- Sharp knife and cutting board (for peeling and slicing apples)
- Measuring cups and spoons (preferably metal for dry ingredients)
- Pastry cutter or two forks (for cutting butter into the oat mixture)
- Spatula or wooden spoon (for mixing)
- Small saucepan (for warming the caramel sauce if it’s too thick)
If you don’t have a pastry cutter, don’t stress. I’ve used two forks, my fingers, and even a food processor in a pinch. Your fingers actually work great—just work quickly so the butter doesn’t get too warm. I’ve also used a 9-inch square dish when I was making a smaller batch, and it worked perfectly. Just adjust the baking time slightly. And if you’re using a metal pan instead of glass, keep an eye on the edges—metal heats up faster and can burn the crumble.
Preparation Method
Alright, let’s get cooking. This is straightforward, but I’ll walk you through every step so you nail it.
- Preheat your oven to 375°F (190°C). Get that going first because you want the oven nice and hot when the crisp goes in. Position a rack in the middle of the oven—not too high or the topping will burn before the apples soften.
- Prepare the apples. Peel, core, and slice your apples into ¼-inch thick pieces. Don’t stress about making them perfect—just try to keep them relatively even so they cook at the same rate. I like to slice them into half-moons, but chunks work fine too. You should end up with about 6 cups of sliced apples.
- Make the apple filling. In your large mixing bowl, combine the sliced apples with the granulated sugar, flour, lemon juice, vanilla extract, cinnamon, nutmeg, and a pinch of salt. Toss everything together with your hands or a spatula until every apple slice is coated. Let it sit for about 5 minutes while you make the topping. This gives the apples time to release some of their juices, which will create that lovely syrupy filling.
- Make the oat crumble topping. In your medium mixing bowl, whisk together the rolled oats, flour, brown sugar, cinnamon, and salt. Add the cold butter cubes. Using a pastry cutter or your fingertips, work the butter into the dry ingredients until the mixture looks like coarse crumbs with some pea-sized butter pieces remaining. Don’t overmix—you want those little butter pockets to melt in the oven and create steam, which makes the crumble light and crispy. If the mixture starts to look like dough, you’ve gone too far. Pop it in the fridge for 5 minutes to firm up.
- Assemble the crisp. Pour the apple mixture into your baking dish and spread it into an even layer. Drizzle about half of the salted caramel sauce over the apples—just zigzag it across the top. Sprinkle the oat crumble evenly over everything. Don’t press it down; you want it loose so it bakes up crispy.
- Bake. Place the dish on a baking sheet to catch any drips (trust me on this—apple juice can bubble over). Bake for 35 to 40 minutes, or until the topping is golden brown and the apples are bubbling up around the edges. If the topping starts browning too quickly, tent it loosely with foil for the last 10 minutes. Your kitchen should smell like a fall candle at this point—if it doesn’t, check your oven temperature.
- Add the finishing touches. Remove the crisp from the oven and let it cool on a wire rack for 10 minutes. This is important—the filling needs time to set so it doesn’t turn into apple soup when you scoop it. Drizzle the remaining salted caramel sauce over the top and sprinkle with flaky sea salt. The salt is non-negotiable, honestly. It makes the caramel pop.
- Serve warm. Scoop into bowls and top with vanilla ice cream or whipped cream if you’re feeling fancy. The contrast between the warm, tender apples and cold ice cream is everything.
Cooking Tips & Techniques
I’ve made this recipe more times than I can count, and I’ve learned a few things along the way. Here are my best tips for getting it right every time.
Don’t skip the lemon juice. I know it seems like a small detail, but it does two things: it keeps the apples from browning and it brightens up all the other flavors. Without it, the filling can taste flat and one-dimensional. I learned this the hard way when I made a batch for a potluck and everyone said it was “fine” but not memorable. The lemon juice makes it memorable.
Use cold butter for the crumble. This is the number one mistake I see people make. If your butter is soft or melted, your crumble will be dense and greasy instead of light and crispy. Cut the butter into small cubes and keep it in the fridge until you’re ready to use it. If your hands are warm, run them under cold water before working the butter into the flour mixture. It makes a real difference.
Let the crisp rest before serving. I know it’s tempting to dig in right away, but giving it 10 to 15 minutes on the counter allows the juices to thicken up. If you serve it too soon, the filling will run all over the plate and the crumble will get soggy. Patience pays off here.
Watch the edges. The crumble around the edges of the dish tends to brown faster than the center. If you notice the edges getting dark before the center is done, just cover those areas with small pieces of foil. I’ve burned more than a few batches by not paying attention to this.
Make extra crumble. I always double the oat topping recipe. It keeps in the fridge for a week and you can use it on muffins, quick breads, or even yogurt. Plus, having extra means you can pile it high on the apples, and nobody ever complained about too much crumble.
Variations & Adaptations
This recipe is incredibly forgiving, so feel free to play around with it. Here are some variations I’ve tried and loved.
Gluten-Free Version: Substitute the all-purpose flour in the filling and topping with a good gluten-free all-purpose blend. Bob’s Red Mill 1-to-1 works great. Also make sure your oats are certified gluten-free if that’s a concern. I tested this for a friend with celiac disease and honestly couldn’t tell the difference.
Dairy-Free Version: Use a high-quality vegan butter stick (not the spreadable kind) in the crumble. Miyoko’s or Country Crock Plant Butter work beautifully. For the caramel sauce, look for a dairy-free version—many store-bought options are naturally dairy-free. I’ve used the one from Whole Foods and it’s perfect.
Seasonal Variations: In the fall, add a handful of fresh cranberries to the apple filling for a tart pop of color. In the summer, swap half the apples for ripe pears or peaches. I made a pear version last September and it was incredible—the pears got almost buttery soft. You can also mix in some chopped pecans or walnuts to the crumble for extra crunch.
Flavor Twists: Add a tablespoon of bourbon or dark rum to the apple filling for a grown-up version. Or swap the cinnamon and nutmeg for pumpkin pie spice if you’re feeling festive. I once added a teaspoon of espresso powder to the caramel sauce and it was mind-blowing—the coffee flavor deepened the caramel without being obvious.
Individual Servings: Make this in ramekins for a dinner party. Just divide the filling and topping among 6 to 8 ramekins and bake for about 20 to 25 minutes. They look so cute and everyone gets their own little portion of crispy topping.
Serving & Storage Suggestions
This crisp is best served warm, but it’s still delicious at room temperature. Here’s how to make the most of it.
Serving Temperature: Warm is definitely the way to go. The apples are tender, the caramel is gooey, and the crumble is still crispy. If you’re reheating leftovers, pop individual portions in the microwave for 30 seconds or in a 350°F oven for 10 minutes.
What to Serve With It: Vanilla ice cream is the classic pairing, and for good reason—the cold creaminess balances the warm, spiced apples. But I also love it with a dollop of whipped cream, a drizzle of heavy cream, or even a scoop of cinnamon ice cream. For a breakfast twist (no judgment), serve it over Greek yogurt with a drizzle of honey.
Storage Instructions: Cover the baking dish tightly with foil or plastic wrap and store in the refrigerator for up to 4 days. The crumble will soften over time, but it’s still delicious. I actually think the flavors meld together even more the next day.
Freezing Instructions: You can freeze the unbaked crisp for up to 3 months. Assemble everything in a freezer-safe dish, cover tightly with foil, and freeze. When you’re ready to bake, add about 10 to 15 minutes to the baking time—no need to thaw. You can also freeze the baked crisp, though the crumble won’t be as crispy after thawing. Reheat in the oven at 350°F until warmed through.
Make-Ahead Tip: You can prep the apple filling and the crumble topping separately up to 2 days in advance. Keep them both in the fridge, then assemble and bake when you’re ready. This is a lifesaver for Thanksgiving or dinner parties.
Nutritional Information & Benefits
Look, this is dessert. It’s not health food. But that doesn’t mean it can’t have some redeeming qualities.
Estimated Nutritional Values (per serving, based on 8 servings):
- Calories: 380
- Total Fat: 16g
- Saturated Fat: 9g
- Cholesterol: 40mg
- Sodium: 220mg
- Total Carbohydrates: 58g
- Dietary Fiber: 5g
- Sugars: 38g
- Protein: 4g
Health Benefits of Key Ingredients: Apples are a great source of fiber and vitamin C. Oats are packed with soluble fiber, which is good for heart health. Cinnamon has anti-inflammatory properties and can help regulate blood sugar. And while butter and sugar aren’t exactly superfoods, a little bit of what you love is good for the soul.
Dietary Considerations: This recipe can be made gluten-free and dairy-free with simple substitutions (see the variations section). It’s naturally nut-free if you skip the optional pecans. It’s not suitable for low-carb or keto diets due to the sugar and oats.
Potential Allergens: This recipe contains gluten (from the flour and oats) and dairy (from the butter). The caramel sauce may also contain dairy, so check the label if that’s a concern.
My personal take? I believe in balance. I eat salads and lean protein most of the time, but I also believe that dessert should be enjoyed without guilt. This crisp is made with real, whole ingredients, and that counts for something. Plus, the fiber from the apples and oats means it’s not just empty calories. So go ahead, have a second scoop.
Conclusion
This salted caramel apple crisp has become a staple in my kitchen for a reason. It’s simple enough to throw together on a random Tuesday, but impressive enough to bring to a holiday dinner. The apples get tender and jammy, the oat crumble stays crispy and golden, and that salted caramel running through everything is just pure magic.
I love that this recipe is forgiving. You can use whatever apples you have, swap the oats for a gluten-free version, or add extra caramel if you’re feeling indulgent. It’s the kind of dessert that adapts to you, not the other way around. And honestly? That’s the best kind of recipe to have in your back pocket.
If you make this, I’d love to hear about it. Leave a comment below and tell me how it turned out, what variations you tried, or if your family asked for it for breakfast like mine did. Don’t forget to snap a photo and tag me on social media—I love seeing your creations. And if you’re looking for more cozy dessert ideas, check out my chocolate-dipped strawberry coconut bars for a no-bake option, or my loaded bacon mac and cheese when you’re craving something savory instead. Happy baking, friends.
Frequently Asked Questions
Can I use quick oats instead of rolled oats?
You can, but I wouldn’t recommend it. Quick oats are processed more finely, so they absorb moisture faster and turn mushy. Rolled oats hold their shape better and give you that satisfying crunchy texture. If quick oats are all you have, reduce the butter slightly and expect a softer crumble.
Do I have to peel the apples?
Not necessarily, but I prefer to. The peels can get tough and chewy during baking, especially if you’re using a variety with thick skin. If you’re short on time or don’t mind the texture, leave them on. Just make sure to wash the apples thoroughly first.
Can I make this in a slow cooker?
Yes! Assemble everything in the slow cooker insert, then cook on low for 3 to 4 hours or on high for 1.5 to 2 hours. The crumble won’t get as crispy as it does in the oven, but it’s still delicious. For a crisper topping, you can transfer the cooked crisp to a baking dish and broil it for 2 to 3 minutes before serving.
My apple filling turned out watery. What went wrong?
This usually happens for one of two reasons: you used apples that are too juicy (like McIntosh) or you didn’t let the crisp rest long enough after baking. Try using firmer apples like Granny Smith or Honeycrisp, and always let the crisp sit for at least 10 minutes before serving. If it’s still watery, you can add an extra tablespoon of flour to the filling next time.
Can I double this recipe?
Absolutely. Double all the ingredients and use a 9×13-inch baking dish or a larger 11×15-inch dish. You may need to add 5 to 10 minutes to the baking time. Keep an eye on the topping—if it starts browning too quickly, tent it with foil. This is perfect for feeding a crowd or for meal prep.
Pin This Recipe!

Ultimate Salted Caramel Apple Crisp with Oat Crumble

This salted caramel apple crisp features tender, caramelized apples with a crunchy oat topping and ribbons of salted caramel. It’s simple enough for a weekday treat but impressive enough to serve to company.
- Prep Time: 20 minutes
- Cook Time: 35 minutes
- Total Time: 55 minutes
- Yield: 8 servings 1x
- Category: Dessert
- Cuisine: American
Ingredients
- 6 medium apples (about 2 pounds or 900g), peeled, cored, and sliced into ¼-inch thick pieces
- ¼ cup (50g) granulated sugar
- 2 tablespoons (15g) all-purpose flour
- 1 tablespoon (15ml) lemon juice
- 1 teaspoon vanilla extract
- ½ teaspoon ground cinnamon
- ¼ teaspoon ground nutmeg
- Pinch of salt
- 1 cup (90g) old-fashioned rolled oats
- ½ cup (60g) all-purpose flour
- ½ cup (100g) packed light brown sugar
- ½ teaspoon ground cinnamon
- ¼ teaspoon salt
- 6 tablespoons (85g) unsalted butter, cold and cut into small cubes
- ½ cup (120ml) store-bought or homemade salted caramel sauce
- Flaky sea salt for finishing
Instructions
- Preheat your oven to 375°F (190°C). Position a rack in the middle of the oven.
- Peel, core, and slice apples into ¼-inch thick pieces (about 6 cups).
- In a large mixing bowl, combine sliced apples with granulated sugar, flour, lemon juice, vanilla extract, cinnamon, nutmeg, and a pinch of salt. Toss to coat. Let sit for 5 minutes.
- In a medium mixing bowl, whisk together rolled oats, flour, brown sugar, cinnamon, and salt. Add cold butter cubes. Using a pastry cutter or fingertips, work butter into dry ingredients until mixture resembles coarse crumbs with some pea-sized butter pieces. Refrigerate for 5 minutes if needed.
- Pour apple mixture into a 9×13-inch baking dish and spread evenly. Drizzle about half of the salted caramel sauce over the apples. Sprinkle oat crumble evenly on top.
- Place dish on a baking sheet. Bake for 35 to 40 minutes, until topping is golden brown and apples are bubbling. If topping browns too quickly, tent with foil for the last 10 minutes.
- Remove from oven and let cool on a wire rack for 10 minutes. Drizzle remaining salted caramel sauce over the top and sprinkle with flaky sea salt.
- Serve warm, optionally with vanilla ice cream or whipped cream.
Notes
For best results, use firm apples like Granny Smith or Honeycrisp. Use cold butter for the crumble. Let the crisp rest for 10-15 minutes before serving to allow juices to thicken. Make extra crumble and store in the fridge for up to a week.
Nutrition
- Serving Size: 1 serving
- Calories: 380
- Sugar: 38
- Sodium: 220
- Fat: 16
- Saturated Fat: 9
- Carbohydrates: 58
- Fiber: 5
- Protein: 4
Keywords: apple crisp, salted caramel, oat crumble, fall dessert, apple dessert, easy dessert


