Third time in as many days, and the cream cheese filling finally stayed put instead of bubbling out the sides like some kind of cheesy volcano. I stared at the pan through the oven door, holding my breath, watching the edges turn that perfect shade of deep amber while the center still had that slight jiggle that promised a soft, tender crumb. The pumpkin bars I’d been chasing—the ones with that hidden ribbon of tangy, silky cream cheese running right through the middle—were finally within reach.
The obsession started on a Tuesday afternoon when the air turned crisp and I found myself craving something that tasted like fall but felt a little more special than a standard slice of pumpkin bread. You know how it goes. You make something once, it’s good. Then you think, “I could make it better.” And before you know it, you’ve got three batches of pumpkin bars cooling on the counter and a kitchen that smells like a harvest festival exploded inside it. Honestly, I wasn’t mad about it.
What kept me coming back wasn’t just the flavor—though the combination of warm pumpkin spice and that cool, creamy filling is something I’d fight for. It was the texture. The way the pumpkin layer stays impossibly moist without being gummy, and how the cream cheese filling creates this little pocket of richness in every single bite. By the third batch, I had it dialed in. The trick, I learned, is all in the temperature of your ingredients and the patience to let things chill properly. This recipe for cream cheese stuffed pumpkin bars became my fall non-negotiable, and I have a feeling it’s about to become yours too.
Why You’ll Love This Recipe
Let me tell you why these cream cheese stuffed pumpkin bars are worth every single minute you spend in the kitchen. I’ve tested this recipe more times than I care to admit, and each time, I found something to tweak. That’s the kind of attention these bars got before I felt confident sharing them with you.
- Quick & Easy : From start to finish, you’re looking at about an hour. The active prep time is maybe 20 minutes. The rest is just oven time and cooling—perfect for a lazy Sunday afternoon or a last-minute potluck contribution.
- Simple Ingredients : Nothing weird here. You probably have most of this in your pantry right now. Canned pumpkin, flour, sugar, eggs, butter, and a block of cream cheese. No fancy extracts or hard-to-find spices.
- Perfect for Fall Gatherings : Whether it’s a Friendsgiving dinner, a Halloween party, or just a cozy night in, these bars fit right in. They travel well, slice cleanly, and everyone always asks for the recipe.
- Crowd-Pleaser : I brought a batch to a neighborhood get-together last week, and they disappeared before the pumpkin pie even got sliced. Kids and adults alike went back for seconds. That’s the kind of universal approval you want in a dessert.
- Unbelievably Delicious : The pumpkin layer is spiced just right—not too heavy, not too faint. And that cream cheese filling? It’s the surprise that makes every bite feel like a little gift. The texture contrast alone is worth the effort.
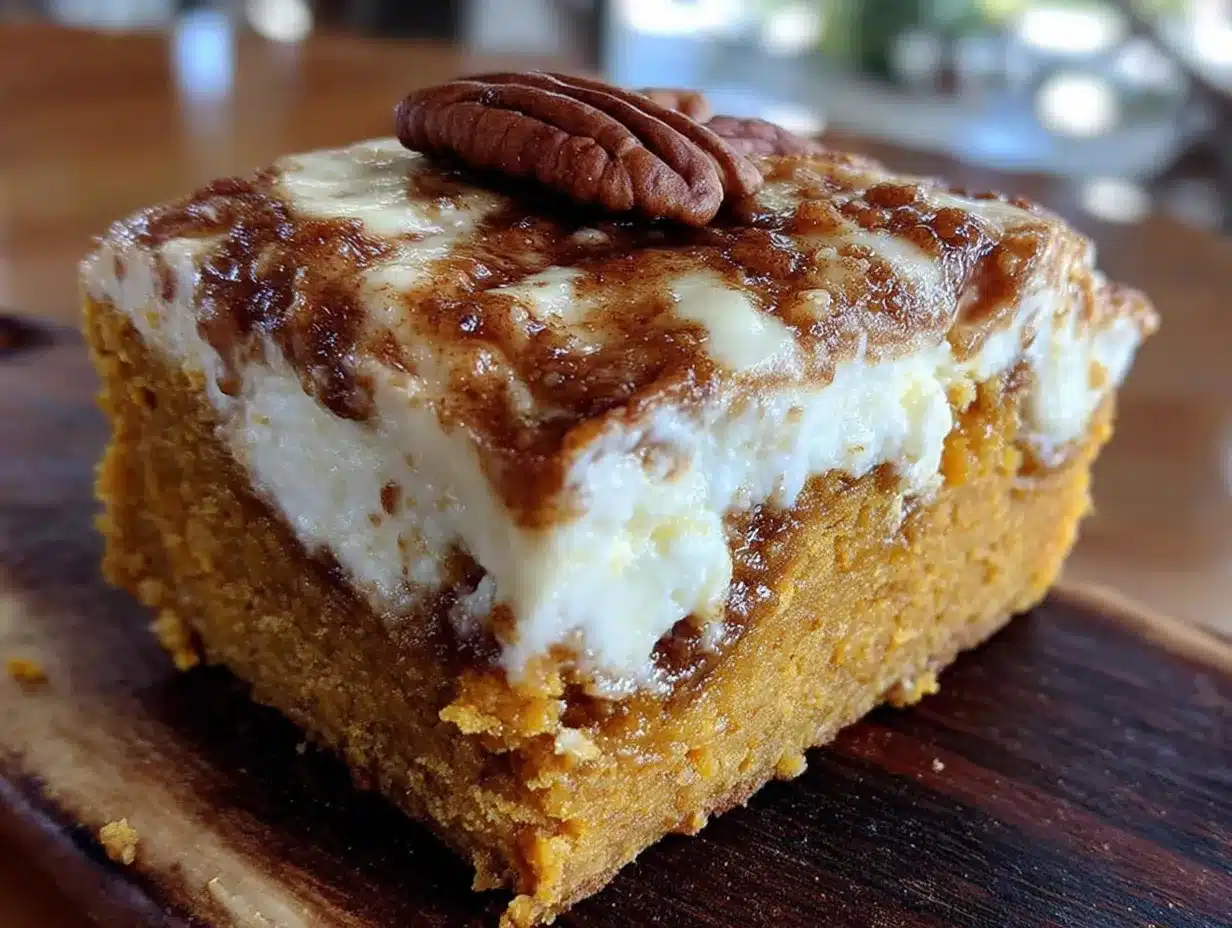
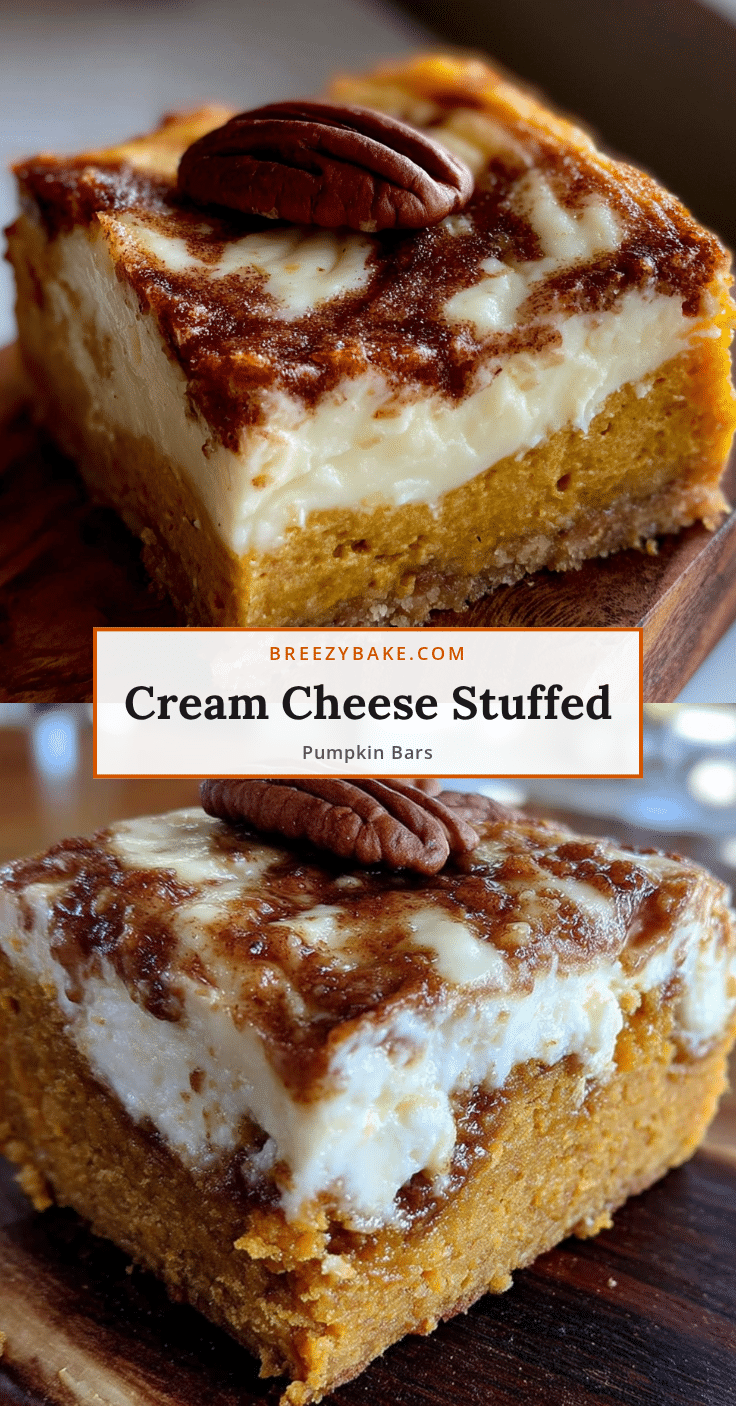
What makes these cream cheese stuffed pumpkin bars different from the dozens of other pumpkin bar recipes out there? It’s the method. Most recipes just swirl the cream cheese on top, which looks pretty but doesn’t give you that distinct layer of filling in every bite. I developed a technique where the cream cheese filling stays centered, creating a beautiful ribbon that runs through the entire bar. It’s not just another version—it’s the best version I’ve ever made.
These bars are the kind of dessert that makes you close your eyes after the first bite. It’s comfort food reimagined—familiar enough to feel like home, but surprising enough to feel special. Perfect for impressing guests without stress, or turning a simple Tuesday into something memorable.
What Ingredients You Will Need
This recipe uses simple, wholesome ingredients to deliver bold flavor and satisfying texture without the fuss. Most of these are pantry staples you probably already have, which makes these cream cheese stuffed pumpkin bars an easy last-minute dessert option.
For the Pumpkin Layer
- 1 ¾ cups all-purpose flour (spooned and leveled for accuracy)
- 1 ½ teaspoons pumpkin pie spice (I prefer McCormick for the most balanced blend)
- 1 teaspoon baking powder
- ½ teaspoon baking soda
- ½ teaspoon salt
- 1 ½ cups granulated sugar
- ½ cup unsalted butter, melted and slightly cooled (adds richness and keeps the bars tender)
- 2 large eggs, room temperature (this matters for even mixing)
- 1 15-ounce can pumpkin puree (not pumpkin pie filling—look for 100% pure pumpkin)
- 1 teaspoon vanilla extract
For the Cream Cheese Filling
- 8 ounces cream cheese, softened (full-fat works best for structure; avoid low-fat here)
- ¼ cup granulated sugar
- 1 large egg yolk (the yolk adds richness and helps the filling set properly)
- ½ teaspoon vanilla extract
Ingredient Selection Tips
For the cream cheese, I recommend Philadelphia brand for the most consistent texture. Look for a block, not the spreadable tub—the block has the right fat content to hold its shape during baking. For the pumpkin puree, Libby’s is my go-to. It’s consistently thick and not watery, which is crucial for avoiding soggy bars. If you’re using a store brand, check the ingredient list—it should be 100% pumpkin with no added spices or sugar.
Substitution Guidance
If you need a gluten-free option, swap the all-purpose flour with a 1:1 gluten-free baking blend that contains xanthan gum. For a dairy-free version, use a plant-based butter stick and dairy-free cream cheese (like Kite Hill or Miyoko’s). Just note that the texture will be slightly softer. You can also use coconut sugar in place of granulated sugar, though the bars will be a touch darker and have a subtle caramel note.
Equipment Needed
- 9×13-inch baking pan (glass or metal both work; I prefer metal for more even browning)
- Parchment paper (for easy lifting and cleanup)
- Electric hand mixer or stand mixer (you can do this by hand, but a mixer makes the cream cheese filling silky smooth)
- Large mixing bowls (two or three, depending on your workflow)
- Whisk (for combining dry ingredients)
- Rubber spatula (for scraping every bit of that cream cheese filling into the pan)
- Measuring cups and spoons
- Cooling rack (essential for even cooling and preventing soggy bottoms)
If you don’t have a hand mixer, you can soften the cream cheese by letting it sit out for an extra 30 minutes and then beat it vigorously with a wooden spoon. It takes a bit of arm work, but it gets the job done. For the baking pan, a glass dish works fine, but you may need to add 3-5 minutes to the baking time since glass retains heat differently. I’ve used both, and honestly, I reach for my metal pan every time—the edges come out crispier.
Preparation Method
Let’s walk through this step by step. I’ll include the little tricks I learned from my obsessive testing so you can nail these cream cheese stuffed pumpkin bars on your first try.
- Preheat and Prep : Preheat your oven to 350°F (175°C). Line your 9×13-inch baking pan with parchment paper, leaving a 2-inch overhang on the long sides. This creates handles for lifting the bars out later. Lightly spray the parchment with non-stick spray for extra insurance.
- Mix the Dry Ingredients : In a medium bowl, whisk together the flour, pumpkin pie spice, baking powder, baking soda, and salt. Set this aside. Pro tip: if your pumpkin pie spice is more than a year old, it’s time to buy a new jar. Fresh spices make a huge difference in these bars.
- Make the Pumpkin Batter : In a large bowl, whisk the melted butter and sugar together until combined—it’ll look like wet sand. Add the eggs one at a time, whisking well after each. Then add the pumpkin puree and vanilla extract, and whisk until smooth. The mixture will be thick and glossy.
- Combine Wet and Dry : Add the dry ingredients to the wet mixture in two additions, folding gently with a rubber spatula. Stop mixing as soon as you no longer see streaks of flour. Overmixing will make the bars tough, and nobody wants a tough pumpkin bar.
- Prepare the Cream Cheese Filling : In a separate bowl, beat the softened cream cheese with an electric mixer on medium speed until smooth, about 1 minute. Add the sugar and beat until fluffy, another minute. Then add the egg yolk and vanilla, and beat just until combined. Don’t overbeat here—you don’t want to incorporate too much air, which can cause cracks during baking.
- Layer the Batter : Spread about two-thirds of the pumpkin batter evenly into the prepared pan. Use an offset spatula or the back of a spoon to smooth it out. This bottom layer should be about ½ inch thick.
- Add the Cream Cheese Filling : Dollop the cream cheese mixture over the pumpkin batter in spoonfuls, spacing them evenly. Gently spread it into an even layer, being careful not to mix it into the pumpkin batter below. You want a distinct stripe of cream cheese, not a swirl.
- Top with Remaining Batter : Drop the remaining pumpkin batter in spoonfuls over the cream cheese layer. Use a spatula to gently spread it to the edges. It’s okay if some cream cheese peeks through—that’s part of the charm.
- Bake : Place the pan on the middle rack and bake for 35-40 minutes. The bars are done when the edges are set and pulling away from the sides slightly, and the center is just barely jiggly. A toothpick inserted into the pumpkin part (avoid the cream cheese) should come out with a few moist crumbs. The cream cheese will still look a bit soft—that’s normal.
- Cool Completely : This is the hardest part. Let the bars cool in the pan on a wire rack for at least 1 hour at room temperature, then transfer to the refrigerator and chill for at least 2 hours before slicing. I know you want to dig in right away, but trust me—chilling sets the cream cheese filling and makes the bars slice cleanly. Warm bars will fall apart.
One more thing—if you notice the cream cheese filling bubbling out during baking, don’t panic. It happens sometimes if your cream cheese was too soft or if you spread it too close to the edges. Just let the bars cool completely, and the filling will firm back up. I’ve had it happen, and the bars still tasted incredible.
Cooking Tips & Techniques
After making these cream cheese stuffed pumpkin bars more times than I care to count, I’ve collected a few tips that will save you from the same mistakes I made.
Room temperature ingredients are non-negotiable. I learned this the hard way on my first batch. Cold cream cheese creates lumps that won’t smooth out, and cold eggs can seize the butter, making the batter dense. Take everything out of the fridge 30-45 minutes before you start. If you forget, you can soften cream cheese in the microwave at 50% power for 10-second intervals, but watch it carefully—you want it soft, not melted.
Don’t overmix the batter. When you combine the wet and dry ingredients, mix just until the flour disappears. Overmixing develops gluten, which makes the bars tough and cakey instead of tender and moist. You’ll see me say this a lot, but it’s the number one mistake I see in pumpkin recipes.
Use a water bath for the cream cheese filling if you want an extra-smooth, crack-free top. Place the pan of bars inside a larger baking dish and pour hot water into the outer dish until it reaches halfway up the sides of the bar pan. This gentle, even heat prevents the cream cheese from curdling. I don’t always do this, but for special occasions, it’s a game-changer.
Let the bars cool gradually. Sudden temperature changes can cause the cream cheese layer to crack. After baking, let the pan sit on the counter for 10 minutes, then transfer to a wire rack for another 50 minutes before refrigerating. This slow cooling process gives the filling time to set without shock.
Slice with a hot knife. For the cleanest cuts, run your knife under hot water, wipe it dry, then make each cut. Wipe the blade between cuts. This prevents the cream cheese from smearing across the pumpkin layer. It takes an extra minute, but the results are worth it.
Variations & Adaptations
One of the best things about these cream cheese stuffed pumpkin bars is how easily they adapt to different tastes and dietary needs. Here are a few variations I’ve tried and loved.
Gluten-Free Version : Swap the all-purpose flour with a 1:1 gluten-free baking blend that contains xanthan gum. I’ve used Bob’s Red Mill with great results. The texture is slightly more crumbly, but the flavor is spot-on. Add an extra tablespoon of flour to the gluten-free blend to compensate for the lack of gluten structure.
Vegan Adaptation : Use a plant-based butter stick (like Miyoko’s) and dairy-free cream cheese (like Kite Hill). Replace the eggs with flax eggs (1 tablespoon ground flaxseed mixed with 3 tablespoons water per egg, let sit for 5 minutes). The texture will be denser, but the flavor is still delicious. I made these for a vegan friend’s birthday, and she asked for the recipe twice.
Spiced-Up Version : Add ½ teaspoon of ground ginger and ¼ teaspoon of ground cloves to the pumpkin batter for a deeper, more complex spice profile. This is my personal favorite for Thanksgiving—it pairs beautifully with the cream cheese filling and gives the bars a warm, almost chai-like flavor.
Chocolate Chip Twist : Fold ½ cup of semi-sweet chocolate chips into the pumpkin batter before layering. The chocolate adds a rich contrast to the pumpkin and cream cheese. I tried this on a whim one rainy afternoon, and it’s now my go-to for potlucks.
Maple Pecan Variation : Replace ¼ cup of the granulated sugar with maple syrup (reduce the pumpkin puree by 2 tablespoons to balance the liquid). Sprinkle ½ cup of chopped pecans over the top before baking. The maple and pecan combination adds a lovely crunch and a deeper, more autumnal flavor.
Serving & Storage Suggestions
These cream cheese stuffed pumpkin bars are incredibly versatile when it comes to serving. Here’s how I like to enjoy them.
Serving Temperature : I prefer them chilled straight from the fridge—the cream cheese filling is firm and the pumpkin layer is perfectly moist. But they’re also fantastic at room temperature if you let them sit out for 15-20 minutes. For a truly indulgent treat, warm a slice in the microwave for 10 seconds and top with a scoop of vanilla ice cream. The warm pumpkin and cold ice cream is a match made in heaven.
Presentation Ideas : Dust the bars with a light sprinkle of powdered sugar and a pinch of cinnamon before serving. For a more elegant look, cut them into small squares and serve on a platter with fresh cranberries and rosemary sprigs. They’re perfect for a fall dessert board alongside other treats like decadent chocolate-dipped strawberry shortcake minis for a beautiful contrast of flavors and colors.
Complementary Dishes : These bars pair beautifully with a hot cup of spiced chai or a cold glass of apple cider. For a full dessert spread, serve them alongside creamy mint chip cream cheese bars for a fun seasonal twist, or keep it classic with a simple whipped cream dollop.
Storage Instructions : Store the bars in an airtight container in the refrigerator for up to 5 days. Place a sheet of parchment paper between layers to prevent sticking. They actually taste better on the second day as the flavors meld together. For longer storage, you can freeze the bars for up to 3 months. Wrap each bar individually in plastic wrap, then place them in a freezer-safe bag. Thaw overnight in the refrigerator before serving.
Reheating Tips : If you prefer your bars warm, microwave a single slice for 15-20 seconds. For a larger batch, place them on a baking sheet and warm in a 300°F oven for 5-7 minutes. The cream cheese will soften without melting, and the pumpkin layer will become fragrant and tender again.
Flavor Development : The pumpkin and spice flavors deepen as the bars sit. I’ve found that they’re at their peak on day two or three. So if you’re making them for a party, bake them a day ahead—your future self will thank you.
Nutritional Information & Benefits
Here’s the estimated nutritional breakdown for one bar (based on 16 servings):
- Calories : 285
- Total Fat : 14g
- Saturated Fat : 8g
- Cholesterol : 65mg
- Sodium : 210mg
- Total Carbohydrates : 36g
- Dietary Fiber : 2g
- Sugars : 22g
- Protein : 5g
These numbers are estimates and will vary based on specific brands and substitutions used.
Health Benefits : Pumpkin is packed with vitamin A, which supports eye health and immune function. It’s also a good source of fiber, which aids digestion. The cream cheese adds calcium and protein, though it’s best enjoyed in moderation. If you’re looking for a lighter option, you can reduce the sugar by ¼ cup without significantly affecting the texture—just know that the bars will be less sweet.
Dietary Considerations : This recipe contains gluten, dairy, and eggs. For gluten-free and vegan adaptations, see the variations section above. These bars are naturally nut-free if you skip the pecan variation, making them a safe option for school events or gatherings where allergies are a concern.
I personally love that these bars feel indulgent without being over-the-top. They satisfy that fall dessert craving without leaving you feeling weighed down. A single bar with a cup of tea is my idea of the perfect afternoon treat.
Conclusion
These cream cheese stuffed pumpkin bars are the fall dessert you didn’t know you needed—but once you try them, you’ll wonder how you ever lived without them. The combination of spiced, tender pumpkin and that hidden ribbon of creamy, tangy filling is nothing short of magical. It’s the kind of recipe that feels special enough for a holiday table but simple enough for a random Tuesday craving.
What I love most about this recipe is how forgiving it is. Even if your first batch isn’t picture-perfect, the flavor will still be incredible. And honestly, the slightly imperfect ones are always the most delicious. So don’t stress about perfection—just make them. Taste them. Share them.
I’d love to hear how yours turn out. Did you try a variation? Did you add chocolate chips or pecans? Drop a comment below and let me know. And if you’re looking for more fall baking inspiration, don’t miss my perfect shamrock green velvet bars for a fun, festive twist on classic dessert bars. Happy baking, friends—may your cream cheese always stay centered and your pumpkin bars always be perfectly moist.
Frequently Asked Questions
Can I use fresh pumpkin instead of canned?
Yes, but you’ll need to roast and puree it first, then drain off any excess liquid. Fresh pumpkin has more water content than canned, so spread the puree on paper towels for 10 minutes to remove moisture before using. Canned is more consistent and easier, but fresh works beautifully if you have the time.
Why did my cream cheese filling crack?
Cracks usually happen from overmixing the filling or sudden temperature changes. Beat the cream cheese just until smooth, and let the bars cool gradually—10 minutes on the counter, then on a wire rack, then in the fridge. A water bath also helps prevent cracking by providing gentle, even heat.
Can I make these bars ahead of time?
Absolutely. These cream cheese stuffed pumpkin bars are actually better the next day. Bake them up to two days in advance, cool completely, and store in an airtight container in the refrigerator. They slice more cleanly when fully chilled, so making them ahead is actually a smart strategy.
How do I know when the bars are done baking?
The edges should be set and slightly pulling away from the pan. The center will still have a slight jiggle—that’s the cream cheese filling, and it will firm up as it cools. A toothpick inserted into the pumpkin part (avoid the cream cheese) should come out with a few moist crumbs, not wet batter.
Can I freeze these bars?
Yes, they freeze beautifully. Wrap each bar individually in plastic wrap, then place them in a freezer-safe bag or container. They’ll keep for up to 3 months. Thaw overnight in the refrigerator before serving. I often double the recipe and freeze half for later—it’s like finding a little gift in your freezer on a busy weeknight.
Pin This Recipe!
Perfect Cream Cheese Stuffed Pumpkin Bars: Easy Fall Dessert
These cream cheese stuffed pumpkin bars feature a spiced, tender pumpkin layer with a hidden ribbon of creamy, tangy cream cheese filling. They’re the perfect fall dessert for gatherings or a cozy night in.
- Prep Time: 20 minutes
- Cook Time: 35-40 minutes
- Total Time: 1 hour (plus 2 hours chilling)
- Yield: 16 servings 1x
- Category: Dessert
- Cuisine: American
Ingredients
- 1 ¾ cups all-purpose flour (spooned and leveled)
- 1 ½ teaspoons pumpkin pie spice
- 1 teaspoon baking powder
- ½ teaspoon baking soda
- ½ teaspoon salt
- 1 ½ cups granulated sugar
- ½ cup unsalted butter, melted and slightly cooled
- 2 large eggs, room temperature
- 1 15-ounce can pumpkin puree (100% pure pumpkin)
- 1 teaspoon vanilla extract
- 8 ounces cream cheese, softened (full-fat block)
- ¼ cup granulated sugar
- 1 large egg yolk
- ½ teaspoon vanilla extract
Instructions
- Preheat oven to 350°F (175°C). Line a 9×13-inch baking pan with parchment paper, leaving a 2-inch overhang on the long sides. Lightly spray with non-stick spray.
- In a medium bowl, whisk together flour, pumpkin pie spice, baking powder, baking soda, and salt. Set aside.
- In a large bowl, whisk melted butter and sugar together until combined. Add eggs one at a time, whisking well after each. Add pumpkin puree and vanilla extract, whisk until smooth.
- Add dry ingredients to wet mixture in two additions, folding gently with a rubber spatula until just combined. Do not overmix.
- In a separate bowl, beat softened cream cheese with an electric mixer on medium speed until smooth, about 1 minute. Add sugar and beat until fluffy, about 1 minute. Add egg yolk and vanilla, beat just until combined.
- Spread about two-thirds of the pumpkin batter evenly into the prepared pan (about ½ inch thick).
- Dollop cream cheese mixture over the pumpkin batter in spoonfuls, then gently spread into an even layer.
- Drop remaining pumpkin batter in spoonfuls over the cream cheese layer and gently spread to the edges.
- Bake on the middle rack for 35-40 minutes, until edges are set and center is just barely jiggly. A toothpick inserted into the pumpkin part should come out with a few moist crumbs.
- Cool in the pan on a wire rack for 1 hour at room temperature, then refrigerate for at least 2 hours before slicing.
Notes
Room temperature ingredients are crucial. Do not overmix the batter. For extra-smooth cream cheese filling, use a water bath. Let bars cool gradually to prevent cracking. Slice with a hot knife for clean cuts. Bars taste even better on day two or three.
Nutrition
- Serving Size: 1 bar
- Calories: 285
- Sugar: 22
- Sodium: 210
- Fat: 14
- Saturated Fat: 8
- Carbohydrates: 36
- Fiber: 2
- Protein: 5
Keywords: pumpkin bars, cream cheese stuffed pumpkin bars, fall dessert, pumpkin dessert, cream cheese bars, easy pumpkin recipe


