I was standing in the baking aisle of our local grocery store last October, staring blankly at the candy display, when the woman next to me reached for the same bag of Oreos I had my eye on. She laughed and said, “Halloween baking season—gotta stock up before the kids raid the pantry.” We got to talking, and she mentioned she makes these little truffles every year that look like black cats. She described them so casually, like it was nothing special, but I could tell from the way she smiled that this was her secret weapon for Halloween parties. She scribbled the basic idea on a receipt, and honestly, I almost lost it before I got home.
That first batch I made? Let me tell you, they were a mess. I used the wrong kind of chocolate coating, and my cats looked more like blobs with ears. But I kept tweaking, and now this Easy Black Cat Oreo Truffles Halloween Recipe is my go-to for every spooky gathering. Maybe you’ve been there—you want something festive and fun, but you don’t have hours to spend in the kitchen. These truffles are the answer. They’re ridiculously simple, but they look like you actually tried. And the best part? No oven required. I mean, who wants to heat up the kitchen when you’re already dealing with Halloween chaos?
These little guys have become a tradition in my house. Every year, my niece helps me shape the ears and pipe on the faces, and we inevitably end up with powdered sugar all over the counter. But that’s the point, right? The recipe arrived through a conversation with a stranger, and now it’s part of my family’s story. That’s why I keep making it—it’s not just a treat, it’s a moment.
Why You’ll Love This Recipe
Let’s be real—Halloween can be exhausting. Between costume planning, candy shopping, and figuring out what to bring to the school party, the last thing you need is a complicated dessert. These Easy Black Cat Oreo Truffles are here to save your sanity. They come together in about 20 minutes of active time, and the rest is just chilling in the fridge. Seriously, if you can crush a cookie and melt some chocolate, you can make these.
- Quick & Easy: From start to finish, you’re looking at about 30 minutes of hands-on work. The fridge does the heavy lifting for you.
- Simple Ingredients: You only need five ingredients, and you probably already have most of them in your pantry. No weird specialty items here.
- Perfect for Halloween: These are a hit at parties, classroom treats, or just for a fun night in. They scream Halloween without screaming “I spent all day in the kitchen.”
- Crowd-Pleaser: Kids love them, adults sneak them, and everyone asks for the recipe. They’re just that good.
- Unbelievably Delicious: The combination of creamy filling and crunchy Oreo bits, all wrapped in smooth chocolate—it’s next-level comfort food in bite-sized form.
What makes this different from other truffle recipes? It’s the texture. Instead of just blending everything into a paste, I keep a few cookie chunks for that satisfying crunch. And the black cat design? It’s way easier than it looks. I promise, even if you’re not a Pinterest-perfect baker, you can pull this off. This is the kind of recipe that makes you look like a hero with minimal effort. Perfect for impressing guests without the stress, or just treating yourself after a long day of Halloween prep.
What Ingredients You Will Need
This recipe uses simple, everyday ingredients to create something that looks and tastes special. Most of these are pantry staples, so you might not even need a grocery run.
- 1 package (14.3 oz) Oreo cookies – Regular Oreos work best. Don’t use the double-stuf ones—they throw off the texture. (Trust me, I learned the hard way.)
- 8 oz cream cheese, softened – Full-fat cream cheese gives the best consistency. Let it sit out for 30 minutes so it blends smoothly.
- 12 oz black candy melts or dark chocolate chips – I prefer Wilton black candy melts for that deep, uniform color. If you use dark chocolate chips, add a teaspoon of coconut oil to thin them out.
- 1/4 cup orange candy melts – For the eyes. You can also use yellow or white—whatever you have on hand.
- Black decorating icing or melted semisweet chocolate – For piping the faces. A small piping bag or even a ziplock bag with the corner snipped works great.
A few notes on ingredients: For the Oreos, I recommend using the classic flavor. Golden Oreos won’t give you that dark color, and mint Oreos might clash with the cream cheese. If you’re dairy-free, you can use vegan cream cheese and dairy-free chocolate chips—just know the texture will be slightly softer. I’ve tried it with Neufchâtel cheese (the lower-fat cream cheese), and it works, but the truffles are a bit less creamy. For the candy melts, I’ve had good luck with the Wilton brand, but any brand labeled “candy melts” or “melting wafers” will do. Avoid white chocolate chips dyed with food coloring—they seize up and get grainy. Look for candy melts that are already black.
Equipment Needed
You don’t need a fancy kitchen to pull these off. Here’s what you’ll need:
- Food processor – For crushing the Oreos into fine crumbs. A blender works too, but a food processor is faster and more consistent.
- Mixing bowl – Any medium-sized bowl will do.
- Baking sheet – To hold the truffles while they chill. Line it with parchment paper for easy cleanup.
- Microwave-safe bowl – For melting the candy melts. You can also use a double boiler, but the microwave is quicker.
- Small piping bag or ziplock bag – For decorating the faces. If you don’t have piping tips, just snip a tiny corner off the bag.
- Candy thermometer – Optional, but helpful if you’re melting chocolate on the stove to avoid burning.
If you don’t have a food processor, you can put the Oreos in a ziplock bag and crush them with a rolling pin. It takes a bit longer, but it works. I’ve done it that way when my food processor was in the dishwasher, and honestly, it’s a good arm workout. For the candy melts, I’ve used both cheap and expensive brands, and the main difference is how smoothly they melt. If you’re on a budget, the store-brand melting wafers work fine—just add a teaspoon of vegetable shortening if they seem too thick.
Preparation Method
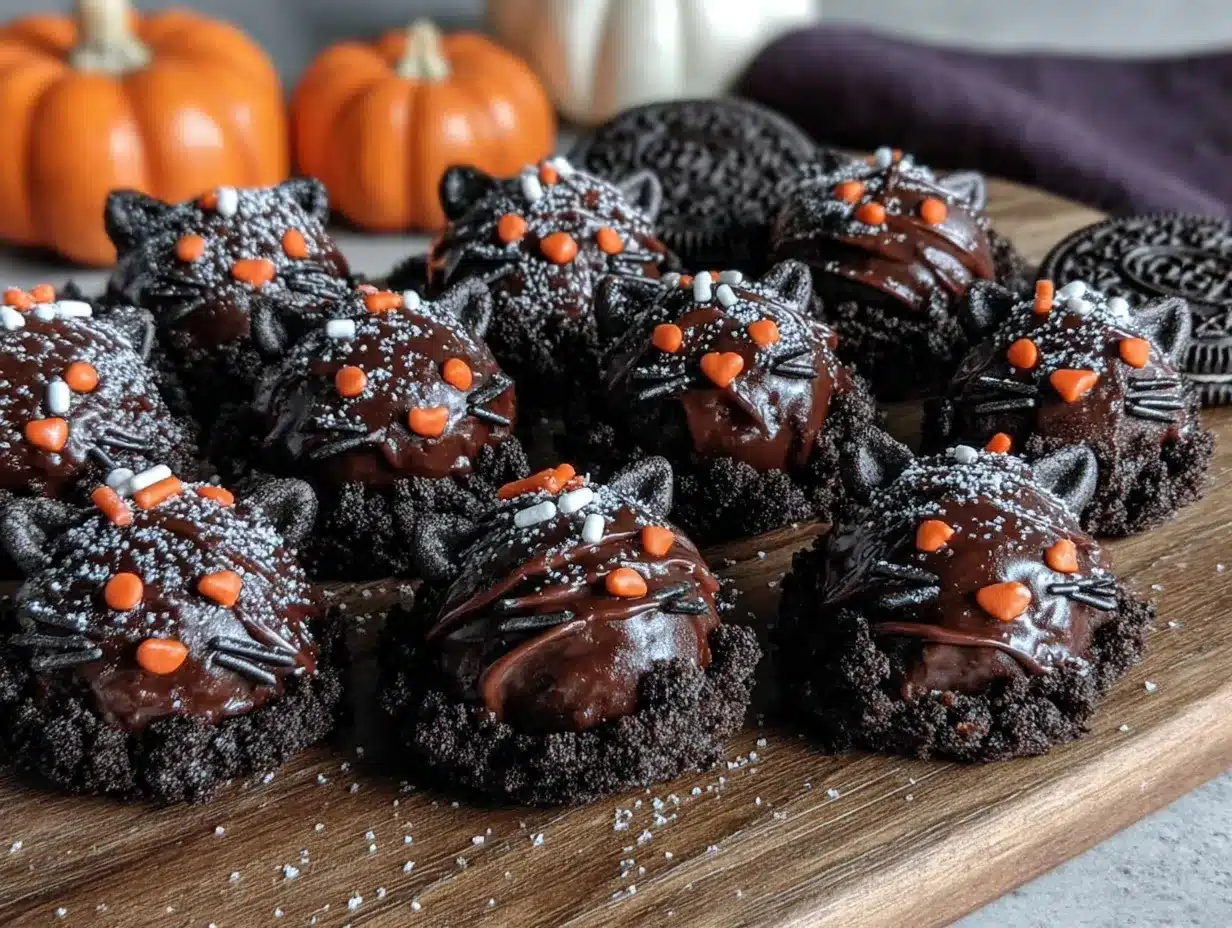
Let’s get to the fun part. Here’s how to make these adorable black cat truffles step by step.
- Crush the Oreos. Place the entire package of Oreos (filling included) into your food processor. Pulse until you have fine crumbs. You want them to look like dark sand. If you see large chunks, keep pulsing. Transfer the crumbs to a large mixing bowl.
- Mix in the cream cheese. Add the softened cream cheese to the Oreo crumbs. Use a spatula or your hands to mix until everything is fully combined. The mixture should hold together when you squeeze it. If it’s too dry, add another tablespoon of cream cheese. If it’s too sticky, add a few more crushed Oreos.
- Shape the truffles. Scoop out about 1 tablespoon of the mixture and roll it into a ball. Place it on the parchment-lined baking sheet. Repeat until you’ve used all the mixture—you should get about 20-24 truffles. Now, to make them look like cats: pinch two small triangles from the top of each ball to form ears. Don’t worry if they’re not perfect—the chocolate coating will smooth things out.
- Chill the truffles. Place the baking sheet in the refrigerator for at least 30 minutes. This step is crucial. If the truffles aren’t cold, the chocolate coating will melt and slide off. I’ve made that mistake before, and it’s not pretty. You want them firm to the touch.
- Melt the black candy melts. Put the black candy melts in a microwave-safe bowl. Microwave in 30-second intervals, stirring after each, until fully melted. Be careful not to overheat—chocolate burns easily and gets lumpy. If it’s too thick, stir in a teaspoon of coconut oil or vegetable shortening.
- Dip the truffles. Using a fork or a dipping tool, lower one chilled truffle into the melted chocolate. Gently spoon chocolate over the top to coat it completely. Lift it out and tap the fork against the bowl to let excess chocolate drip off. Place it back on the parchment paper. Repeat for all truffles. If the ears lose their shape during dipping, use a toothpick to gently reshape them before the chocolate sets.
- Let the coating set. Place the baking sheet back in the refrigerator for 15-20 minutes, or until the chocolate is firm.
- Pipe the faces. While the truffles chill, melt the orange candy melts for the eyes. Use a toothpick to dab small dots of orange onto each truffle for eyes. Let them set for 5 minutes. Then, using the black decorating icing or melted chocolate, pipe on pupils inside the orange dots, and draw a small “Y” shape for the nose and mouth. Add three tiny whiskers on each side of the face. Don’t stress about perfection—each cat will have its own personality.
- Final chill. Refrigerate for another 15 minutes to set the faces. Then they’re ready to serve!
A quick note: If the chocolate coating starts to thicken while you’re dipping, pop it back in the microwave for 10 seconds and stir. And if you’re making these with kids, let them handle the face piping—it’s the messiest and most fun part.
Cooking Tips & Techniques
I’ve made these truffles more times than I can count, and I’ve picked up a few tricks along the way. First, the biggest mistake people make is not chilling the truffles long enough. I know you’re excited, but trust the process. If the truffles are even slightly warm, the chocolate will slide right off, and you’ll end up with a puddle of chocolate and a sad blob of Oreo mixture. I learned this the hard way when I tried to rush a batch for a party. Let’s just say my black cats looked more like black slugs.
Another tip: when you’re dipping, work quickly. The cold truffles will start to warm up as you handle them, especially if your kitchen is warm. I like to work in batches—take out only 4-5 truffles from the fridge at a time, leaving the rest cold. This keeps the chocolate from getting messy. Also, if you notice the chocolate cracking after it sets, that means your truffles were too cold when you dipped them. Let them sit at room temperature for 5 minutes before dipping next time.
For the faces, I’ve found that using a toothpick for the eyes gives you more control than a piping bag. Dip the toothpick into the melted orange candy and just dab it on. For the whiskers, a steady hand is key, but if you mess up, you can scrape off the icing with a toothpick and try again before it sets. And here’s a pro tip: if you want the cats to look extra cute, pipe tiny white dots inside the eyes for a little sparkle. It takes an extra 10 seconds per truffle but makes a huge difference.
Variations & Adaptations
One of the best things about this recipe is how easy it is to adapt. Here are a few ways to switch it up:
- Dietary Swap: For a gluten-free version, use gluten-free chocolate sandwich cookies. The texture will be slightly different, but they still taste amazing. For a vegan version, use vegan cream cheese and dairy-free chocolate chips.
- Flavor Twist: Add 1/4 cup of peanut butter to the Oreo mixture for a Reese’s-inspired truffle. Or swap the Oreos for mint-flavored ones—just know the color will be a bit lighter.
- Seasonal Variation: Skip the cat faces and roll the truffles in crushed pretzels or sprinkles for a non-Halloween treat. You can also shape them into pumpkins for Thanksgiving or snowmen for Christmas.
- Method Adjustment: If you’re short on time, skip the dipping and just roll the truffles in cocoa powder or crushed Oreo crumbs. They won’t look like cats, but they’ll taste just as good.
I once tried a version where I added a teaspoon of espresso powder to the Oreo mixture. It gave the truffles a subtle coffee flavor that paired perfectly with the chocolate. My sister-in-law, who claims she doesn’t like coffee, ate three before I told her. So, you know, experiment a little.
Serving & Storage Suggestions
These truffles are best served cold, straight from the fridge. The firm texture and smooth chocolate coating are perfect at that temperature. If you’re serving them at a party, arrange them on a platter with some Halloween-themed napkins or a spooky tablecloth. They look adorable next to a bowl of candy corn or pumpkin-shaped cookies.
For storage, keep the truffles in an airtight container in the refrigerator. They’ll stay fresh for up to a week—though honestly, they never last that long in my house. If you want to make them ahead, you can freeze them for up to 3 months. Just layer them between sheets of parchment paper in a freezer-safe container. When you’re ready to serve, let them thaw in the fridge overnight. Don’t thaw them at room temperature, or the chocolate might sweat.
One thing I’ve noticed: the flavors actually get better after a day or two. The Oreo and cream cheese meld together, and the chocolate coating firms up perfectly. So if you’re planning a Halloween party, make these a day or two in advance. Your future self will thank you.
Nutritional Information & Benefits
Let’s be honest—these are a treat, not a health food. But here’s the breakdown for one truffle (based on 24 servings): approximately 180 calories, 10g fat, 22g carbs, 2g protein, and 14g sugar. Not terrible for a little bite of happiness.
The cream cheese adds a small amount of calcium and protein, and the dark chocolate (if you use it) contains antioxidants. But the real benefit here is the joy factor. These truffles bring people together, spark conversations, and make Halloween feel special. Sometimes that’s just as important as what’s on the nutrition label.
If you’re watching your sugar intake, you can use sugar-free Oreos and sugar-free chocolate chips. The texture will be a bit different, but it’s a decent alternative. And for anyone with nut allergies, this recipe is naturally nut-free—just double-check your chocolate brand to make sure it’s processed in a nut-free facility.
Conclusion
These Easy Black Cat Oreo Truffles are the kind of recipe that makes you look like a Halloween hero without breaking a sweat. They’re quick, simple, and absolutely adorable. Whether you’re making them for a classroom party, a potluck, or just a cozy night in, they never fail to bring smiles. And the best part? You can customize them however you want—change the colors, the shapes, the flavors. Make them your own.
I love this recipe because it reminds me that the best things in life are often the simplest. That conversation in the grocery store, the messy kitchen counter, the laughter when my niece accidentally gives a cat three eyes—those are the moments that matter. So go ahead, give these a try. And when you do, I’d love to hear about it. Leave a comment below, share your photos, tell me how your cats turned out. Happy Halloween, and happy baking!
Frequently Asked Questions
Can I use double-stuf Oreos for this recipe?
I don’t recommend it. The extra filling makes the mixture too soft and sticky, and the truffles won’t hold their shape as well. Stick with regular Oreos for the best results.
How do I keep the chocolate from cracking?
Make sure your truffles aren’t too cold when you dip them. Let them sit at room temperature for 5 minutes after chilling. Also, don’t overheat the chocolate—melt it slowly and stir frequently.
Can I make these without a food processor?
Absolutely. Put the Oreos in a ziplock bag and crush them with a rolling pin or even a heavy skillet. It takes a bit more elbow grease, but it works perfectly.
How far in advance can I make these?
You can make them up to 3 days ahead and store them in the fridge. They also freeze well for up to 3 months. Just thaw them in the fridge overnight before serving.
My truffles are too soft—what did I do wrong?
You might have added too much cream cheese, or the Oreos weren’t crushed finely enough. Try adding a few more crushed Oreos to firm up the mixture. Also, make sure you chill them for at least 30 minutes before dipping.
Pin This Recipe!

Easy Black Cat Oreo Truffles Halloween Recipe

These Easy Black Cat Oreo Truffles are a quick, no-bake Halloween treat made with just five ingredients. They’re adorable, delicious, and perfect for parties or classroom treats.
- Prep Time: 20 minutes
- Cook Time: 0 minutes
- Total Time: 1 hour 20 minutes (includes chilling)
- Yield: 24 servings 1x
- Category: Dessert
- Cuisine: American
Ingredients
- 1 package (14.3 oz) Oreo cookies
- 8 oz cream cheese, softened
- 12 oz black candy melts or dark chocolate chips
- 1/4 cup orange candy melts
- Black decorating icing or melted semisweet chocolate
Instructions
- Crush the Oreos: Place the entire package of Oreos (filling included) into a food processor. Pulse until you have fine crumbs. Transfer to a large mixing bowl.
- Mix in the cream cheese: Add the softened cream cheese to the Oreo crumbs. Use a spatula or your hands to mix until fully combined. The mixture should hold together when squeezed.
- Shape the truffles: Scoop out about 1 tablespoon of the mixture and roll into a ball. Place on a parchment-lined baking sheet. Repeat until all mixture is used (about 20-24 truffles). Pinch two small triangles from the top of each ball to form ears.
- Chill the truffles: Place the baking sheet in the refrigerator for at least 30 minutes, until firm.
- Melt the black candy melts: Microwave in 30-second intervals, stirring after each, until fully melted. If too thick, stir in 1 teaspoon of coconut oil or vegetable shortening.
- Dip the truffles: Using a fork or dipping tool, lower one chilled truffle into the melted chocolate. Spoon chocolate over the top to coat completely. Lift out, tap off excess, and place back on parchment. Repeat for all truffles. Use a toothpick to reshape ears if needed.
- Let the coating set: Refrigerate for 15-20 minutes, until chocolate is firm.
- Pipe the faces: Melt the orange candy melts. Use a toothpick to dab small dots of orange onto each truffle for eyes. Let set for 5 minutes. Using black decorating icing or melted chocolate, pipe pupils inside the orange dots, a small ‘Y’ shape for the nose and mouth, and three tiny whiskers on each side.
- Final chill: Refrigerate for another 15 minutes to set the faces. Serve cold.
Notes
For best results, use regular Oreos (not double-stuf). Chill truffles thoroughly before dipping to prevent chocolate from sliding off. If chocolate cracks, let truffles sit at room temperature for 5 minutes before dipping. For a gluten-free version, use gluten-free chocolate sandwich cookies. For a vegan version, use vegan cream cheese and dairy-free chocolate chips.
Nutrition
- Serving Size: 1 truffle
- Calories: 180
- Sugar: 14
- Sodium: 120
- Fat: 10
- Saturated Fat: 5
- Carbohydrates: 22
- Fiber: 1
- Protein: 2
Keywords: Halloween, Oreo truffles, black cat, no-bake, easy dessert, chocolate truffles


