I swore I didn’t need homemade rolls at Thanksgiving. For years, maybe a decade, I was perfectly happy with the canned crescent rolls—you know, the ones that pop open with that satisfying *thwack* against the counter. They were buttery, they were easy, and honestly, who has the oven space for yet another dish on the big day? Then, two Novembers ago, my sister-in-law, Jen, showed up at our family dinner carrying a basket covered in a tea towel. I watched her set it down, and the smell—warm yeast, sweet honey, and something deeply savory—cut right through the chaos of the kitchen. I told myself I wasn’t impressed. But I found myself reaching for one before the turkey was even carved. Let me tell you, that first bite was a problem. The outside was soft, almost pillowy, and the top had this sticky, golden sheen that caught the dining room light. I had to sit down. I mean, I actually had to sit down and pretend I was adjusting my napkin so no one would see me take a second one before we’d even said grace. That was the moment I knew my crescent roll era was over. This recipe for Cozy Honey Butter Thanksgiving Dinner Rolls is the one that did it. It’s the kind of roll that makes you forget about the gravy for a second—and honestly, that’s saying something.
Why You’ll Love This Recipe
Let’s be real—Thanksgiving dinner is a high-stakes meal. You need every dish to pull its weight, and these rolls are the unsung heroes of the table. Here is why this version is worth every bit of effort:
- Incredibly Soft & Pillowy : The combination of milk, butter, and a touch of honey creates a crumb that is tender without being doughy. I tested this recipe four times to get that perfect pull-apart texture.
- Make-Ahead Friendly : You can prep the dough the night before, let it rise in the fridge, and bake them fresh on Thanksgiving morning. This was a game-changer for my own holiday prep—no more fighting for oven space at the last minute.
- Simple Pantry Ingredients : Flour, yeast, milk, butter, honey, and an egg. That is it. No weird specialty flours or hard-to-find extracts. You probably have most of this in your kitchen right now.
- Crowd-Pleasing Flavor : The honey butter glaze is brushed on twice—once right out of the oven and again just before serving. It gives the rolls a subtle sweetness that pairs perfectly with salty turkey and rich gravy.
- Foolproof for Bakers of All Levels : I have had readers who never baked bread before tell me these came out perfectly. The dough is forgiving, and I will walk you through every step so you feel confident.
These rolls are not just a side dish—they are the kind of thing that makes you close your eyes after the first bite. It is comfort food reimagined for the holiday table, and honestly, they might just steal the show from the turkey.
What Ingredients You Will Need
This recipe uses simple, wholesome ingredients to deliver that signature soft texture and cozy honey butter flavor. Most of these are pantry staples, which makes this a low-stress addition to your Thanksgiving menu.
For the Dough
- 1 cup (240 ml) whole milk, warm (about 110°F) —Whole milk gives the richest texture, but 2% works in a pinch. I recommend warming it gently on the stove or in the microwave for about 30 seconds. You want it warm to the touch, not hot.
- 2 ¼ teaspoons (7 g) active dry yeast —One standard packet. I prefer Red Star or Fleischmann’s for consistent results. If you use instant yeast, you can skip the proofing step and mix it directly with the flour.
- ¼ cup (60 ml) honey —This adds sweetness and helps keep the rolls moist. Use a mild honey like clover or orange blossom so it doesn’t overpower the butter.
- 4 tablespoons (56 g) unsalted butter, melted and slightly cooled —Salted butter will work if you reduce the added salt by ¼ teaspoon.
- 1 large egg, room temperature —A cold egg can shock the yeast and slow down the rise. Let it sit on the counter for 30 minutes before starting.
- 3 ½ cups (440 g) all-purpose flour, plus more for dusting —Bleached or unbleached both work. I have used King Arthur Flour and Gold Medal with great success.
- 1 teaspoon (6 g) fine sea salt —Table salt is fine, just reduce to ¾ teaspoon since it is denser.
For the Honey Butter Glaze
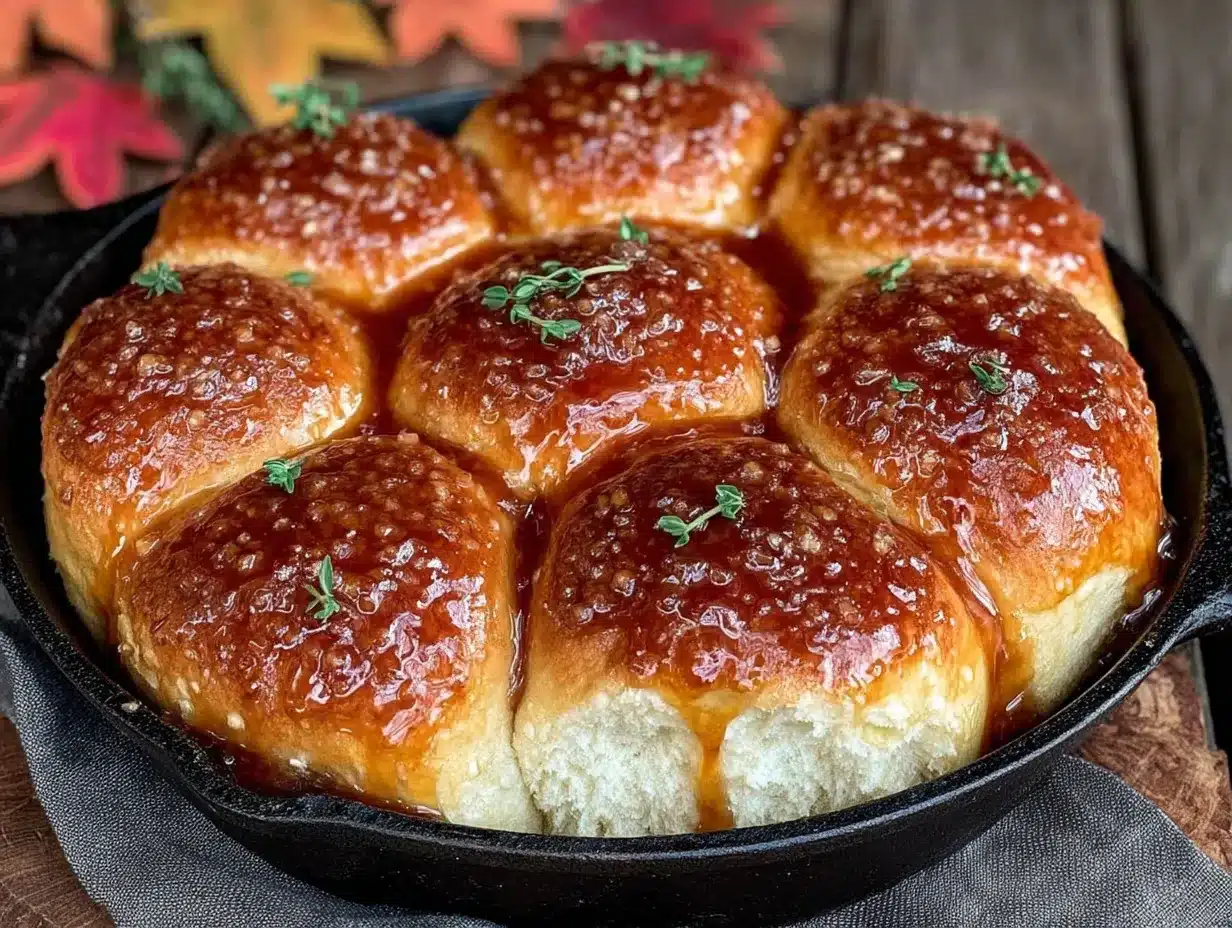
- 3 tablespoons (42 g) unsalted butter, melted —Use good quality butter here. It makes a difference.
- 2 tablespoons (30 ml) honey —Same type as above for consistency.
- Flaky sea salt, for sprinkling (optional but highly recommended) —Maldon or any flaky salt adds a lovely crunch and balances the sweetness.
Substitution notes: For a dairy-free version, use oat milk and vegan butter. I tested this with Miyoko’s vegan butter, and it worked beautifully. For a gluten-free option, I recommend a 1-to-1 gluten-free flour blend like Bob’s Red Mill, but note the texture will be slightly denser.
Equipment Needed
You do not need a stand mixer for these rolls, though it does make the kneading easier. Here is what you will need:
- Large mixing bowl —Glass or stainless steel works best. Avoid plastic as it can retain odors.
- Wooden spoon or dough whisk —For mixing the dough by hand.
- Stand mixer with dough hook (optional) —Makes kneading hands-free. I use my KitchenAid for this.
- 9×13-inch baking dish —Glass or metal both work. I prefer a light-colored metal pan for even browning.
- Plastic wrap or a clean kitchen towel —For covering the dough while it rises.
- Pastry brush —For applying the honey butter glaze. A silicone brush is easier to clean.
- Instant-read thermometer —Helpful for checking milk temperature, but not essential.
Budget-friendly tip: If you do not have a stand mixer, kneading by hand for 8-10 minutes works perfectly. It is actually a great stress reliever before the holiday chaos begins. I have done it both ways, and honestly, hand-kneaded rolls often feel more satisfying to make.
Preparation Method
This recipe takes about 2 hours and 30 minutes total, including rising time. The active work is only about 20 minutes, so plan accordingly.
- Proof the yeast. In your large mixing bowl, combine the warm milk (about 110°F), 1 tablespoon of the honey, and the active dry yeast. Stir gently and let it sit for 5-7 minutes until it becomes frothy and bubbly. If it doesn’t foam, your yeast may be dead—start over with fresh yeast.
- Mix the wet ingredients. Add the remaining honey, the melted butter, and the room-temperature egg to the yeast mixture. Whisk until smooth and well combined.
- Add the dry ingredients. Add 3 cups of the flour and the salt. Stir with a wooden spoon or dough whisk until a shaggy dough forms. It will look messy and sticky at this point—that is normal.
- Knead the dough. Turn the dough out onto a lightly floured surface. Knead for 8-10 minutes, adding the remaining ½ cup of flour a little at a time as needed. The dough should be smooth, soft, and slightly tacky but not sticky. If using a stand mixer, knead on medium-low speed with the dough hook for 6-7 minutes.
- First rise. Lightly grease the same mixing bowl with a bit of butter or oil. Place the dough back in, turning it once to coat. Cover with plastic wrap or a clean kitchen towel and let it rise in a warm, draft-free spot for 1 hour, or until doubled in size. I usually put it in my oven with the light on—it stays perfectly warm.
- Shape the rolls. Punch the dough down gently to release the air. Turn it out onto a lightly floured surface. Divide the dough into 12 equal pieces. A kitchen scale is easiest here, but you can eyeball it. Shape each piece into a smooth ball by tucking the edges under and rolling it between your palms. Place the rolls in a greased 9×13-inch baking dish, spacing them evenly—they should touch slightly.
- Second rise. Cover the dish loosely with plastic wrap and let the rolls rise for another 30-45 minutes, until they have puffed up and are touching each other. They should look pillowy and soft.
- Preheat and bake. About 20 minutes before the rolls are done rising, preheat your oven to 375°F (190°C). Bake the rolls on the middle rack for 18-22 minutes, until the tops are golden brown and the rolls sound hollow when tapped. If the tops brown too quickly, tent loosely with foil for the last 5 minutes.
- Apply the honey butter. While the rolls bake, make the glaze by whisking together the melted butter and honey. As soon as the rolls come out of the oven, brush the glaze generously over the tops. Let them cool in the pan for 5 minutes, then brush with the remaining glaze and sprinkle with flaky sea salt if using.
Sensory cue: The rolls are done when the kitchen smells like a warm bakery and the tops are a deep, even gold. If you tap one lightly, it should feel firm but give slightly under your finger.
Cooking Tips & Techniques
I have made these rolls about a dozen times now, and I have learned a few things the hard way. Here is what I wish I knew from the start:
- Don’t skip the proofing step. I tried rushing once and added the yeast straight to the flour. The rolls were dense and flat. Taking those extra 5 minutes to proof the yeast ensures a light, airy texture.
- Use a thermometer for your milk. If the milk is too hot (over 120°F), it will kill the yeast. Too cold, and the yeast won’t activate. I use a simple instant-read thermometer, but if you don’t have one, the milk should feel like a warm bath on your wrist—not hot, not cold.
- Don’t over-flour the dough. It is tempting to keep adding flour when the dough feels sticky, but a slightly tacky dough yields softer rolls. Trust the process and use a light dusting of flour on your hands instead.
- Let the rolls cool slightly before serving. I know it is hard to wait, but the honey butter needs a minute to soak in. If you serve them piping hot, the glaze will just slide right off.
- Multitask wisely. While the dough is rising for the first time, you can prep other dishes. I often make my cranberry sauce or set the table during that hour. It makes the whole process feel less overwhelming.
My biggest failure: The first time I made these, I forgot to add the salt. The rolls were edible, but they tasted flat—like something was missing. Salt is not just for flavor; it strengthens the gluten structure and helps control yeast activity. Don’t skip it.
Variations & Adaptations
One of the best things about this recipe is how easy it is to customize. Here are a few ways I have adapted it over the years:
- Herb-Infused Rolls : Add 1 tablespoon of fresh chopped rosemary or thyme to the dough along with the flour. The herbs pair beautifully with the honey butter and make the rolls feel even more festive. I did this for a Friendsgiving last year, and they disappeared in minutes.
- Garlic Honey Butter Rolls : Mince 2 cloves of garlic and add it to the melted butter for the glaze. Let it sit for 5 minutes to infuse, then brush over the hot rolls. This is perfect if you want a savory-sweet balance that stands up to hearty stews or roasted meats.
- Whole Wheat Version : Substitute 1 cup of the all-purpose flour with whole wheat flour. The rolls will be slightly denser and nuttier, but still soft. Add an extra tablespoon of milk to compensate for the whole wheat’s absorbency.
- Vegan Adaptation : Use oat milk, vegan butter, and a flax egg (1 tablespoon ground flaxseed mixed with 3 tablespoons water). I tested this for a vegan friend, and honestly, I could barely tell the difference. The rolls were still pillowy and rich.
- Mini Dinner Rolls : Divide the dough into 18-20 pieces instead of 12 and bake for 14-16 minutes. These are perfect for appetizers or for smaller hands at the kids’ table.
Serving & Storage Suggestions
These rolls are best served warm, straight from the oven, with the honey butter glaze still glistening. I like to arrange them in a cloth-lined basket or on a wooden board so guests can pull them apart easily. They pair beautifully with roasted turkey, creamy mashed potatoes, and a tangy cranberry sauce—the sweetness of the rolls balances all those savory flavors perfectly.
Storage: Leftover rolls (if you have any!) can be stored in an airtight container at room temperature for up to 2 days. To reheat, wrap them in foil and warm them in a 300°F oven for 5-7 minutes. You can also microwave them for 10-15 seconds, but the oven method keeps the texture soft.
Freezing: These rolls freeze beautifully. Let them cool completely, then wrap tightly in plastic wrap and place in a freezer-safe bag. They will keep for up to 3 months. To serve, thaw at room temperature and reheat in a 350°F oven for 5-8 minutes. I often make a double batch and freeze one for Christmas—it saves so much time during the holiday rush.
Flavor note: The honey butter flavor actually deepens after a day. If you can resist eating them all immediately, the leftovers are even better the next morning with a smear of jam or a drizzle of extra honey.
Nutritional Information & Benefits
Each roll (based on 12 servings) contains approximately:
- Calories: 210
- Carbohydrates: 34g
- Protein: 5g
- Fat: 7g
- Saturated Fat: 4g
- Sugar: 9g
- Sodium: 220mg
These rolls are not exactly health food—they are a holiday indulgence, and that is okay. But the honey provides a touch of natural sweetness with antioxidants, and the whole milk offers calcium and vitamin D. If you are watching your sugar intake, you can reduce the honey in the dough to 2 tablespoons without sacrificing texture.
Dietary considerations: This recipe contains gluten, dairy, and eggs. For a gluten-free version, use a 1-to-1 gluten-free flour blend. For dairy-free, substitute oat milk and vegan butter. The rolls will still be soft and delicious.
Conclusion
These Cozy Honey Butter Thanksgiving Dinner Rolls are more than just a side dish—they are the warm, buttery hug your holiday table deserves. They are soft, slightly sweet, and impossibly tender, with that golden glaze that makes every bite feel special. I have made these for Thanksgiving, Christmas, and even a random Tuesday in November, and they never fail to bring smiles. The best part is how forgiving the recipe is—even if you are new to baking bread, you can pull these off. So go ahead, give them a try. Customize them with herbs or garlic if that is your style, or keep them classic with just the honey butter. Either way, I promise you will be reaching for a second roll before the turkey is passed. And honestly? That is exactly how it should be.
Have you made these rolls? I would love to hear how they turned out! Drop a comment below or tag me in your photos—I cannot wait to see your holiday table.
Frequently Asked Questions
Can I make these rolls ahead of time?
Yes! You can prepare the dough through the shaping step, cover the dish tightly with plastic wrap, and refrigerate overnight. The next morning, let the rolls sit at room temperature for 30-45 minutes to finish rising, then bake as directed. This is my go-to method for Thanksgiving morning.
Why did my rolls turn out dense?
Dense rolls usually mean the yeast was not activated properly, or the dough was over-floured. Make sure your milk is warm (around 110°F) and that you let the yeast proof until frothy. Also, resist the urge to add too much extra flour during kneading—the dough should be tacky, not dry.
Can I use instant yeast instead of active dry yeast?
Absolutely. If using instant yeast, skip the proofing step and mix it directly with the flour. You can still add the warm milk and honey to the bowl, but you do not need to wait for it to foam. The rise times may be slightly shorter, so keep an eye on the dough.
How do I store leftover honey butter glaze?
If you have extra glaze, store it in an airtight container in the refrigerator for up to a week. Reheat it gently in the microwave for 10-15 seconds before brushing on rolls or using it on pancakes or waffles—it is delicious on just about everything.
Can I double this recipe?
Yes! This recipe doubles easily. Use two 9×13-inch baking dishes or one large half-sheet pan. You may need to knead the dough a little longer to incorporate all the flour, and the rise times will stay roughly the same. Perfect for a big holiday gathering.
Pin This Recipe!
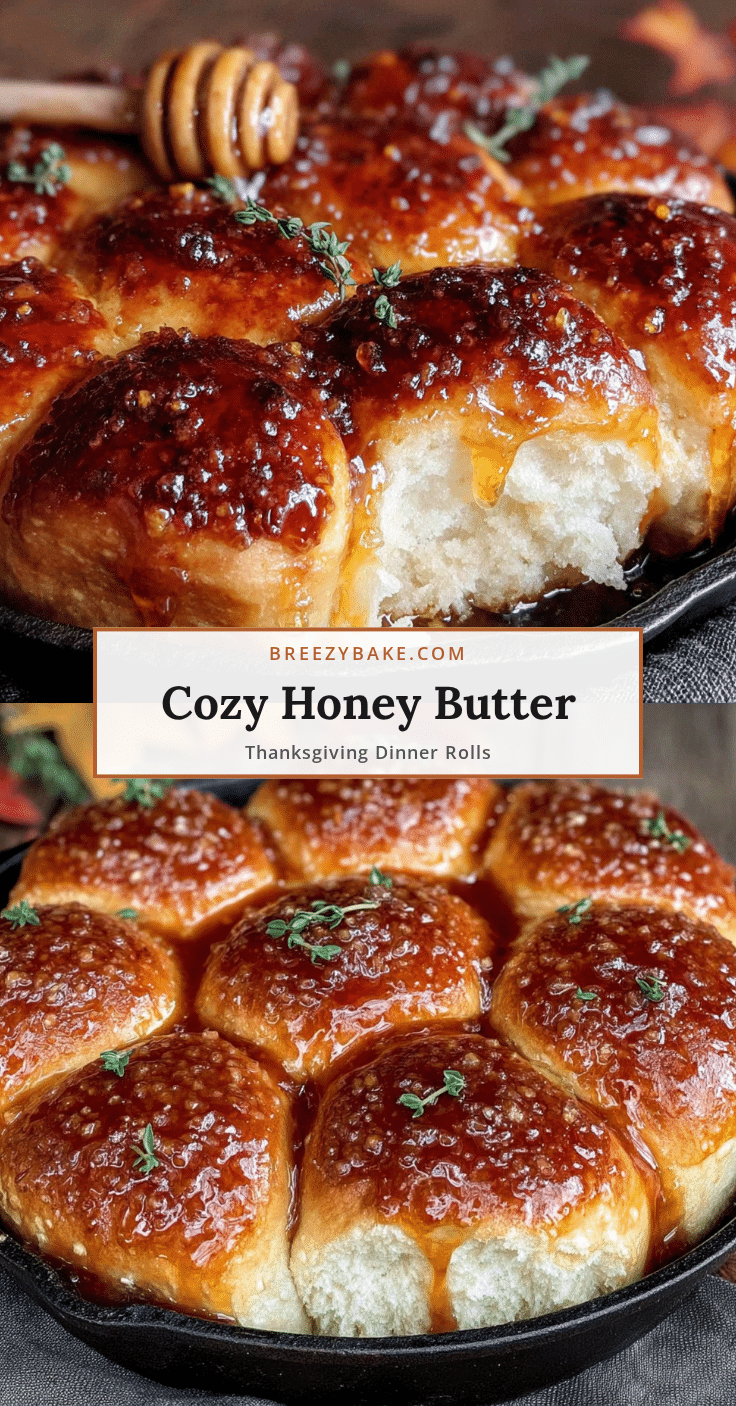
Cozy Honey Butter Thanksgiving Dinner Rolls
These soft, pillowy honey butter dinner rolls are brushed with a sweet glaze and perfect for Thanksgiving. They are make-ahead friendly and use simple pantry ingredients.
- Prep Time: 20 minutes
- Cook Time: 20 minutes
- Total Time: 2 hours 30 minutes
- Yield: 12 servings 1x
- Category: Side Dish
- Cuisine: American
Ingredients
- 1 cup (240 ml) whole milk, warm (about 110°F)
- 2 ¼ teaspoons (7 g) active dry yeast
- ¼ cup (60 ml) honey
- 4 tablespoons (56 g) unsalted butter, melted and slightly cooled
- 1 large egg, room temperature
- 3 ½ cups (440 g) all-purpose flour, plus more for dusting
- 1 teaspoon (6 g) fine sea salt
- 3 tablespoons (42 g) unsalted butter, melted (for glaze)
- 2 tablespoons (30 ml) honey (for glaze)
- Flaky sea salt, for sprinkling (optional)
Instructions
- Proof the yeast: In your large mixing bowl, combine the warm milk (about 110°F), 1 tablespoon of the honey, and the active dry yeast. Stir gently and let it sit for 5-7 minutes until it becomes frothy and bubbly.
- Mix the wet ingredients: Add the remaining honey, the melted butter, and the room-temperature egg to the yeast mixture. Whisk until smooth and well combined.
- Add the dry ingredients: Add 3 cups of the flour and the salt. Stir with a wooden spoon or dough whisk until a shaggy dough forms.
- Knead the dough: Turn the dough out onto a lightly floured surface. Knead for 8-10 minutes, adding the remaining ½ cup of flour a little at a time as needed. The dough should be smooth, soft, and slightly tacky but not sticky.
- First rise: Lightly grease the same mixing bowl with a bit of butter or oil. Place the dough back in, turning it once to coat. Cover with plastic wrap or a clean kitchen towel and let it rise in a warm, draft-free spot for 1 hour, or until doubled in size.
- Shape the rolls: Punch the dough down gently. Turn it out onto a lightly floured surface. Divide the dough into 12 equal pieces. Shape each piece into a smooth ball and place in a greased 9×13-inch baking dish, spacing them evenly.
- Second rise: Cover the dish loosely with plastic wrap and let the rolls rise for another 30-45 minutes, until they have puffed up and are touching each other.
- Preheat and bake: About 20 minutes before the rolls are done rising, preheat your oven to 375°F (190°C). Bake the rolls on the middle rack for 18-22 minutes, until the tops are golden brown and the rolls sound hollow when tapped.
- Apply the honey butter: While the rolls bake, make the glaze by whisking together the melted butter and honey. As soon as the rolls come out of the oven, brush the glaze generously over the tops. Let them cool in the pan for 5 minutes, then brush with the remaining glaze and sprinkle with flaky sea salt if using.
Notes
For a dairy-free version, use oat milk and vegan butter. For gluten-free, use a 1-to-1 gluten-free flour blend. The dough can be made ahead and refrigerated overnight after shaping. Let rolls sit at room temperature for 30-45 minutes before baking.
Nutrition
- Serving Size: 1 roll
- Calories: 210
- Sugar: 9
- Sodium: 220
- Fat: 7
- Saturated Fat: 4
- Carbohydrates: 34
- Fiber: 1
- Protein: 5
Keywords: dinner rolls, honey butter, Thanksgiving, homemade rolls, soft rolls, holiday side dish


