I was standing in the freezer aisle at Aldi last Tuesday when it hit me—that sticky-sweet smell of honey and garlic, the kind that makes your mouth water before you even know what you’re craving. I wasn’t expecting it. I was just trying to grab a bag of frozen broccoli and get out before my toddler lost it over the cart. But there it was. And suddenly I was seven years old in my neighbor Mrs. Kowalski’s kitchen, watching her pull the lid off a slow cooker that had been bubbling all afternoon. The steam would fog up her glasses and she’d wave it away with her hand, grinning. She wasn’t my grandmother or my aunt. She was just the lady next door who somehow always knew when our family was having a rough week. She’d show up with that crockpot under her arm and say, “This’ll fix what’s ailin’ ya.” And you know what? She was right.
I’ve been chasing that exact feeling ever since. Not the chicken itself—though that was good, don’t get me wrong. It was the way the house smelled. The way the sauce clung to everything. The way you didn’t have to do much to get something that felt like a real meal. I’ve tried a dozen versions over the years. Some were too sweet, some were too garlicky, and some just didn’t have that sticky factor that makes you want to lick the spoon. Honestly, I almost gave up. But last week, I finally cracked it. This crockpot honey garlic chicken hits that exact note I’ve been looking for—sweet but not cloying, savory with just enough garlic, and sticky enough that it coats every bite like a warm hug.
Maybe you’ve been there, too. Maybe you have your own Mrs. Kowalski—someone whose cooking you’re still trying to recreate. Or maybe you just want dinner to be easy without tasting like it. Either way, this one’s for you.
Why You’ll Love This Recipe
Let me tell you straight up: this isn’t one of those recipes that looks good on Pinterest but falls flat on your plate. I tested this crockpot honey garlic chicken four times before I got it right. The first batch was too watery. The second was burned on the edges. The third? Well, the third was close, but the sauce needed something. A little tang, maybe. A little depth. So I tweaked it again, and this version? This is the one I keep making on repeat.
Here’s why I think you’ll love it too:
- Set It and Forget It: Throw everything in the slow cooker in the morning, and by dinner time, you’ve got sticky, tender chicken that tastes like you fussed for hours. I’m not kidding—active prep time is maybe 10 minutes.
- Pantry-Friendly Ingredients: You probably already have honey, soy sauce, garlic, and chicken thighs in your kitchen right now. No fancy trips to a specialty store. No obscure spices you’ll never use again.
- Perfect for Busy Weeknights: Whether you’re juggling work, kids, or just the chaos of life, this recipe shows up when you need it most. It’s the kind of meal that makes you look like a hero with minimal effort.
- Crowd-Pleaser Status: I’ve served this to picky kids, skeptical in-laws, and friends who “don’t really like chicken thighs.” Every single person went back for seconds. The sauce is that good.
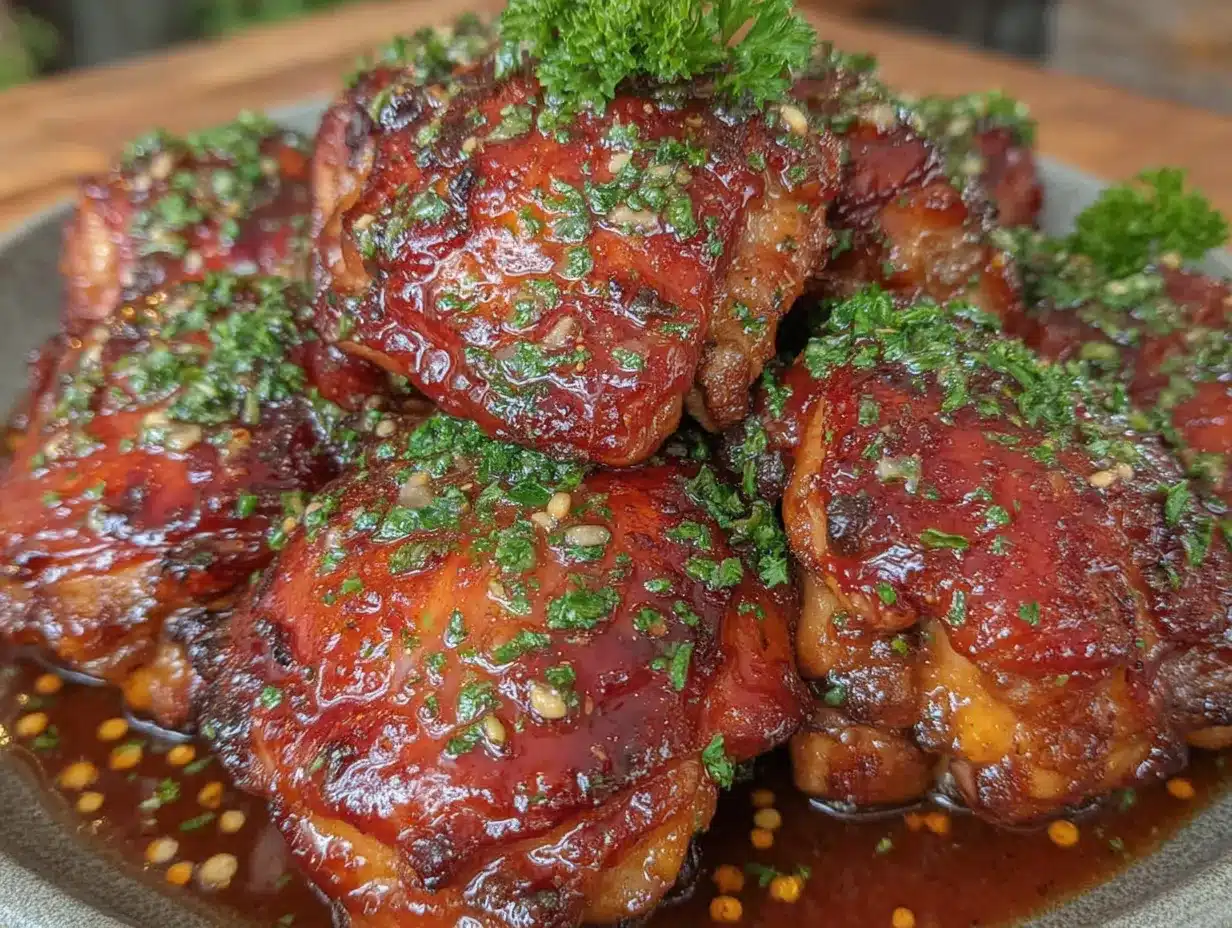
- Unbelievably Sticky and Delicious: The secret is in the reduction. Letting the sauce simmer down at the end creates that glossy, thick coating that clings to every piece of chicken. It’s next-level comfort food without the guilt.
What makes this different from all the other honey garlic chicken recipes out there? It’s the balance. Most versions are either too sweet or too salty. I use a specific ratio of honey to soy sauce, plus a splash of rice vinegar for acidity, and a thickener that won’t clump. The result is a sauce that’s glossy, sticky, and deeply flavorful—not just sweet goo. Plus, using chicken thighs instead of breasts means the meat stays juicy even after hours in the crockpot. You won’t end up with dry, stringy chicken. Ever.
This is the kind of recipe that makes you close your eyes after the first bite. It’s comfort food reimagined—healthier than takeout, faster than a complicated stove-top dish, but with the same soul-soothing satisfaction. Perfect for impressing guests without stress, or turning a simple Tuesday into something memorable.
What Ingredients You Will Need
This recipe uses simple, wholesome ingredients to deliver bold flavor and satisfying texture without the fuss. Most of these are pantry staples, which is exactly what I love about it. Here’s what you’ll need and why each one matters:
For the Chicken
- 2 pounds boneless, skinless chicken thighs – I prefer thighs here because they stay tender and juicy during the long cook time. Breasts tend to dry out. If you can find organic or free-range, great, but regular works just fine. (Pro tip: trim any excess fat before cooking for a cleaner sauce.)
- Salt and black pepper, to taste – A simple seasoning helps build flavor from the ground up. Don’t skip it.
For the Sticky Honey Garlic Sauce
- 1/2 cup honey – Use a good-quality honey here. I like local raw honey for its floral notes, but any honey works. If your honey is crystallized, warm it up slightly before measuring.
- 1/3 cup low-sodium soy sauce – Low-sodium is key so the sauce doesn’t end up too salty. You can also use tamari or coconut aminos for a gluten-free option.
- 6 cloves garlic, minced – Fresh garlic is non-negotiable here. Don’t use the jarred stuff—it won’t give you that punchy, aromatic flavor. I use a garlic press to save time and avoid garlicky fingers.
- 2 tablespoons rice vinegar – This adds a subtle tang that balances the sweetness. Apple cider vinegar works in a pinch.
- 1 tablespoon sesame oil – For a nutty, toasty undertone. It’s subtle but makes a difference. Skip it if you don’t have it, but you’ll miss that little something.
- 1 tablespoon sriracha or chili garlic sauce (optional) – Adds a gentle heat that cuts through the sweetness. I add it because I like a little kick, but my kids still eat it without complaint.
- 2 tablespoons cornstarch mixed with 3 tablespoons cold water – This slurry thickens the sauce at the end. Don’t skip it, or you’ll end up with thin, watery sauce. Trust me, I learned this the hard way.
For Garnish (Optional but Recommended)
- Sesame seeds – For that classic look and a little nutty crunch.
- Chopped green onions – Adds freshness and color. I always sprinkle these on right before serving.
- Fresh cilantro or parsley – If you’re a cilantro person, go for it. If not, parsley works beautifully.
Ingredient Selection Tip: Look for chicken thighs that are uniform in size so they cook evenly. If some are much larger than others, cut them in half. And about the honey—I’ve tried this with both clover honey and orange blossom honey, and honestly, both work great. The orange blossom adds a subtle floral note that’s lovely, but clover is more neutral. Use what you have.
Substitution Guidance: Need this to be gluten-free? Swap the soy sauce for tamari or coconut aminos. Want it less sweet? Reduce the honey to 1/3 cup and add an extra tablespoon of soy sauce. Don’t have chicken thighs? Bone-in thighs work too—just increase the cook time by about 30 minutes and remove the skin before serving. I’ve even made this with chicken drumsticks for a fun twist, and it was a hit at a backyard barbecue.
Equipment Needed
The beauty of this recipe is that you don’t need a ton of fancy equipment. Here’s what you’ll need:
- A 6-quart or larger slow cooker – This is the star of the show. I use a Crock-Pot brand slow cooker, but any brand works. If yours runs hot, keep an eye on the cook time. Every slow cooker is a little different, and you’ll get to know yours over time.
- A small mixing bowl – For whisking together the sauce ingredients. Nothing fancy needed.
- A whisk or fork – To mix the sauce and the cornstarch slurry smoothly.
- Tongs – For placing the chicken in the slow cooker and flipping it halfway through. Metal tongs with silicone tips are my favorite because they won’t scratch the insert.
- A liquid measuring cup – For measuring honey and soy sauce. A glass one is best because honey slides right out.
- A garlic press (optional but helpful) – Speeds up mincing and keeps your hands from smelling like garlic for days.
- A cutting board and knife – For trimming chicken and mincing garlic.
Budget-Friendly Options: If you don’t have a slow cooker, you can make this in a Dutch oven on the stovetop or in the oven at 300°F for about 2 hours. The texture will be slightly different, but the flavor will still be there. I’ve also used an Instant Pot on the slow cook setting—just make sure the lid is vented so the sauce can reduce properly.
Personal Note: I’ve had the same slow cooker for eight years. It’s scratched, the lid handle is a little loose, and the “warm” setting doesn’t work anymore. But I refuse to replace it because it’s broken in. That’s the thing about slow cookers—they get better with age, like a good cast iron skillet. If you’re new to slow cooking, don’t stress about having the latest model. Your grandma’s old Crock-Pot will do just fine.
Preparation Method
Alright, let’s get cooking. I promise this is as easy as it sounds. Here’s the step-by-step:
- Prep the chicken. Pat the chicken thighs dry with paper towels. Season both sides generously with salt and black pepper. Don’t be shy—the seasoning is your foundation. Trim any large pieces of fat, but leave a little for flavor. Place the chicken in the bottom of your slow cooker in a single layer if possible. If they overlap a bit, that’s okay.
- Make the sauce. In a small bowl, whisk together the honey, low-sodium soy sauce, minced garlic, rice vinegar, sesame oil, and sriracha (if using). Whisk until the honey is fully incorporated and the sauce looks smooth. Taste it. It should be sweet, salty, and slightly tangy. If it’s too sweet for your liking, add another splash of soy sauce.
- Pour and slow cook. Pour the sauce evenly over the chicken thighs. Make sure each piece gets some love. Put the lid on your slow cooker and cook on LOW for 4 to 5 hours or on HIGH for 2.5 to 3 hours. I prefer LOW for a longer cook—it makes the chicken more tender. About halfway through, flip the chicken pieces with tongs so they cook evenly and absorb the sauce from all sides.
- Check for doneness. The chicken is done when it’s tender enough to shred with a fork. If it’s still firm, give it another 30 minutes. Chicken thighs are forgiving, so don’t panic if you go a little over. But don’t cook them for 8 hours on low—they’ll start to fall apart into mush. Ask me how I know.
- Remove the chicken (optional but recommended). Using tongs, transfer the cooked chicken to a plate or cutting board. Don’t discard the sauce—this is where the magic happens. Let the chicken rest while you thicken the sauce.
- Thicken the sauce. In a small bowl, whisk together the cornstarch and cold water until smooth. Pour this slurry into the slow cooker with the remaining sauce. Turn the heat to HIGH (or use the sauté function if you have an Instant Pot). Let the sauce simmer, stirring occasionally, for about 10 to 15 minutes, until it thickens and becomes glossy. It should coat the back of a spoon. If it’s still thin, mix another tablespoon of cornstarch with water and repeat.
- Return the chicken to the pot. Shred the chicken into bite-sized pieces with two forks, or leave the thighs whole if you prefer. Return the chicken to the thickened sauce and stir gently to coat every piece. Let it sit on WARM for 5 minutes so the sauce clings to the meat.
- Garnish and serve. Sprinkle with sesame seeds, chopped green onions, and fresh cilantro or parsley. Serve immediately over steamed rice, noodles, or with a side of roasted vegetables. Don’t forget to spoon extra sauce over the top.
Sensory Cues: At step 4, your kitchen should smell like a combination of honey, garlic, and soy sauce—warm and inviting. The sauce will look thin and watery at this point, but don’t worry. That’s normal. By step 6, the sauce will transform into a thick, glossy glaze that clings to the chicken like caramel. You’ll see it bubble and reduce, and the color will deepen to a rich amber. That’s when you know it’s ready.
Troubleshooting Tip: If your sauce isn’t thickening after 15 minutes, your cornstarch might be old. Cornstarch loses its thickening power over time. Try using arrowroot powder or potato starch instead. Also, make sure the sauce is actually simmering—not just warm. A gentle bubble is what activates the cornstarch.
Cooking Tips & Techniques
I’ve made this recipe more times than I can count, and I’ve picked up a few tricks along the way. Here’s what I wish someone had told me the first time:
Don’t lift the lid. I know it’s tempting. I know you want to check on it. But every time you lift that lid, you release heat and steam, and your cook time stretches out. Trust the process. Peek once at the halfway mark to flip the chicken, and that’s it.
Pat the chicken dry. This is a small step that makes a big difference. Wet chicken releases more liquid into the pot, which waters down your sauce. Patting it dry helps the seasoning stick and keeps the sauce concentrated.
Use a meat thermometer if you’re nervous. Chicken thighs are safe to eat at 165°F, but they’re best at 175°F to 185°F. At that higher temperature, the connective tissue breaks down and the meat becomes spoon-tender. Don’t be afraid of a little extra time.
Reduce the sauce before thickening. If you have time, remove the chicken and let the sauce simmer on HIGH for 20 to 30 minutes before adding the cornstarch slurry. This concentrates the flavors and makes the sauce even stickier. I do this when I’m not in a rush, and it’s worth the extra wait.
My biggest failure: The first time I made this, I used chicken breasts and cooked them on HIGH for 4 hours. They came out dry and stringy, and the sauce was watery because I skipped the cornstarch. I tried to salvage it by adding more honey, which made it cloying. It was a mess. My husband ate it without complaint (bless him), but I knew it wasn’t right. That’s when I switched to thighs and started thickening the sauce. Lesson learned.
Multitasking Strategy: While the chicken cooks, prep your sides. Make a batch of steamed rice, chop some veggies for a quick stir-fry, or set the table. The slow cooker does the heavy lifting, so use that time wisely. I often make this on a Sunday afternoon while I’m meal-prepping for the week.
Variations & Adaptations
This recipe is forgiving, so feel free to make it your own. Here are some variations I’ve tried and loved:
- Spicy Honey Garlic Chicken: Add 2 tablespoons of sriracha or gochujang to the sauce. The heat balances the sweetness beautifully. I made this version for a game day party, and it disappeared in minutes.
- Lemon Honey Garlic Chicken: Swap the rice vinegar for 2 tablespoons of fresh lemon juice and add a teaspoon of lemon zest. The citrus brightens everything up. Perfect for spring or summer when you want something lighter.
- Slow Cooker Honey Garlic Meatballs: Use frozen or homemade meatballs instead of chicken. Cook on LOW for 3 to 4 hours, then thicken the sauce as directed. Serve over rice or as an appetizer with toothpicks. This is my go-to for potlucks.
- Keto-Friendly Version: Replace the honey with 1/4 cup of monk fruit sweetener or a sugar-free honey substitute. Use tamari instead of soy sauce. The sauce won’t be as sticky, but the flavor is still fantastic.
- Baked Version: If you don’t have a slow cooker, place the seasoned chicken in a baking dish, pour the sauce over, and bake at 350°F for 40 to 45 minutes, basting halfway through. For the sticky finish, broil for 3 to 5 minutes at the end. I’ve done this when my slow cooker was already in use, and it worked beautifully.
Personal Variation: I once added a tablespoon of grated fresh ginger to the sauce on a whim, and it was incredible. The ginger adds a warm, zesty note that pairs perfectly with the garlic and honey. I don’t always include it, but when I do, it feels like a special treat.
Serving & Storage Suggestions
This sticky honey garlic chicken is versatile, so here’s how to serve and store it:
Serving Temperature: Serve it hot, straight from the slow cooker. The sauce is at its best when it’s warm and glossy. If it cools down, the sauce thickens and becomes less pourable. Reheat gently if needed.
What to Serve With It:
- Steamed jasmine or basmati rice – The classic choice. The rice soaks up all that extra sauce.
- Cauliflower rice – For a low-carb option that still feels satisfying.
- Steamed broccoli or green beans – The crunch contrasts nicely with the tender chicken.
- Asian-style slaw – A tangy, crunchy slaw with a sesame dressing cuts through the richness.
- Noodles – Toss cooked ramen or udon noodles with a little of the sauce and serve the chicken on top.
Storage Instructions: Store leftovers in an airtight container in the refrigerator for up to 4 days. The flavors actually deepen overnight, so it’s even better the next day. I love making a double batch just for leftovers.
Freezing: This freezes beautifully. Let the chicken cool completely, then transfer it to a freezer-safe bag or container. Remove as much air as possible. Freeze for up to 3 months. To reheat, thaw in the refrigerator overnight and warm in a skillet over medium heat, adding a splash of water or chicken broth to loosen the sauce. Or reheat directly from frozen in a covered skillet on low heat.
Reheating Tips: The microwave works in a pinch, but the sauce can become gummy. For best results, reheat in a skillet over medium-low heat, stirring occasionally. Add a tablespoon of water if the sauce seems too thick. The chicken will stay tender, and the sauce will regain its glossy sheen.
Flavor Development: I’ve noticed that the sauce thickens and becomes even more flavorful after a day in the fridge. The garlic mellows out, and the honey and soy sauce meld together beautifully. So don’t be afraid to make this a day ahead—it might actually be better.
Nutritional Information & Benefits
Here’s an approximate nutritional breakdown per serving (based on 6 servings, with chicken and sauce only):
| Nutrient | Amount per Serving |
|---|---|
| Calories | 320 |
| Protein | 28g |
| Fat | 12g |
| Saturated Fat | 3g |
| Carbohydrates | 24g |
| Fiber | 0g |
| Sugar | 20g |
| Sodium | 680mg |
Health Benefits: Chicken thighs are a great source of protein, iron, and B vitamins, which support energy metabolism and immune function. Honey provides antioxidants and has natural antibacterial properties. Garlic is known for its anti-inflammatory and immune-boosting effects. While this dish is higher in sugar and sodium than some recipes, it’s made with whole, recognizable ingredients and no processed additives. It’s a balanced indulgence—satisfying without being over-the-top.
Dietary Considerations: This recipe is naturally dairy-free and nut-free. For a gluten-free version, use tamari or coconut aminos instead of soy sauce. For a lower-sugar option, reduce the honey to 1/3 cup. If you’re watching your sodium, use low-sodium soy sauce and skip the added salt in the seasoning.
Allergens: Soy (if using soy sauce), sesame (if using sesame oil). Always check labels if cooking for someone with allergies.
Personal Wellness Perspective: I don’t believe in labeling foods as “good” or “bad.” This recipe is about balance. It’s a meal that makes you feel nourished and satisfied, without the guilt. When I serve this to my family, I feel good knowing it’s made from scratch with real ingredients. And when they ask for seconds, I feel even better.
Conclusion
This crockpot honey garlic chicken isn’t just a recipe—it’s a little piece of comfort that I think we all need sometimes. It’s the kind of meal that makes your house smell like someone cares, even on days when you barely have time to breathe. It’s sticky, sweet, savory, and everything in between. And honestly? It’s the closest I’ve come to recreating that feeling from Mrs. Kowalski’s kitchen all those years ago.
I hope you give this a try and make it your own. Maybe you’ll add extra garlic, or skip the spice, or serve it over noodles instead of rice. That’s the beauty of cooking—it’s yours to play with. And when you do make it, I’d love to hear about it. Drop a comment below and tell me how it turned out, or share your own twist on the recipe. Did you add ginger? Use drumsticks? Forget to thicken the sauce and eat it anyway (I’ve been there)? Let me know.
If you loved this recipe, share it with a friend who needs an easy dinner win. Pin it to your favorite board, save it for later, or just bookmark this page. And if you’re craving more slow cooker magic, check out my crockpot sesame chicken or this slow cooker teriyaki meatball recipe—both are just as forgiving and delicious.
Until next time, happy cooking. And remember: the best meals aren’t perfect. They’re made with love, a little patience, and maybe a few extra spoonfuls of honey.
Frequently Asked Questions
Can I use chicken breasts instead of thighs?
Yes, but be careful. Chicken breasts cook faster and can dry out. If you use breasts, cook on LOW for 2.5 to 3 hours and check for doneness early. You may also want to add a little chicken broth to keep them moist. The texture won’t be as tender as thighs, but it still tastes great.
Can I make this in an Instant Pot?
Absolutely. Use the sauté function to brown the chicken first (optional), then add the sauce and cook on HIGH pressure for 10 minutes. Do a quick release, remove the chicken, and use the sauté function to thicken the sauce with the cornstarch slurry. It’s faster but still delicious.
My sauce is too thin. What did I do wrong?
Most likely, you either skipped the cornstarch slurry or didn’t let it simmer long enough. The slurry needs to come to a gentle boil to activate. Also, if you used chicken breasts or added extra liquid, the sauce will be thinner. Try whisking another tablespoon of cornstarch with water and simmering again.
Can I double this recipe?
Yes, as long as your slow cooker is large enough (at least 6 quarts). Double all the ingredients but keep the cook time the same. You may need to flip the chicken more often to ensure even cooking. The sauce might take a little longer to thicken, so be patient.
How do I make this less sweet?
Reduce the honey to 1/3 cup and add an extra tablespoon of soy sauce or rice vinegar. You can also add a pinch of red pepper flakes to balance the sweetness with heat. Taste the sauce before pouring it over the chicken and adjust to your preference.
Pin This Recipe!

Easy Crockpot Honey Garlic Chicken Thighs: Best Sticky Recipe

This crockpot honey garlic chicken is sticky, sweet, savory, and incredibly easy to make. With just 10 minutes of prep, you can set it and forget it for a comforting meal that tastes like you fussed for hours.
- Prep Time: 10 minutes
- Cook Time: 4 hours 30 minutes
- Total Time: 4 hours 40 minutes
- Yield: 6 servings 1x
- Category: Main Course
- Cuisine: Asian
Ingredients
- 2 pounds boneless, skinless chicken thighs
- Salt and black pepper, to taste
- 1/2 cup honey
- 1/3 cup low-sodium soy sauce
- 6 cloves garlic, minced
- 2 tablespoons rice vinegar
- 1 tablespoon sesame oil
- 1 tablespoon sriracha or chili garlic sauce (optional)
- 2 tablespoons cornstarch mixed with 3 tablespoons cold water
- Sesame seeds (for garnish)
- Chopped green onions (for garnish)
- Fresh cilantro or parsley (for garnish)
Instructions
- Pat the chicken thighs dry with paper towels. Season both sides generously with salt and black pepper. Trim any large pieces of fat. Place the chicken in the bottom of your slow cooker in a single layer if possible.
- In a small bowl, whisk together the honey, low-sodium soy sauce, minced garlic, rice vinegar, sesame oil, and sriracha (if using) until smooth.
- Pour the sauce evenly over the chicken thighs. Cover and cook on LOW for 4 to 5 hours or on HIGH for 2.5 to 3 hours. About halfway through, flip the chicken pieces with tongs.
- Check for doneness: the chicken is done when it’s tender enough to shred with a fork.
- Using tongs, transfer the cooked chicken to a plate or cutting board. Let it rest while you thicken the sauce.
- In a small bowl, whisk together the cornstarch and cold water until smooth. Pour this slurry into the slow cooker with the remaining sauce. Turn the heat to HIGH and let the sauce simmer, stirring occasionally, for about 10 to 15 minutes, until it thickens and becomes glossy.
- Shred the chicken into bite-sized pieces with two forks, or leave the thighs whole. Return the chicken to the thickened sauce and stir gently to coat. Let it sit on WARM for 5 minutes.
- Sprinkle with sesame seeds, chopped green onions, and fresh cilantro or parsley. Serve immediately over steamed rice, noodles, or with a side of roasted vegetables.
Notes
For a gluten-free version, use tamari or coconut aminos instead of soy sauce. To reduce sweetness, use 1/3 cup honey and add an extra tablespoon of soy sauce. The sauce thickens and becomes more flavorful after a day in the fridge.
Nutrition
- Serving Size: 1 serving (about 1/6
- Calories: 320
- Sugar: 20
- Sodium: 680
- Fat: 12
- Saturated Fat: 3
- Carbohydrates: 24
- Protein: 28
Keywords: crockpot honey garlic chicken, slow cooker chicken thighs, sticky chicken, easy weeknight dinner, honey garlic sauce


