My oven timer beeped, and I pulled out a tray of what looked like little bandaged snacks. My four-year-old, who had been suspiciously quiet, came running into the kitchen. “Mom! You made monsters!” he shouted, his face lighting up like it was Christmas morning. I wasn’t expecting this kind of reaction from a simple weeknight dinner experiment, but there I was, watching him grab one before I could even get a plate out. That’s how our love affair with these little guys started—completely by accident on a Tuesday that felt like any other.
Honestly, I was just trying to get something on the table fast. I had a pack of hot dogs and a tube of crescent rolls in the fridge, and I was this close to just making plain hot dog buns. But then I remembered a silly Halloween craft from my own childhood, and I thought, why not wrap them up like little mummies? I mean, the kids were already bouncing off the walls. A little fun with dinner couldn’t hurt, right? I sliced the dough into thin strips, wrapped them haphazardly around the hot dogs, and popped them in. I didn’t even use mustard for the eyes because I was out—I used little dots of ketchup instead. It was a mess, but a delicious one.
That first batch was gone in five minutes flat. My husband even snagged two before I could stop him. Since then, these Kid-Approved Mummy Hot Dogs with Crescent Dough Wraps have become our go-to for busy nights, birthday parties, and, of course, Halloween. They’re the kind of recipe that makes you feel like a hero without actually doing much work. Maybe you’ve had one of those days where you just need a win at the dinner table? This is it. They’re silly, they’re simple, and they work every single time. I keep making them because they turn a regular meal into a little moment of joy, and honestly, that’s something we all need more of.
Why You’ll Love This Recipe
I’ve tested this recipe more times than I can count, and I can tell you with confidence—it’s a winner. As a mom and a home cook who’s always looking for shortcuts that don’t sacrifice taste, these mummy hot dogs check every box. They’re not just cute; they’re genuinely delicious. The crescent dough bakes up flaky and golden, while the hot dog stays juicy inside. It’s a texture combo that kids absolutely go crazy for.
- Quick & Easy: From fridge to table in under 25 minutes. Perfect for those after-school meltdowns or last-minute playdate snacks.
- Simple Ingredients: You only need three things—hot dogs, crescent dough, and something for the eyes. No fancy grocery trips required.
- Perfect for Busy Nights & Parties: Great for Halloween, movie nights, or just a fun Tuesday dinner. They’re also a huge hit at school potlucks.
- Crowd-Pleaser: I’ve never met a kid who didn’t love these. Even picky eaters gobble them up because they’re familiar flavors with a fun twist.
- Unbelievably Delicious: The flaky, buttery dough wrapped around a savory hot dog is pure comfort food. It’s simple, but it hits the spot every time.
What makes this version different from all the other mummy hot dog recipes out there? It’s the technique. I’ve learned that how you cut the dough matters. Too thick, and the mummy looks lumpy. Too thin, and the dough breaks. I’ll show you the perfect way to slice it so you get those neat, bandage-like strips that bake up evenly. Plus, I’ve figured out the best way to get the eyes to stay on, so you don’t end up with a mummy who lost his eyeballs in the oven. Trust me, I’ve been there.
This recipe isn’t just good—it’s the kind that makes you close your eyes after the first bite. It’s comfort food reimagined for the little ones, but honestly, I love them just as much as my kids do. Perfect for impressing your children without any stress, or turning a simple weeknight meal into something memorable.
What Ingredients You Will Need
This recipe uses simple, mostly pantry-staple ingredients to deliver big flavor and maximum fun without the fuss. You probably already have everything you need, which is my favorite kind of recipe.
- Hot Dogs (8 standard-sized): This is the base of our mummies. I recommend using your family’s favorite brand. For the best texture, go with all-beef or turkey hot dogs. They hold up better during baking and have a nicer snap. If you’re feeling fancy, you can even use jumbo hot dogs, but you’ll need to adjust the baking time by a couple of minutes.
- Crescent Roll Dough (1 can, 8 oz): This is the magic ingredient. I almost always use Pillsbury Original Crescent Rolls. The dough is flaky, buttery, and so easy to work with. You can find it in the refrigerated section of any grocery store. Make sure it’s cold when you start—it’s much easier to cut into strips. If you can’t find crescent rolls, you can use puff pastry sheets, but the texture will be a bit different and less kid-friendly.
- Mustard or Ketchup (for the eyes): This is for adding the mummy’s face! I’ve used both, and I have a slight preference for yellow mustard because it gives a nice, bright contrast. But my kids prefer ketchup dots. You can also use small pieces of black olive or even a dab of sriracha if you want a spicy mummy. Just make sure whatever you use is thick enough that it won’t just melt into a blob in the oven.
- Cooking Spray or Butter (optional): A light spray on the baking sheet is a good idea to prevent sticking. I also like to brush the tops of the dough strips with a little melted butter before baking. It gives them a beautiful golden-brown color and an extra layer of flavor. It’s not necessary, but it makes them look a bit more bakery-style.
When it comes to ingredient selection, I’ve learned a few things. Look for crescent roll dough that feels cold and firm in the store. If the tube is puffed up or feels warm, it might have been sitting out too long, which can make the dough harder to handle. For the hot dogs, I personally prefer the brand Hebrew National for their beefy flavor, but any brand you trust works great. If you’re using frozen hot dogs, make sure they are completely thawed and patted dry before wrapping, or the excess moisture will make the dough soggy.
Here’s a little substitution guidance. For a gluten-free option, you can use gluten-free crescent dough, but it can be a bit more fragile. Work with it while it’s very cold. For a dairy-free version, use dairy-free crescent dough (some brands make it) and skip the butter wash. The hot dogs themselves are usually gluten-free, but always check the label. Honestly, this recipe is so simple that substitutions are easy to make without ruining the fun.
Equipment Needed
You don’t need any fancy gadgets for this recipe, which is part of its beauty. Here’s what you’ll need to get those mummies on the table.
- Baking Sheet: A standard half-sheet pan works perfectly. I’ve used both non-stick and regular aluminum pans. If you’re using a regular pan, just make sure to line it with parchment paper or give it a good spray of cooking oil.
- Sharp Knife or Pizza Cutter: This is crucial. A sharp knife makes clean cuts through the dough without tearing it. I actually prefer a pizza cutter for this job—it glides through the dough strips perfectly and keeps them even. A dull knife will just squish the dough.
- Small Bowl (optional): If you’re brushing the dough with butter, you’ll need a small bowl to melt it in.
- Pastry Brush (optional): For that butter wash. You can also use a paper towel to dab it on if you don’t have a brush.
- Cutting Board: A clean, flat surface for unrolling and cutting the dough.
- Toothpicks (optional): If you’re having trouble getting the eyes to stick, you can use a toothpick to make a small indent in the dough before adding the mustard or ketchup dot. I’ve done this when I wanted them to look extra perfect for a party.
I’ve made these with just a butter knife and a fork before, and it worked, but it was frustrating. A pizza cutter is a game-changer. You can find a decent one for under $10 at any grocery store. It’s one of those tools that makes you wonder why you didn’t get it sooner.
Preparation Method
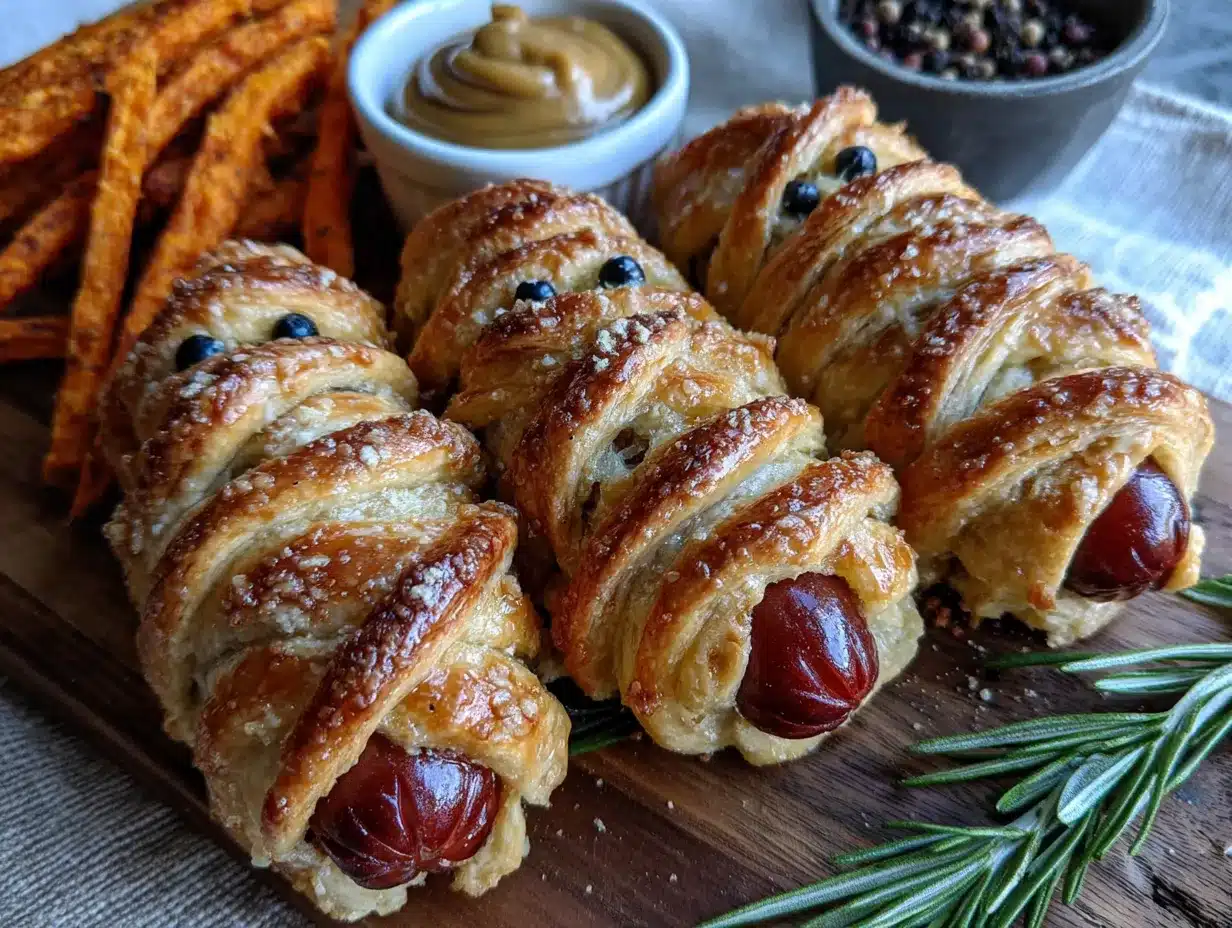
Alright, let’s get to the fun part. This is where we turn simple ingredients into something that looks like it came out of a spooky cartoon. Follow these steps, and you’ll have a tray of perfect mummies in no time.
- Preheat your oven to 375°F (190°C). This is important. While the oven is heating up, line your baking sheet with parchment paper or give it a light spray of cooking oil. I like using parchment because cleanup is a breeze.
- Prepare the crescent dough. Open the can of crescent rolls carefully—I’ve had one pop on me, and it’s startling! Unroll the dough on your cutting board. You’ll see it’s perforated into 8 triangles. Press the seams together to create one large rectangle of dough. Don’t worry if it’s not perfect. Just pinch the seams closed.
- Cut the dough into strips. Using your sharp knife or pizza cutter, slice the dough lengthwise into thin strips. I aim for about 8 to 10 strips per rectangle. They should be about ½ inch wide. If they’re too thick, the mummy looks bulky. Too thin, and they’ll break when you try to wrap them. You’ll get a feel for it after the first one.
- Wrap the hot dogs. Take one hot dog and place it at one end of a dough strip. Start wrapping the strip around the hot dog, slightly overlapping the dough as you go. Think of it like wrapping a bandage. Leave a small gap at the top of the hot dog (about ½ inch) for the face. The dough will expand a bit in the oven, so don’t wrap it too tightly. I usually wrap each hot dog with 2 to 3 strips of dough. Place the wrapped mummy on your prepared baking sheet. Repeat with the remaining hot dogs.
- Add the eyes. Before they go in the oven, add the eyes. Using a toothpick or the tip of a knife, make two small indents in the exposed part of the hot dog. Then, drop a tiny amount of mustard or ketchup into each indent. This helps the eyes stay in place. If you just put a dollop on top, it might slide off. I learned this the hard way when I opened the oven to find a bunch of blind mummies.
- Optional butter wash. If you want that beautiful golden-brown finish, melt a tablespoon of butter and brush it gently over the dough strips. This step is purely for looks and a little extra flavor, but it does make them look more professional.
- Bake. Place the baking sheet in the preheated oven and bake for 12 to 15 minutes. You’ll know they are done when the dough is puffed up and golden brown, and the hot dogs are heated through. Keep an eye on them after the 12-minute mark. Ovens vary, and you don’t want burnt mummies.
- Cool slightly and serve. Let them cool on the baking sheet for 2 to 3 minutes before serving. The dough will be very hot right out of the oven. This also gives the eyes a chance to set. Serve them warm with extra ketchup or mustard for dipping.
A quick tip from my kitchen to yours: Don’t overwork the dough. The more you handle it, the tougher it gets. Just cut, wrap, and bake. It’s that simple. And if a strip breaks, just press it back together on the hot dog. Nobody will notice after it’s baked.
Cooking Tips & Techniques
I’ve made these mummy hot dogs at least two dozen times, and I’ve picked up a few tricks along the way. Let me share what I’ve learned so you can skip the mistakes I made.
Don’t over-bake them. The biggest mistake I made the first time was leaving them in too long because I wanted the dough to be super crispy. The problem is, the hot dog can get tough and split if you overdo it. Pull them out as soon as the dough is golden. The residual heat will continue to cook the dough a bit on the pan.
Keep the dough cold. Crescent dough is much easier to work with when it’s cold. If it gets too warm and sticky, just pop the cut strips in the fridge for 5 minutes before wrapping. This makes the strips less likely to tear. I once tried to rush this step, and I ended up with a gooey mess that looked more like a science experiment than dinner.
Space them out. Give each mummy a little room on the baking sheet. The dough will expand, and if they are touching, they’ll bake into one giant mummy blob. It’s still edible, but it loses the individual mummy look. I usually put 8 on a standard sheet pan.
Multitask like a pro. While the oven is preheating, I get the kids to help with the wrapping. It’s a great way to keep them occupied and involved in dinner. They love deciding where the eyes go. It turns a chore into a craft project. Honestly, the mess is worth it for the memories.
For consistency, measure your strips. If you want all your mummies to look uniform, use a ruler to measure your dough strips. I don’t usually bother, but if you’re making them for a party or a school event, it makes a difference. A uniform mummy is a happy mummy.
Variations & Adaptations
One of the best things about this recipe is how easy it is to change up. You can make it fit any occasion or dietary need with just a few tweaks.
- Cheesy Mummies: Before wrapping the hot dog, cut a slit lengthwise down the center and stuff it with a strip of cheddar or mozzarella cheese. The cheese will melt and ooze out a little during baking, making them extra decadent. My kids call these “ghost mummies” because of the white cheese.
- Spicy Adult Version: For a grown-up twist, use spicy Italian sausages instead of hot dogs. Wrap them in the dough and add a small dollop of sriracha or hot sauce on the dough before baking. The spicy kick pairs surprisingly well with the buttery dough.
- Veggie Mummies: For a vegetarian option, use veggie dogs. I’ve tried several brands, and Field Roast works best because they hold their shape. You can also wrap the dough around mozzarella sticks for a cheesy, meatless version that kids still love.
- Breakfast Mummies: Use breakfast sausage links instead of hot dogs. Bake them the same way, and serve with a side of scrambled eggs. It’s a fun, silly breakfast for Halloween morning or a special weekend treat.
- Gluten-Free Adaptation: As I mentioned, gluten-free crescent dough is available. It’s a bit more delicate, so handle it gently and keep it very cold. You might need to add a minute or two to the baking time.
I personally love the cheesy version. I tried it one night when I had leftover cheese sticks, and it was a huge hit. It adds a whole new level of flavor and makes the mummies even more satisfying.
Serving & Storage Suggestions
These mummy hot dogs are best served warm, right out of the oven. The dough is at its flakiest, and the hot dog is perfectly juicy. I like to arrange them on a platter with a bowl of ketchup in the center and a bowl of mustard on the side. For a Halloween party, I sometimes put them on a plate lined with black or orange napkins to make them pop.
They pair beautifully with a simple side of baked beans, potato chips, or a fresh veggie platter. For a complete meal, I serve them with a side of easy mac and cheese or a simple green salad. The kids love dipping them in everything—ketchup, mustard, ranch dressing, you name it.
If you have leftovers (which is rare in my house), here’s how to store them. Let them cool completely, then place them in an airtight container in the refrigerator. They will keep for up to 3 days. The dough will lose some of its crispiness, but they’ll still taste good.
To reheat: The best way to bring them back to life is in the oven or an air fryer. Preheat to 350°F (175°C) and bake for 5 to 7 minutes, or until heated through. The microwave works in a pinch, but the dough will get soft and a bit chewy. I don’t recommend freezing them after baking, as the texture of the dough changes significantly. However, you can freeze the unbaked, wrapped mummies. Just place them on a baking sheet in the freezer until solid, then transfer to a freezer bag. Bake from frozen, adding 3 to 5 minutes to the baking time.
I’ve noticed that the flavors actually meld together a bit more after a day in the fridge. The leftover ones I’ve had for lunch the next day are still pretty darn good, especially if I pop them in the air fryer.
Nutritional Information & Benefits
Let’s be real—these are a fun treat, not a health food. But here’s a rough breakdown so you know what you’re working with. Per serving (one mummy hot dog), you’re looking at approximately 250-300 calories, 15-18 grams of fat, 22-25 grams of carbohydrates, and 8-10 grams of protein. The exact numbers will vary based on the brand of hot dog and dough you use.
On the plus side, hot dogs do provide a decent amount of protein, which helps keep little tummies full. The crescent dough offers some quick energy from carbohydrates. If you want to make them a bit more balanced, serve them with a side of fruit or carrot sticks.
For those watching their intake, here are some dietary considerations. This recipe is not gluten-free unless you use a specific alternative dough. It contains dairy if you use the butter wash, but you can easily skip it. The hot dogs themselves may contain soy or other allergens, so always check the label. If you’re using turkey or chicken hot dogs, the fat content will be lower.
My personal wellness perspective? Everything in moderation. These mummy hot dogs are about fun and family, not about being perfect. I don’t stress about the nutritional stats when I’m making them for a Halloween party or a fun Friday night dinner. They’re a memory in the making, and that has its own kind of value.
Conclusion
So there you have it—my go-to recipe for turning a regular weeknight into a little adventure. These Kid-Approved Mummy Hot Dogs with Crescent Dough Wraps are proof that you don’t need a lot of time or fancy ingredients to make something special. They’re silly, they’re delicious, and they bring a smile to everyone’s face. That’s a win in my book.
I hope you give them a try and make them your own. Maybe you’ll add cheese, or use spicy sausage, or let your kids go wild with the eye placement. That’s the beauty of this recipe—it’s a blank canvas for fun. I’d love to hear how they turned out for you. Did your kids love them? Did you come up with a new variation? Drop a comment below and share your mummy masterpieces. And if you found this helpful, please share it with a friend who needs a little dinner inspiration.
Happy cooking, and remember—sometimes the best meals are the ones that make you laugh.
Frequently Asked Questions
Can I make these mummy hot dogs ahead of time?
Yes! You can wrap the hot dogs in the dough strips and place them on the baking sheet up to 24 hours in advance. Just cover them with plastic wrap and store them in the refrigerator. Add the eyes right before baking for the best results.
What if my crescent dough tears while I’m wrapping?
Don’t worry, it happens to me all the time. Just press the torn piece back together on the hot dog. Once it bakes, the dough will puff up and seal itself, and you won’t even notice the tear. It’s very forgiving.
Can I use puff pastry instead of crescent dough?
Absolutely. Thaw the puff pastry according to the package directions, then cut it into thin strips. The texture will be a bit flakier and less soft than crescent dough, but it still works great. You might need to add a minute or two to the baking time.
How do I get the eyes to stay on perfectly?
The trick is to make a small indent in the hot dog with a toothpick or the tip of a knife before adding the mustard or ketchup. This gives the condiment a little pocket to sit in. Also, make sure the hot dog is dry before you add the eyes, or they might slide off.
My kids are picky eaters. Will they like these?
In my experience, yes. These are basically hot dogs wrapped in bread, which is a winning combo for most kids. The fun shape and silly eyes make them even more appealing. I’ve had picky eaters who refused regular hot dogs gobble these up because they looked like a fun snack.
Pin This Recipe!

Easy Kid-Approved Mummy Hot Dogs with Crescent Dough
These fun and simple mummy hot dogs are wrapped in flaky crescent dough and baked to golden perfection. Perfect for Halloween, busy weeknights, or any time you want to turn a regular meal into a little moment of joy.
- Prep Time: 10 minutes
- Cook Time: 15 minutes
- Total Time: 25 minutes
- Yield: 8 servings 1x
- Category: Main Course
- Cuisine: American
Ingredients
- 8 standard-sized hot dogs
- 1 can (8 oz) crescent roll dough
- Mustard or ketchup (for the eyes)
- Cooking spray or butter (optional, for greasing and brushing)
Instructions
- Preheat your oven to 375°F (190°C). Line a baking sheet with parchment paper or lightly spray with cooking oil.
- Open the can of crescent rolls carefully. Unroll the dough on a cutting board and press the perforated seams together to form one large rectangle.
- Using a sharp knife or pizza cutter, slice the dough lengthwise into thin strips, about ½ inch wide (aim for 8 to 10 strips per rectangle).
- Take one hot dog and place it at one end of a dough strip. Wrap the strip around the hot dog, slightly overlapping as you go, like a bandage. Leave about ½ inch of the hot dog exposed at the top for the face. Use 2 to 3 strips per hot dog. Place the wrapped mummy on the prepared baking sheet. Repeat with remaining hot dogs.
- Before baking, use a toothpick or the tip of a knife to make two small indents in the exposed part of the hot dog for the eyes. Drop a tiny amount of mustard or ketchup into each indent.
- Optional: Melt 1 tablespoon of butter and brush it gently over the dough strips for a golden-brown finish.
- Bake for 12 to 15 minutes, until the dough is puffed up and golden brown and the hot dogs are heated through.
- Let cool on the baking sheet for 2 to 3 minutes before serving. Serve warm with extra ketchup or mustard for dipping.
Notes
Keep the crescent dough cold for easier handling. Don’t over-bake; pull them out as soon as the dough is golden. For the eyes, making a small indent helps the condiment stay in place. You can also use small pieces of black olive for eyes. For a cheesy version, slit the hot dog and stuff with cheese before wrapping. Leftovers can be stored in an airtight container in the refrigerator for up to 3 days; reheat in the oven or air fryer at 350°F for 5-7 minutes.
Nutrition
- Serving Size: 1 mummy hot dog
- Calories: 275
- Sugar: 5
- Sodium: 680
- Fat: 16
- Saturated Fat: 6
- Carbohydrates: 23
- Protein: 9
Keywords: mummy hot dogs, crescent dough hot dogs, Halloween recipe, kid-friendly dinner, easy weeknight meal, fun snack


