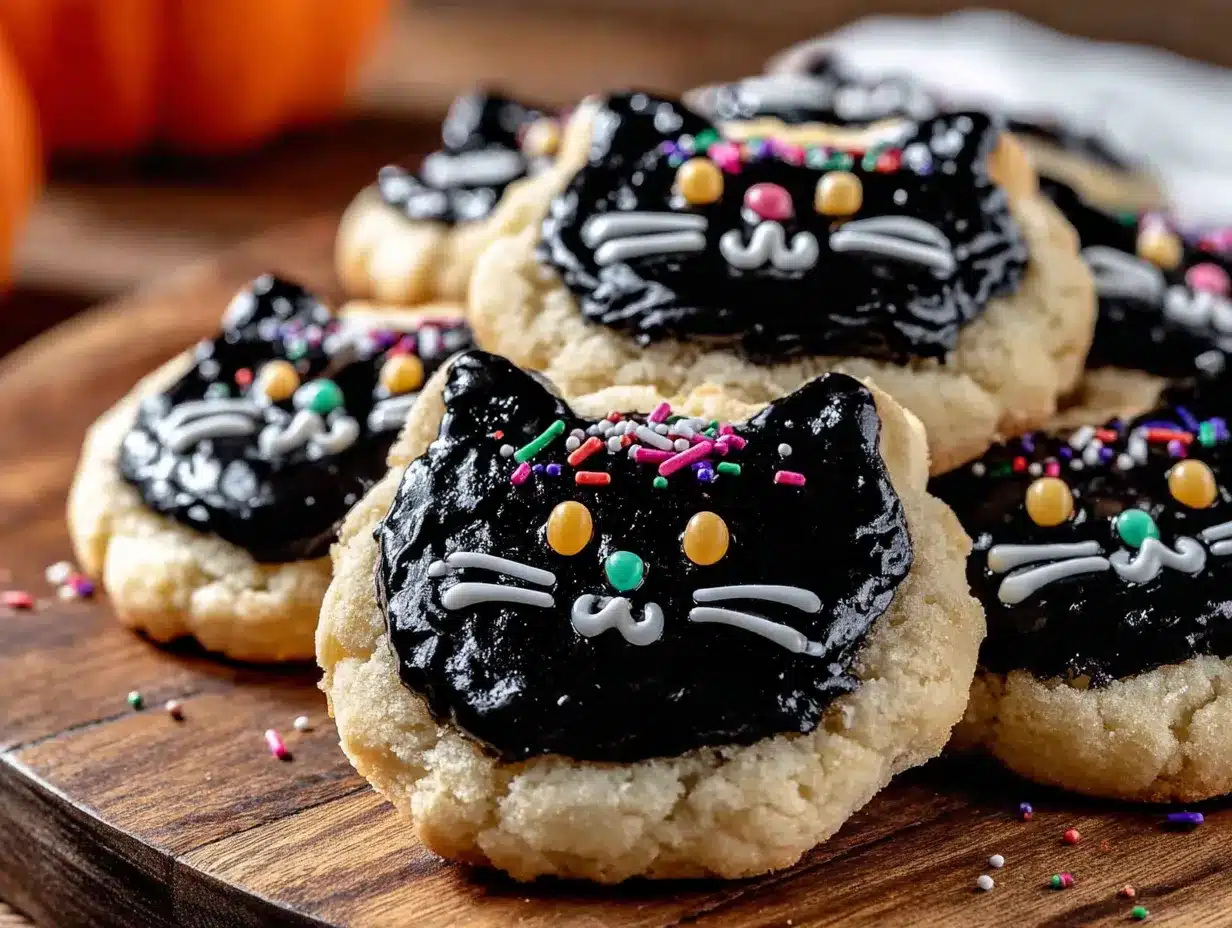
My neighbor Karen wasn’t trying to impress anyone. I’d stopped by to return her slow cooker on a random Tuesday afternoon, and the smell of vanilla and butter hit me before I even made it up her front steps. She had flour on her cheek and a cookie cutter shaped like a cat dangling from her fingers. “Oh, these are just for the kids’ Halloween party,” she said when I asked, shrugging like she was boiling pasta instead of creating the most adorable black cat cookies I’d ever seen.
Honestly, I stood there in her doorway for a solid minute just watching her work. She wasn’t fussing over details or checking a recipe on her phone. She just moved—dough, cutter, tray, oven—like she’d done it a hundred times before. And maybe she had. But for me, it was a revelation. I mean, I’d spent years buying those overpriced bakery cookies that look cute but taste like cardboard. Here she was, making something better with basic pantry ingredients and zero stress.
Karen let me take one warm from the oven, and let me tell you, that first bite was something else. The edges were just barely crisp, the center was soft, and the black cocoa gave it this deep, dark chocolate flavor that wasn’t too sweet. She’d piped on little orange eyes that made each cat look slightly different—some goofy, some fierce, all adorable. “My kids help decorate,” she said, wiping her hands on her apron. “That’s why they look a bit wonky.”
I left with a cookie in one hand and the recipe scribbled on a sticky note in the other. That was three Halloweens ago, and I’ve made these black cat cookies every October since. They’re the kind of recipe that doesn’t need fancy techniques or expensive ingredients—just a little time, some patience with frosting, and maybe a tiny helper or two. Maybe you’ve been there, staring at store-bought Halloween treats and thinking there has to be a better way. There is. And it starts with a cat-shaped cookie cutter and a stick of butter.
Why You’ll Love This Recipe
Let me tell you why these black cat cookies have become my go-to Halloween treat. First off, they’re genuinely easy to make, even if baking isn’t your strong suit. The dough comes together in one bowl, no electric mixer required, and it chills in just 30 minutes. That means you can whip up a batch after school pickup and still have cookies on the table before dinner.
- Kid-Friendly Fun: My own kids have been decorating these since they were three. The frosting is forgiving, the eyes are easy to pipe, and each cookie ends up looking unique. It’s messy in the best way possible.
- Simple Ingredients: You probably have most of this in your pantry right now. Butter, sugar, flour, eggs, vanilla, and black cocoa powder. No trips to a specialty baking store required.
- Perfect for Halloween Parties: Whether it’s a classroom celebration, a neighborhood gathering, or just a spooky movie night at home, these cookies fit right in. They’re cute without being overly complicated.
- Crowd-Pleaser: Kids love the cat shape and the chocolate flavor. Adults appreciate that they’re not cloyingly sweet. Everyone reaches for another one.
- Unbelievably Delicious: The black cocoa powder gives these cookies a rich, almost Oreo-like taste. The texture is soft in the center with slightly crisp edges. It’s comfort food disguised as a Halloween craft.
What makes these different from every other sugar cookie recipe you’ve seen? It’s the combination of black cocoa and a touch of espresso powder. That little bit of coffee doesn’t make them taste like coffee—it just deepens the chocolate flavor and makes the black color really pop. I tested this recipe six times before I got it right. The first batch was too dry. The second was too flat. But this version? This is the one that made Karen’s kids ask for seconds.
These cookies aren’t just good—they’re the kind that makes you close your eyes after the first bite. It’s Halloween fun without the stress, and that’s exactly what busy parents need.
What Ingredients You Will Need
This recipe uses simple, wholesome ingredients to deliver bold chocolate flavor and a soft, tender texture. Most of these are pantry staples, which means you can make these black cat cookies on a whim without a special trip to the store.
For the Cookie Dough
- 1 cup (226g) unsalted butter, softened — I use Kerrygold for its rich flavor, but any good-quality unsalted butter works. Let it sit out for 30 minutes before starting.
- 1 cup (200g) granulated sugar — Regular white sugar gives the cookies a nice structure. You can reduce it to 3/4 cup if you prefer less sweet cookies.
- 1 large egg, room temperature — Cold eggs can make the dough seize up. If you forgot to take it out early, place the egg in a bowl of warm water for 5 minutes.
- 1 teaspoon vanilla extract — Pure vanilla is best, but imitation works fine for baking. I’ve used both and honestly can’t tell the difference in the finished cookie.
- 2 cups (250g) all-purpose flour — Spoon and level your flour for the most accurate measurement. Scooping directly from the bag can pack in too much flour and make dry cookies.
- 1/2 cup (50g) black cocoa powder — This is the secret ingredient. Black cocoa has a deeper, darker color than regular cocoa and a milder chocolate flavor. I recommend Rodelle or King Arthur Flour brands. Regular Dutch-process cocoa works too, but the cookies won’t be as dark.
- 1/2 teaspoon baking powder — Helps the cookies spread just enough without puffing up too much.
- 1/4 teaspoon salt — Balances the sweetness and enhances the chocolate flavor. Fine sea salt is my preference.
- 1/2 teaspoon espresso powder (optional but recommended) — You won’t taste coffee, I promise. It just makes the chocolate taste more chocolatey. I use Medaglia d’Oro instant espresso.
For the Royal Icing
- 2 cups (240g) powdered sugar — Sift it first to avoid lumps. Trust me on this one.
- 2 tablespoons meringue powder — This gives the icing a nice structure and dries hard, which is perfect for stacking cookies. Wilton brand is widely available and reliable.
- 3-4 tablespoons water — Add slowly. You’re looking for a consistency that’s thick enough to hold its shape but thin enough to pipe smoothly.
- Orange gel food coloring — For the eyes. Americolor brand gives the most vibrant color without altering the icing consistency. Liquid food coloring will thin the icing too much.
- Black decorating gel or edible marker — For the pupils. You can also use a tiny bit of black icing.
If you’re making these with very young kids, consider skipping the royal icing and using store-bought black frosting with candy eyes instead. It’s faster and less messy. I’ve done both, and honestly, the kids don’t care which method you use—they just want to eat the cookies.
Equipment Needed
You don’t need a fully stocked bakery to make these black cat cookies. Here’s what you’ll actually use:
- Large mixing bowl — Any bowl works, but a wide one makes mixing easier. I use my grandmother’s old ceramic bowl, but a stainless steel one is fine.
- Hand mixer or stand mixer — You can mix by hand if you’re patient, but a mixer makes creaming the butter and sugar much faster. I’ve done both, and hand mixing works but takes about 5 extra minutes.
- Rolling pin — I prefer a wooden rolling pin with adjustable rings for even thickness. If you don’t have one, two wooden spoons placed on either side of the dough work as a makeshift guide.
- Cat-shaped cookie cutter — I found mine at a craft store for $3. Amazon has sets with multiple sizes. A 3-inch cutter is perfect for little hands.
- Baking sheets — Two standard half-sheet pans work well. Line them with parchment paper or silicone baking mats for easy cleanup.
- Piping bags or zip-top bags — For the royal icing. I use disposable piping bags with a #2 round tip for the eyes. A zip-top bag with a tiny corner snipped off works just as well.
- Cooling rack — Metal racks let air circulate so cookies cool evenly. If you don’t have one, a clean dish towel on the counter works in a pinch.
One tip: if you’re making these with kids, skip the fancy piping tips. Let them use small spoons or toothpicks to apply the icing. The cookies will look more rustic, but that’s part of the charm. My daughter’s first batch had cats with three eyes and lopsided smiles, and honestly, those were my favorites.
Preparation Method
Let me walk you through this step by step. I’ve made these black cat cookies more times than I can count, and these instructions include every trick I’ve learned along the way.
- Cream the butter and sugar. In a large mixing bowl, beat the softened butter and granulated sugar together until light and fluffy, about 2-3 minutes. You’re looking for a pale yellow color and a texture that looks like wet sand. Scrape down the sides of the bowl halfway through. If you’re mixing by hand, use a wooden spoon and some elbow grease—it’s a good arm workout.
- Add the egg and vanilla. Crack in the room-temperature egg and pour in the vanilla extract. Mix until just combined. Don’t overmix here, or the cookies can turn out tough. The mixture might look slightly curdled at this point—that’s normal, especially if your egg was a bit cold.
- Combine the dry ingredients. In a separate bowl, whisk together the flour, black cocoa powder, baking powder, salt, and espresso powder. This step aerates the flour and distributes the leavening evenly. I use a fork for this, but a whisk works too.
- Mix wet and dry together. Gradually add the dry ingredients to the wet mixture, mixing on low speed or stirring by hand. Stop as soon as the flour disappears. You’ll have a soft, slightly sticky dough that smells amazing. If it seems too sticky to handle, add one more tablespoon of flour.
- Chill the dough. Divide the dough in half, flatten each half into a disc about 1-inch thick, and wrap them tightly in plastic wrap. Refrigerate for at least 30 minutes, or up to 3 days. This step is non-negotiable—chilled dough is much easier to roll and cut without sticking. I once skipped this step and ended up with a sticky mess that required a spatula to peel off the counter.
- Preheat and prepare. Preheat your oven to 350°F (175°C). Line two baking sheets with parchment paper or silicone mats. Take one disc of dough out of the fridge and let it sit at room temperature for 5 minutes—this prevents cracking when you roll it.
- Roll and cut. On a lightly floured surface, roll the dough to 1/4-inch thickness. I aim for even thickness by pressing gently with my rolling pin and checking the edges. Dip your cat cookie cutter in flour before each cut to prevent sticking. Press straight down and lift—don’t twist the cutter, or the edges will seal and the cookies won’t spread evenly.
- Transfer to baking sheets. Use a thin spatula to move the cut cookies to your prepared baking sheets, spacing them about 2 inches apart. Gather the scraps, re-roll, and cut again. You should get about 24-30 cookies depending on your cutter size.
- Bake. Bake for 8-10 minutes. The cookies are done when the edges look set and the tops are slightly puffed. They won’t look fully baked—that’s intentional. Overbaked cookies are dry cookies. Let them cool on the baking sheet for 5 minutes, then transfer to a wire rack to cool completely. The cookies will firm up as they cool.
- Make the royal icing. While the cookies cool, whisk together the powdered sugar and meringue powder in a medium bowl. Add water one tablespoon at a time, stirring until the icing reaches a thick but pipeable consistency. It should hold a ribbon for a few seconds when you lift the whisk. Divide the icing into two bowls—leave most of it white, and color a small portion orange for the eyes.
- Pipe the eyes. Transfer the orange icing to a piping bag or zip-top bag with a tiny corner snipped off. Pipe two small oval shapes on each cookie for the eyes. Let the orange icing dry for about 15 minutes before adding the pupils.
- Add the pupils. Use black decorating gel or an edible marker to add a small dot in the center of each orange eye. This is where the cats get their personality. My son makes his cats look surprised with huge pupils. I prefer tiny dots that make them look mischievous.
- Let the icing set. Allow the decorated cookies to sit at room temperature for at least 1 hour so the icing hardens completely. This prevents smudging when you stack or store them.
One thing I learned the hard way: don’t rush the cooling process. If you pipe icing onto warm cookies, it will melt into a puddle. Ask me how I know. Just be patient—the cookies will be worth the wait.
Cooking Tips & Techniques
After making these black cat cookies for three Halloweens straight, I’ve collected a few tips that make the process smoother and the results better.
Get the dough consistency right. The dough should be soft but not sticky. If it sticks to your hands after chilling, dust your rolling surface and rolling pin with a little extra flour. If it cracks when you roll it, let it sit at room temperature for a few more minutes. I’ve had batches that were too dry because I measured the flour wrong—adding a teaspoon of milk fixed it right up.
Use a light touch with the cocoa powder. Black cocoa is more delicate than regular cocoa. If you pack it into your measuring cup, you’ll end up with dry dough. Spoon it lightly into the cup and level it off with a knife. This is one of those small details that makes a big difference.
Chill between batches. If you’re making multiple trays, keep the unused dough in the fridge. Warm dough spreads more in the oven, and you’ll end up with flat, shapeless cats instead of defined ones. I learned this after my second batch came out looking more like blobs than cats.
Test one cookie first. Before baking a whole tray, bake one test cookie to check your oven temperature and dough consistency. This sounds fussy, but it saves you from ruining an entire batch. If the test cookie spreads too much, chill the dough longer. If it doesn’t spread at all, your dough might be too dry.
Pipe eyes with confidence. The eyes don’t need to be perfect. In fact, uneven eyes give each cat its own personality. If you mess up, just wipe the icing off with a damp paper towel and try again before it dries. My first batch had some truly terrifying cats with mismatched eyes, and the kids loved them.
Plan your decorating time. I like to bake the cookies one day and decorate them the next. This breaks up the work and means I’m not rushing through either step. The cookies actually taste better after sitting overnight—the flavors meld together somehow.
Keep extras frozen. These cookies freeze beautifully. I always make a double batch and freeze half the undecorated cookies. Then, when Halloween sneaks up on me (which it always does), I just thaw, decorate, and go.
Variations & Adaptations
One of the best things about this black cat cookie recipe is how easy it is to adapt. Here are a few variations I’ve tried over the years.
Gluten-Free Version: Substitute the all-purpose flour with a 1:1 gluten-free baking flour blend. I’ve used Bob’s Red Mill and King Arthur Flour brands with good results. The cookies will be slightly more crumbly, so handle them gently. Add an extra tablespoon of butter to compensate for the dryness of gluten-free flour.
Vegan Adaptation: Use vegan butter sticks (not tub margarine) and a flax egg (1 tablespoon ground flaxseed mixed with 3 tablespoons water, let sit for 5 minutes). The texture won’t be exactly the same—slightly less tender—but they’re still delicious. My neighbor’s daughter is vegan, and I made these for her last year. She ate four in one sitting.
Different Shapes: Don’t limit yourself to cats. This dough works with any Halloween cookie cutter—pumpkins, ghosts, bats, or skulls. For pumpkins, skip the black cocoa and use regular cocoa powder with orange icing. For ghosts, leave the dough plain and use white icing. I’ve even made these into Christmas trees by swapping the black cocoa for matcha powder.
Flavor Twists: Add 1/2 teaspoon of peppermint extract for a chocolate mint version that tastes like a Thin Mint. Or swap the vanilla for almond extract for a nutty, marzipan-like flavor. My personal favorite is adding 1/4 cup of finely chopped dark chocolate to the dough for extra chocolate chunks.
No-Icing Option: If you’re short on time or patience, skip the royal icing entirely. Press candy eyes into the dough before baking, or use a toothpick to draw faces on the baked cookies with melted chocolate. It’s faster and less messy, and kids still love the result.
Spooky Spider Variation: Use a round cookie cutter instead of a cat shape. After baking, pipe eight legs onto each cookie with black icing and add a candy spider on top. My son’s class went crazy for these last year.
Serving & Storage Suggestions
These black cat cookies are best served at room temperature, which lets the icing harden and the cookie texture shine. Arrange them on a platter with some orange and black napkins for a festive Halloween display. I like to scatter a few candy corn around the plate for extra color—though honestly, the cookies are pretty enough on their own.
For a Halloween party, set up a cookie decorating station. Bake the cookies ahead of time, prepare the icing in squeeze bottles, and let guests decorate their own cats. It’s a fun activity that keeps kids entertained while adults chat. I did this for my daughter’s class party last year, and it was a huge hit—though some kids ended up with more icing on their faces than on the cookies.
Storage Tips:
- Store undecorated cookies in an airtight container at room temperature for up to 5 days. Layer them between sheets of parchment paper to prevent sticking.
- Decorated cookies need to be stored in a single layer or with wax paper between layers to protect the icing. They’ll keep for up to a week at room temperature.
- Freeze undecorated cookies for up to 3 months. Place them in a freezer-safe container with parchment between layers. Thaw at room temperature for 30 minutes before decorating.
- I don’t recommend freezing decorated cookies—the icing can get sticky and smudge when thawed.
One thing I’ve noticed: these cookies actually taste better on day two. The flavors mellow out and the texture softens slightly. So don’t worry if you need to make them a day or two ahead. In fact, I prefer it that way.
Nutritional Information & Benefits
Let’s be real—these are cookies, not health food. But they’re made with real ingredients, and that counts for something. Here’s the approximate nutritional breakdown per cookie (based on a 3-inch cutter and 28 cookies per batch):
- Calories: 145
- Total Fat: 8g
- Saturated Fat: 5g
- Carbohydrates: 18g
- Sugar: 11g
- Protein: 2g
- Fiber: 1g
The black cocoa powder in these cookies is actually a good source of antioxidants—more than regular cocoa, in fact. And since you’re making them from scratch, you control exactly what goes in. No preservatives, no artificial flavors, no mysterious ingredients you can’t pronounce. That’s something you can’t say about store-bought Halloween treats.
If you’re watching sugar intake, you can reduce the sugar to 3/4 cup without affecting the texture too much. The cookies won’t be quite as tender, but they’ll still taste good. I’ve done this for my own family, and honestly, no one noticed the difference.
These cookies are not gluten-free, vegan, or dairy-free as written, but I’ve included adaptation notes above for those who need them. They do contain eggs and dairy, so keep that in mind if you’re baking for someone with allergies.
Conclusion
These black cat cookies have become a Halloween tradition in my house, and I hope they become one in yours too. They’re the kind of recipe that brings people together—kids and adults, experienced bakers and complete beginners. There’s something special about gathering around the kitchen counter with flour on your hands and a cookie cutter in your grip, creating something that’s as fun to make as it is to eat.
I love that this recipe doesn’t take itself too seriously. The cats don’t have to be perfect. The eyes can be lopsided. The icing can be messy. That’s the whole point. Halloween should be fun, not stressful, and these cookies embody that spirit perfectly.
So go ahead—preheat your oven, dust off that cat cookie cutter, and get baking. Your kids will remember the messy kitchen and the silly faces more than they’ll remember perfectly piped icing. And when you take that first bite of a warm, chocolatey cat cookie, you’ll understand why Karen was so casual about it. Some recipes are just meant to be shared without fuss.
I’d love to hear how yours turn out! Drop a comment below with your decorating creations, or tag me in your photos on social media. Did your kids come up with their own cat personalities? Did you try a variation I haven’t thought of? Let me know—I’m always looking for new ideas to try.
Frequently Asked Questions
Can I make the dough ahead of time?
Absolutely. The dough can be refrigerated for up to 3 days or frozen for up to 3 months. Just wrap it tightly in plastic wrap and then in foil. Thaw frozen dough in the refrigerator overnight before rolling.
Why did my cookies spread too much?
This usually happens when the dough isn’t chilled enough or the butter was too soft. Make sure you chill the dough for at least 30 minutes, and if your kitchen is warm, pop the cut cookies in the fridge for 10 minutes before baking.
Can I use regular cocoa powder instead of black cocoa?
Yes, but the cookies won’t be as dark. Use Dutch-process cocoa for a deeper color, or add a drop of black gel food coloring to the dough. Regular natural cocoa will give you more of a brown cat, which is still cute for Halloween.
How do I get the icing to dry faster?
Set up a fan nearby to circulate air around the cookies. You can also place them in a warm, dry spot away from steam or humidity. Avoid the refrigerator—condensation will make the icing sticky.
My cookies turned out dry. What went wrong?
Most likely, you overbaked them or added too much flour. Next time, pull them out of the oven when the edges are just set—they’ll continue baking on the hot sheet. Also, spoon and level your flour instead of scooping it directly from the bag.
Pin This Recipe!

Easy Black Cat Sugar Cookies for Halloween Fun

These adorable black cat sugar cookies are made with black cocoa for a rich, Oreo-like flavor and decorated with orange royal icing eyes. They’re easy to make, kid-friendly, and perfect for Halloween parties or spooky movie nights.
- Prep Time: 30 minutes
- Cook Time: 10 minutes
- Total Time: 1 hour 40 minutes
- Yield: 24-30 cookies 1x
- Category: Dessert
- Cuisine: American
Ingredients
- 1 cup (226g) unsalted butter, softened
- 1 cup (200g) granulated sugar
- 1 large egg, room temperature
- 1 teaspoon vanilla extract
- 2 cups (250g) all-purpose flour
- 1/2 cup (50g) black cocoa powder
- 1/2 teaspoon baking powder
- 1/4 teaspoon salt
- 1/2 teaspoon espresso powder (optional but recommended)
- 2 cups (240g) powdered sugar
- 2 tablespoons meringue powder
- 3–4 tablespoons water
- Orange gel food coloring
- Black decorating gel or edible marker
Instructions
- Cream the butter and sugar together until light and fluffy, about 2-3 minutes.
- Add the egg and vanilla; mix until just combined.
- In a separate bowl, whisk together flour, black cocoa powder, baking powder, salt, and espresso powder.
- Gradually add dry ingredients to wet mixture, mixing until just combined. Dough will be soft and slightly sticky.
- Divide dough in half, flatten into discs, wrap in plastic, and refrigerate for at least 30 minutes.
- Preheat oven to 350°F (175°C). Line baking sheets with parchment paper.
- On a lightly floured surface, roll dough to 1/4-inch thickness. Cut with a cat-shaped cookie cutter.
- Place cookies 2 inches apart on prepared baking sheets. Bake for 8-10 minutes until edges are set.
- Cool on baking sheet for 5 minutes, then transfer to a wire rack to cool completely.
- Make royal icing: whisk powdered sugar and meringue powder; add water 1 tablespoon at a time until thick but pipeable. Divide and color a portion orange.
- Pipe orange eyes onto cooled cookies. Let dry 15 minutes.
- Add black pupils with decorating gel or edible marker. Let icing set for 1 hour.
Notes
Chill dough thoroughly to prevent spreading. For best flavor, bake cookies one day and decorate the next. Cookies can be frozen undecorated for up to 3 months.
Nutrition
- Serving Size: 1 cookie
- Calories: 145
- Sugar: 11
- Sodium: 50
- Fat: 8
- Saturated Fat: 5
- Carbohydrates: 18
- Fiber: 1
- Protein: 2
Keywords: black cat cookies, Halloween cookies, sugar cookies, black cocoa cookies, easy Halloween treats, kid-friendly baking


