Introduction
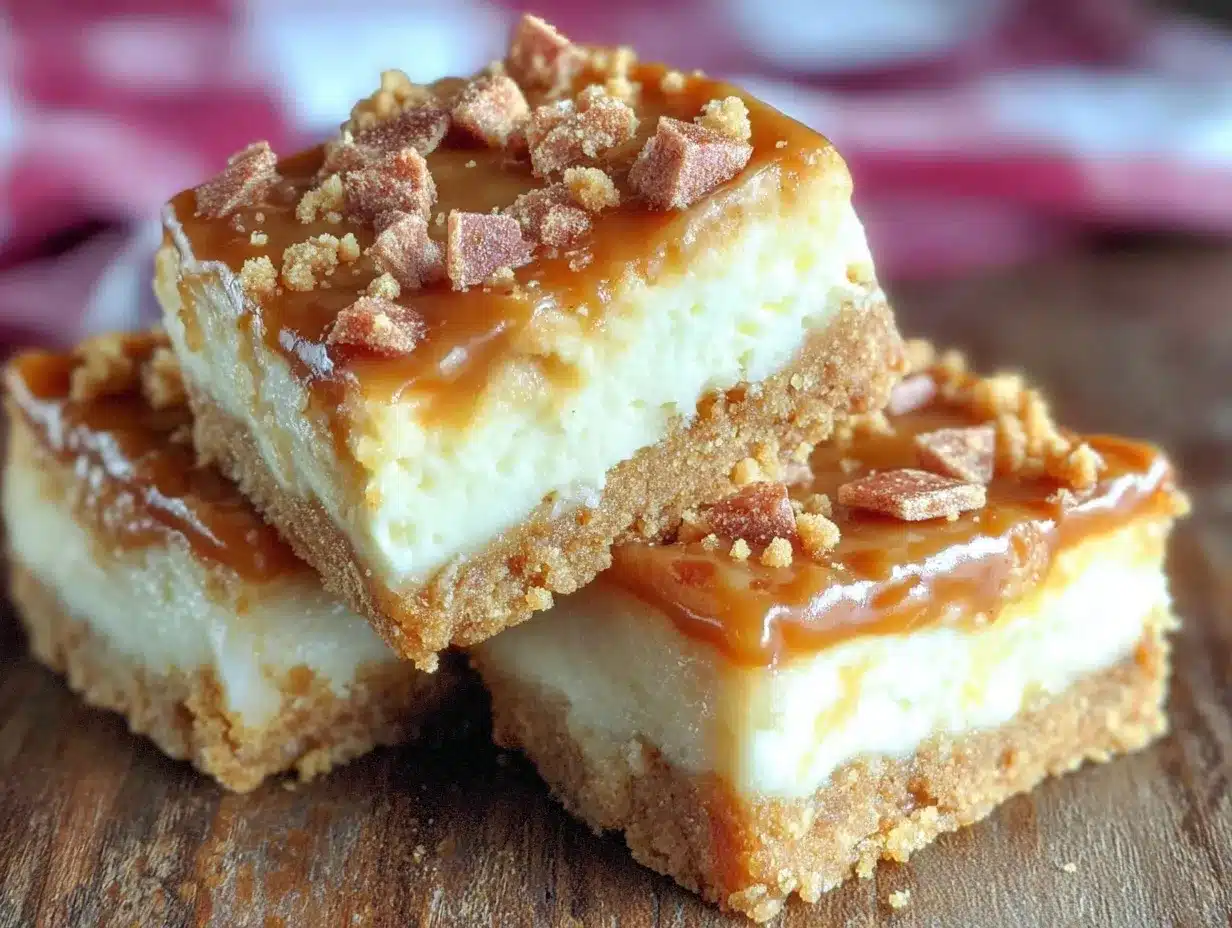
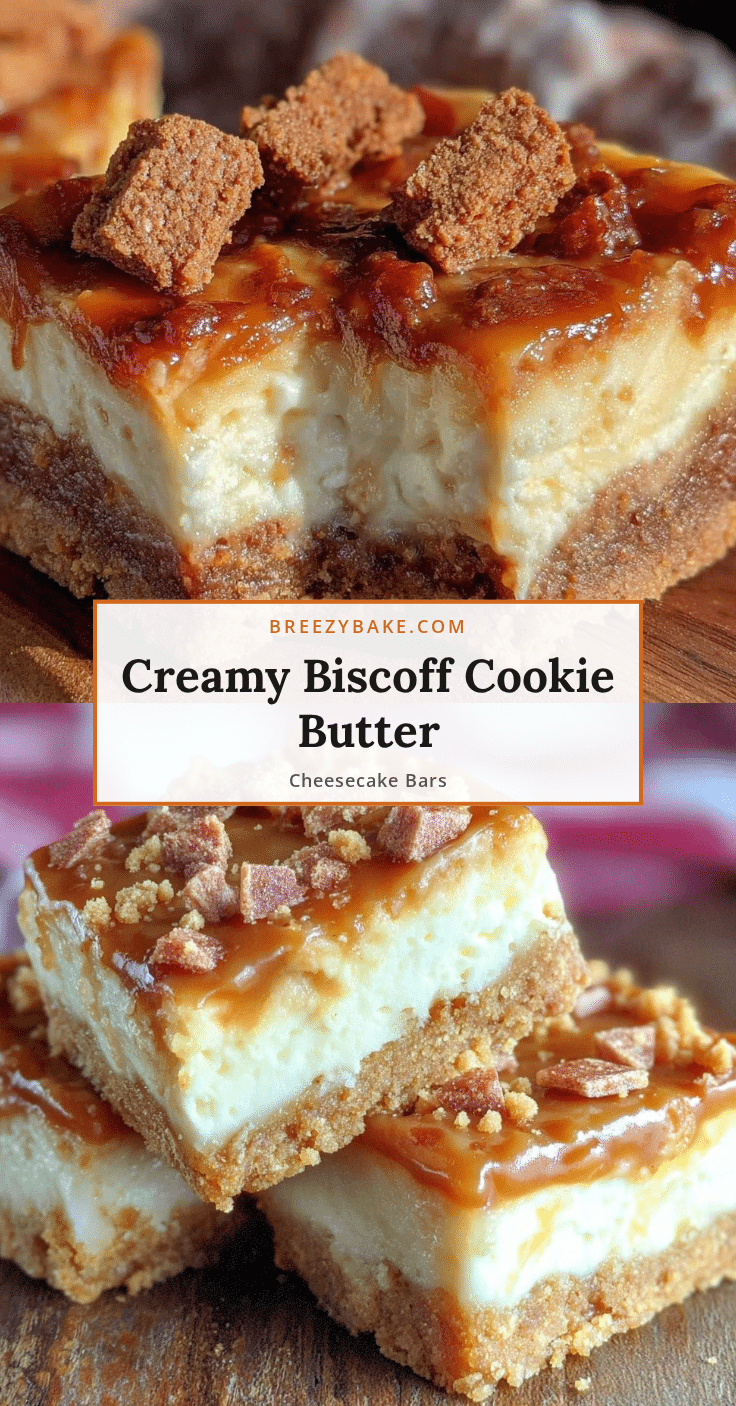
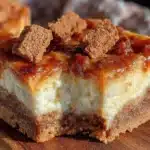
Let me tell you, the scent of warm Biscoff cookie butter melting into rich, creamy cheesecake is enough to make anyone’s mouth water. The first time I baked these Creamy Biscoff Cookie Butter Cheesecake Bars, I was instantly hooked. It was one of those rare baking moments where you pause, take a deep breath, and just smile because you know you’re onto something truly special. I remember when I was knee-high to a grasshopper, my grandma used to whip up the most indulgent desserts, but nothing quite matched the magic of these bars.
Years ago, I stumbled upon Biscoff cookie butter at a local market and thought, “What if I combined this with cheesecake?” The result was dangerously easy and delivered pure, nostalgic comfort in every bite. Honestly, my family couldn’t stop sneaking them off the cooling rack (and I can’t really blame them). Whether you’re a dessert fanatic or just looking to brighten up your Pinterest cookie board, these cheesecake bars are perfect for potlucks, sweet treats for your kids, or an indulgent afternoon pick-me-up.
I’ve baked this recipe countless times in the name of research, of course, and it’s become a staple for family gatherings, gifting, and those moments when you just need a warm hug in dessert form. Trust me, you’re going to want to bookmark this one.
Why You’ll Love This Recipe
From my kitchen trials to family-approved taste tests, here’s why these Creamy Biscoff Cookie Butter Cheesecake Bars stand out:
- Quick & Easy: Comes together in under 45 minutes, perfect for busy weeknights or last-minute cravings.
- Simple Ingredients: No fancy grocery trips needed; you likely already have everything in your pantry.
- Perfect for Any Occasion: Great for brunch, potlucks, cozy dinners, or holiday mornings.
- Crowd-Pleaser: Always gets rave reviews from kids and adults alike—seriously, no leftovers.
- Unbelievably Delicious: The perfect balance of silky cheesecake and the caramelized, spiced flavor of Biscoff cookie butter makes for next-level comfort food.
This isn’t just another cheesecake bar recipe. The secret is in blending the Biscoff cookie butter directly into the cheesecake batter, creating an ultra-smooth, melt-in-your-mouth texture. The crust also gets a unique twist by using crushed Biscoff cookies instead of traditional graham crackers, which gives the whole bar an irresistible depth of flavor. Honestly, this recipe feels like dessert reimagined—faster, simpler, but with all the soul-soothing satisfaction you crave.
Whether you want to impress guests without stress or just treat yourself to something memorable, these bars are pure gold.
What Ingredients You Will Need
This recipe uses simple, wholesome ingredients to deliver bold flavor and satisfying texture without the fuss. Most ingredients are pantry staples, and substitutions are easy if needed.
- For the crust:
- 1 ½ cups Biscoff cookies, finely crushed (I recommend Lotus brand for the authentic flavor)
- 5 tablespoons unsalted butter, melted (adds richness and binds the crust)
- 2 tablespoons granulated sugar
- For the cheesecake filling:
- 16 oz (450g) cream cheese, softened (use full-fat for best texture)
- ¾ cup Biscoff cookie butter (smooth, room temperature)
- ½ cup granulated sugar
- 2 large eggs, room temperature
- 1 teaspoon pure vanilla extract
- ¼ cup sour cream (adds extra creaminess)
- Optional topping:
- 2 tablespoons Biscoff cookie butter, melted (for drizzling)
- Crushed Biscoff cookies or chopped nuts (for garnish)
Substitution tips: Use dairy-free cream cheese and coconut yogurt instead of sour cream for a vegan-friendly version. Almond flour or gluten-free cookie crumbs work well for a gluten-free crust. If you can’t find Biscoff cookie butter, peanut butter or speculoos spread can be interesting alternatives, but the signature flavor won’t be quite the same.
Equipment Needed
- 8×8-inch (20×20 cm) square baking pan – I like using one with removable sides to make slicing easier.
- Mixing bowls – at least two, one for crust and one for filling.
- Electric mixer or stand mixer – to beat the cream cheese smooth and creamy.
- Food processor or strong zip-top bag and rolling pin – to crush the cookies finely.
- Rubber spatula – essential for scraping down the bowl to avoid lumps.
- Measuring cups and spoons – for precision.
- Oven thermometer (optional) – to double-check baking temperature if your oven is tricky.
If you don’t have a food processor, just toss the cookies in a sturdy plastic bag and crush them with a rolling pin or heavy pan. I’ve used both methods, and while the processor is quicker, the bag method works just fine in a pinch. And if you’re on a budget, a hand mixer will get the job done instead of a stand mixer.
Preparation Method
- Preheat your oven to 325°F (163°C). Line your 8×8-inch pan with parchment paper, leaving some overhang on the sides for easy removal later. This little step saves a lot of scrapping later!
- Make the crust: In a medium bowl, combine crushed Biscoff cookies, melted butter, and sugar. Stir until crumbs are evenly coated and resemble wet sand. Press this mixture firmly into the bottom of the prepared pan, creating an even layer. Use the bottom of a glass or measuring cup to compact it well. Bake for 10 minutes, then set aside to cool slightly while you prepare the filling.
- Prepare the cheesecake filling: In a large bowl, beat softened cream cheese with an electric mixer on medium speed until smooth and creamy, about 2-3 minutes. Add the granulated sugar and beat again until light and fluffy.
- Mix in the Biscoff cookie butter and vanilla extract until fully combined. You want it silky smooth here, so don’t rush this part.
- Add eggs one at a time, beating just until combined after each addition. Overbeating can cause cracks, so be gentle!
- Fold in the sour cream using a spatula, ensuring the batter is well mixed but not overworked.
- Assemble and bake: Pour the cheesecake filling over the warm crust, smoothing the top with your spatula. Bake for 35-40 minutes, or until the edges are set but the center still jiggles slightly when you gently shake the pan.
- Turn off the oven and leave the bars inside with the door slightly ajar for 30 minutes. This helps prevent cracks by cooling them gradually.
- Remove from the oven and chill in the refrigerator for at least 4 hours, preferably overnight. This step is key for that creamy, sliceable texture.
- Optional finishing: Before serving, warm the remaining Biscoff cookie butter slightly and drizzle it over the bars. Sprinkle crushed cookies or chopped nuts on top for extra crunch.
Pro tip: If your cream cheese isn’t fully softened, it will make lumps in the batter. I usually take it out of the fridge a few hours ahead or zap it in short bursts in the microwave. Also, keep an eye on the baking time because ovens vary. The gentle jiggle in the center is your best indicator—the bars will firm up as they chill.
Cooking Tips & Techniques
When making cheesecake bars, patience is your best friend. Overmixing the batter introduces air bubbles that can cause cracks, so mix just until ingredients are combined. I learned this the hard way after my first batch looked more like a cracked desert than a creamy treat.
Using room temperature eggs is another trick that makes a big difference in texture. Cold eggs can cause the batter to seize or become lumpy, which nobody wants.
Pressing the crust firmly ensures it holds together when you cut the bars. I like to press it down with the bottom of a glass—simple but effective. Also, consider lining your pan with parchment paper with a good overhang; it makes lifting the bars out so much easier than trying to dig them out with a spatula.
Finally, the slow cooling trick (letting the bars sit in the turned-off oven) is a game-changer. I skipped this step once, and my cheesecake cracked like crazy. Since then, I never bake without it. It helps the dessert settle gently, keeping it smooth and beautiful.
If you want perfectly even slices, chill your bars well and use a sharp knife warmed under hot water before slicing. Wipe the knife clean between cuts for neat edges.
Variations & Adaptations
Here are some delicious ways to switch up your Creamy Biscoff Cookie Butter Cheesecake Bars:
- Chocolate swirl: Drop dollops of melted dark or milk chocolate on the batter before baking, then swirl gently with a toothpick for a marbled effect.
- Vegan version: Use vegan cream cheese, coconut yogurt for sour cream, and flax eggs instead of regular eggs. The crust can be made with vegan cookies and coconut oil instead of butter.
- Seasonal fruit twist: Add a layer of thinly sliced pears or apples on top of the crust before pouring the cheesecake batter. The fruit caramelizes beautifully during baking.
- Nutty upgrade: Mix chopped toasted pecans or walnuts into the crust or sprinkle on top for extra crunch and flavor.
I once tried a version with a salted caramel drizzle on top, which was dangerously good—sweet and salty is always a winner in my book. Feel free to experiment with spices too; a pinch of cinnamon or nutmeg in the crust can add a cozy warmth that complements the Biscoff flavor perfectly.
Serving & Storage Suggestions
Serve these cheesecake bars chilled or at room temperature, depending on your preference. They’re perfect on their own or paired with a dollop of whipped cream or a scoop of vanilla ice cream for an indulgent treat. Coffee or a lightly spiced chai latte makes a lovely beverage to accompany these bars, especially on a chilly afternoon.
Store leftover bars in an airtight container in the refrigerator for up to 5 days. If you want to keep them longer, wrap them tightly in plastic wrap and freeze for up to 2 months. When ready to eat, thaw overnight in the fridge.
Reheating isn’t generally recommended since cheesecake is best cold or at room temperature, but if you do warm them slightly, do so in short bursts in the microwave to avoid melting the texture.
Fun fact: These bars actually taste even better the next day, as the Biscoff cookie butter flavors meld beautifully overnight. So, if you can wait, give yourself that sweet reward!
Nutritional Information & Benefits
Each serving of these Creamy Biscoff Cookie Butter Cheesecake Bars contains approximately 350 calories, 22 grams of fat, 30 grams of carbohydrates, and 5 grams of protein. Keep in mind, these numbers can vary slightly based on ingredient brands and portion sizes.
The cream cheese provides a good source of calcium and protein, while the Biscoff cookie butter adds a unique caramelized flavor and some iron. This recipe is not gluten-free by default due to the cookie crust but can easily be adapted with gluten-free cookies. It’s also vegetarian-friendly.
I personally appreciate this dessert as a treat that balances indulgence with familiar, wholesome ingredients—no artificial additives or preservatives. It’s a nice way to enjoy a rich dessert while knowing exactly what’s inside.
Conclusion
So there you have it—your go-to recipe for Creamy Biscoff Cookie Butter Cheesecake Bars that are as easy as they are irresistible. This recipe offers a perfect blend of creamy texture and spiced caramel flavor that’s sure to impress your family, friends, or just your sweet tooth.
Feel free to customize with your favorite toppings or mix-ins. Honestly, I love this recipe because it always brings a smile to the table and disappears way too fast. Please let me know how your bars turn out, or share your own twists—I’m always eager to hear your delicious adaptations!
Don’t forget to bookmark this one, share it with fellow dessert lovers, and come back for more easy, crowd-pleasing recipes. Happy baking and enjoy every luscious bite!
FAQs
Can I make these cheesecake bars ahead of time?
Absolutely! They taste even better after chilling overnight. Just store them covered in the fridge.
What if I don’t have Biscoff cookie butter?
You can substitute peanut butter or speculoos spread, but the classic Biscoff flavor is pretty unique and worth seeking out.
Can I freeze the cheesecake bars?
Yes, wrap them tightly and freeze for up to 2 months. Thaw overnight in the fridge before serving.
How do I prevent cracks in my cheesecake bars?
Don’t overmix the batter, use room temperature eggs, and let the bars cool slowly in the oven with the door ajar after baking.
Are these bars gluten-free?
Not with traditional Biscoff cookies, but you can use gluten-free cookies for the crust to make a gluten-free version.
Pin This Recipe!
Creamy Biscoff Cookie Butter Cheesecake Bars
These cheesecake bars combine the rich, creamy texture of cheesecake with the caramelized, spiced flavor of Biscoff cookie butter, creating an easy and indulgent dessert perfect for any occasion.
- Prep Time: 15 minutes
- Cook Time: 50 minutes
- Total Time: 5 hours 5 minutes
- Yield: 16 bars 1x
- Category: Dessert
- Cuisine: American
Ingredients
- 1 ½ cups Biscoff cookies, finely crushed
- 5 tablespoons unsalted butter, melted
- 2 tablespoons granulated sugar
- 16 oz (450g) cream cheese, softened
- ¾ cup Biscoff cookie butter (smooth, room temperature)
- ½ cup granulated sugar
- 2 large eggs, room temperature
- 1 teaspoon pure vanilla extract
- ¼ cup sour cream
- Optional topping: 2 tablespoons Biscoff cookie butter, melted (for drizzling)
- Optional topping: Crushed Biscoff cookies or chopped nuts (for garnish)
Instructions
- Preheat your oven to 325°F (163°C). Line your 8×8-inch pan with parchment paper, leaving some overhang on the sides for easy removal later.
- Make the crust: In a medium bowl, combine crushed Biscoff cookies, melted butter, and sugar. Stir until crumbs are evenly coated and resemble wet sand. Press this mixture firmly into the bottom of the prepared pan, creating an even layer. Use the bottom of a glass or measuring cup to compact it well. Bake for 10 minutes, then set aside to cool slightly while you prepare the filling.
- Prepare the cheesecake filling: In a large bowl, beat softened cream cheese with an electric mixer on medium speed until smooth and creamy, about 2-3 minutes. Add the granulated sugar and beat again until light and fluffy.
- Mix in the Biscoff cookie butter and vanilla extract until fully combined.
- Add eggs one at a time, beating just until combined after each addition. Be gentle to avoid overbeating.
- Fold in the sour cream using a spatula, ensuring the batter is well mixed but not overworked.
- Pour the cheesecake filling over the warm crust, smoothing the top with your spatula. Bake for 35-40 minutes, or until the edges are set but the center still jiggles slightly when you gently shake the pan.
- Turn off the oven and leave the bars inside with the door slightly ajar for 30 minutes to cool gradually.
- Remove from the oven and chill in the refrigerator for at least 4 hours, preferably overnight.
- Optional finishing: Before serving, warm the remaining Biscoff cookie butter slightly and drizzle it over the bars. Sprinkle crushed cookies or chopped nuts on top for extra crunch.
Notes
Use room temperature cream cheese and eggs for best texture. Avoid overmixing the batter to prevent cracks. Press crust firmly and line pan with parchment paper with overhang for easy removal. Cool bars slowly in the oven with door ajar to prevent cracking. Chill bars at least 4 hours or overnight for best sliceability. Warm knife before slicing for clean edges.
Nutrition
- Serving Size: 1 bar (1/16th of the
- Calories: 350
- Fat: 22
- Carbohydrates: 30
- Protein: 5
Keywords: Biscoff, cheesecake bars, cookie butter, dessert, easy cheesecake, creamy cheesecake, Biscoff cookie butter, no crack cheesecake, dessert bars