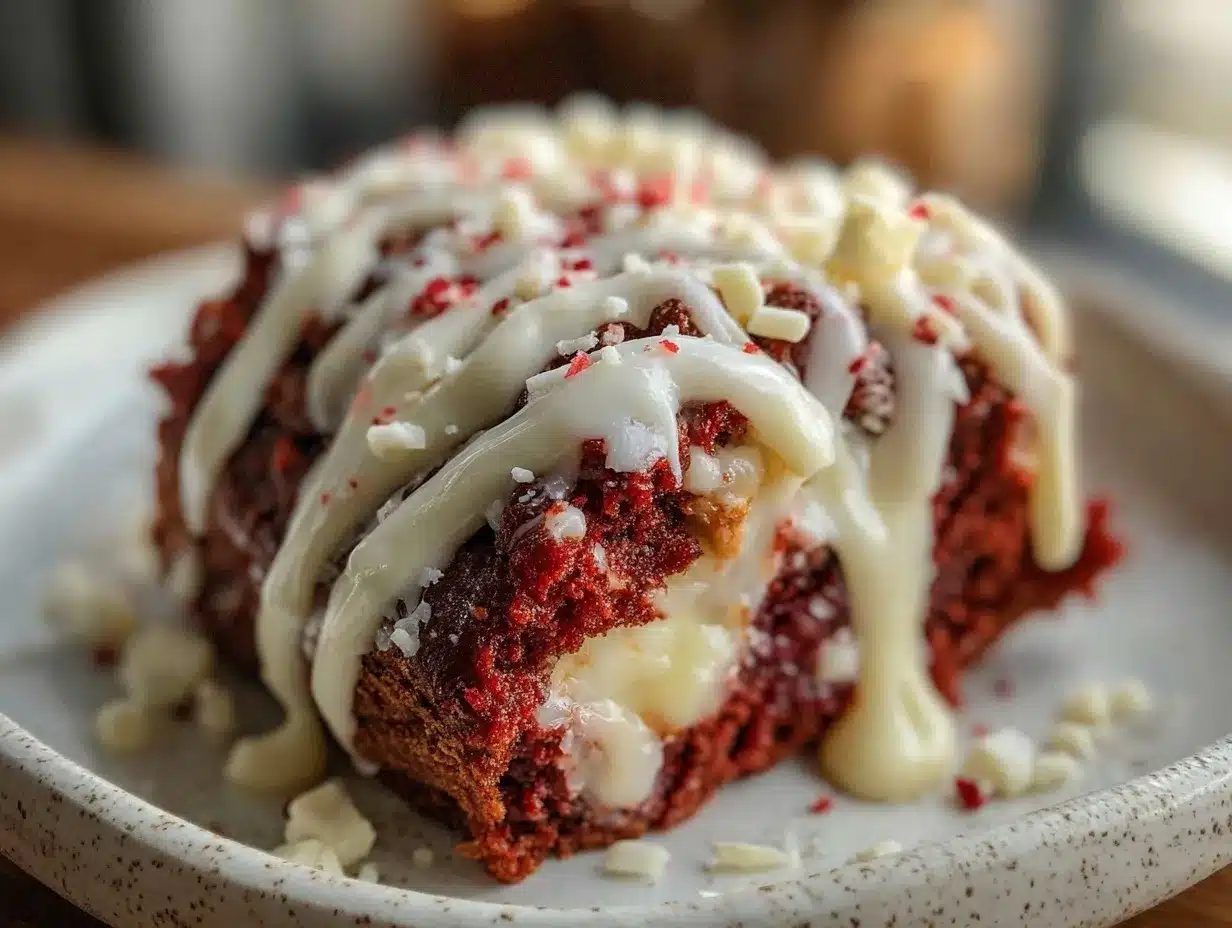
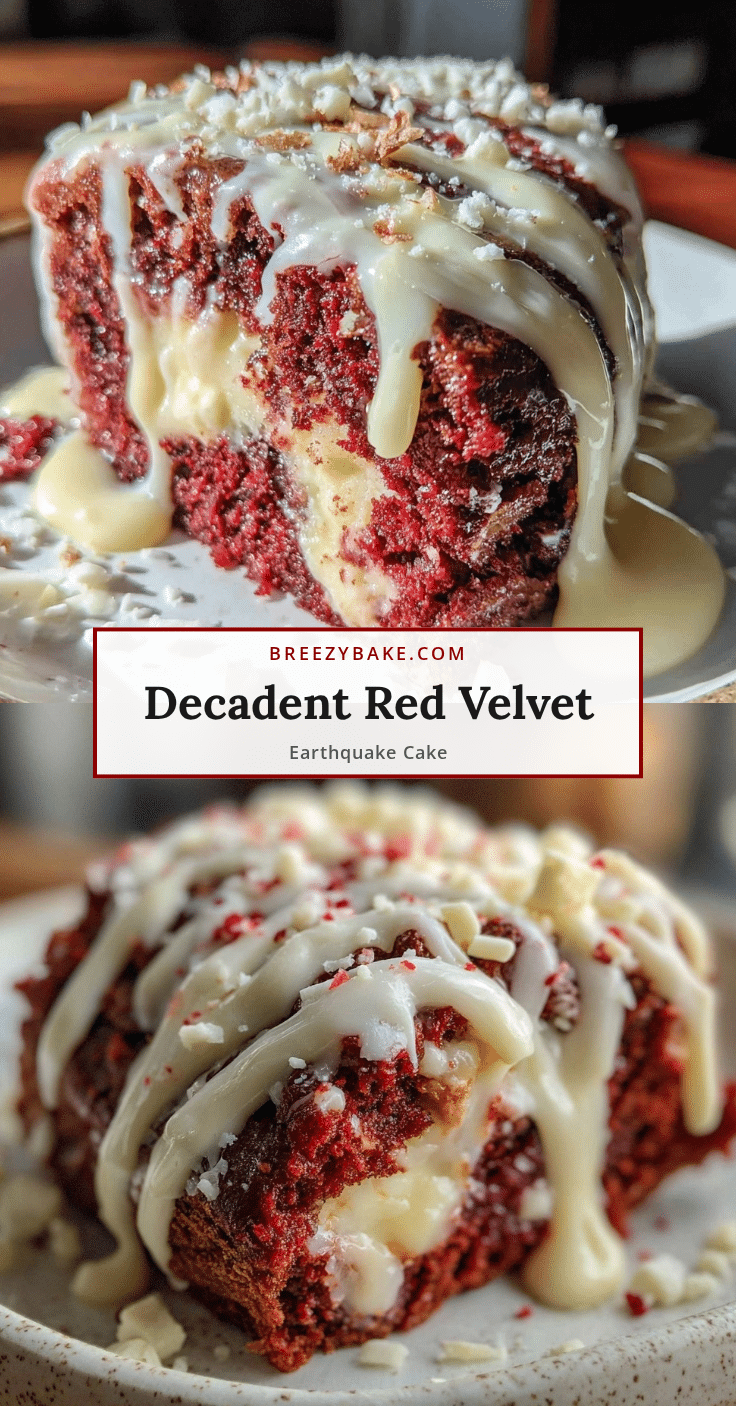
“You sure this is going to work?” I asked, glancing skeptically at the lumpy mound of batter in the bowl. Honestly, I wasn’t expecting much when I first tried making this Decadent Red Velvet Earthquake Cake with White Chocolate Drizzle. It started as a last-minute plan to surprise a few friends when I realized I was out of my usual cake mix. The idea was simple: throw together a red velvet cake batter, drop dollops of cream cheese filling on top, and let it bake into a beautiful, cracked masterpiece. What I got was this wildly dramatic, cracked, gooey cake that looked like it survived an earthquake — hence the name. But the real kicker? That silky white chocolate drizzle that I lazily melted and poured on top, which somehow brought it all together.
That first bite was a revelation. The cake was dense yet tender, with pockets of sweet cream cheese swirling through, and the drizzle added a touch of creamy sweetness that felt just right. I kept thinking, “Why hadn’t I made this before?” It quickly became my go-to for unexpected guests or when I needed a dessert that felt fancy but took almost no effort. This cake has this cozy, indulgent vibe that makes you want to slow down and savor the moment — perfect for those times when life’s a bit chaotic, and you need a delicious pause.
Since then, I’ve made this red velvet earthquake cake more times than I can count — sometimes swapping out toppings, sometimes adding a little flair — but always keeping that white chocolate drizzle because it’s just that good. If you’re curious about a dessert that’s both show-stopping and surprisingly easy to pull off, this recipe is for you. It’s one of those recipes that feels like a secret weapon in the kitchen, quietly waiting to impress.
Why You’ll Love This Recipe
Honestly, this Decadent Red Velvet Earthquake Cake with White Chocolate Drizzle checks all the boxes for a dessert that feels like a treat but comes together without drama. Here’s why I keep coming back to it:
- Quick & Easy: You can get this cake from mixing bowl to oven in about 15 minutes, making it perfect for those nights when you want something special without fuss.
- Simple Ingredients: No tricky or obscure items here — just pantry basics and a few staples you likely have on hand.
- Perfect for Any Occasion: Whether it’s a birthday, a casual get-together, or a cozy night in, this cake fits effortlessly.
- Crowd-Pleaser: The rich red velvet flavor combined with the creamy swirls always gets people asking for seconds.
- Unbelievably Delicious: The texture is just right — moist and dense but not heavy, with the white chocolate drizzle adding a smooth, sweet finish that’s irresistible.
What makes this recipe stand out is the way the cream cheese filling creates these molten pockets within the cake, almost like a lava cake but with the classic charm of red velvet. Plus, the white chocolate drizzle isn’t just a pretty topping — it balances the tanginess of the cream cheese with a mellow sweetness that makes every bite feel indulgent but not overwhelming. I’ve tried other red velvet cakes before, but this one has a kind of rustic elegance that feels both homemade and special.
It’s also great for when you want to put together a dessert that feels impressive without the stress. I often think back to when I first realized how easy it was to make this cake — it’s like a little win in the kitchen that makes you want to share it with everyone. And if you love desserts with a bit of drama and a lot of flavor, this is going to fit right in. In fact, if you appreciate sweets that blend texture and flavor in unexpected ways, you might also enjoy the Creamy Pink Strawberry Crème Puff Bars or the Decadent Chocolate Covered Strawberry Ice Cream Mousse Cups I’ve shared before.
What Ingredients You Will Need
This Decadent Red Velvet Earthquake Cake with White Chocolate Drizzle relies on straightforward ingredients that come together to create a bold, luscious dessert without complicated steps. Everything can be found easily, and I’ve included simple swaps where you might want to customize.
- For the Red Velvet Cake Batter:
- All-purpose flour – 2 ½ cups (300g), sifted for a light texture
- Granulated sugar – 2 cups (400g) for sweetness
- Unsweetened cocoa powder – 2 tablespoons (15g), preferably Dutch-processed for a deep color
- Baking soda – 1 teaspoon (5g), to help the cake rise
- Salt – ½ teaspoon (3g), balances the flavors
- Buttermilk – 1 cup (240ml), room temperature (you can substitute with milk + 1 tablespoon vinegar if needed)
- Vegetable oil – 1 cup (240ml), adds moisture (I like using canola oil for neutral flavor)
- Large eggs – 2, room temperature
- Red food coloring – 2 tablespoons (30ml), gel type works best for vivid color without thinning the batter
- Vanilla extract – 1 teaspoon (5ml), for warm aroma
- White distilled vinegar – 1 teaspoon (5ml), reacts with baking soda for lift
- For the Cream Cheese Filling:
- Cream cheese – 8 oz (225g), softened (I recommend Philadelphia for the best texture)
- Granulated sugar – ⅓ cup (65g)
- Large egg – 1
- Vanilla extract – ½ teaspoon (2.5ml)
- For the White Chocolate Drizzle:
- White chocolate chips or chopped white chocolate – 1 cup (170g), good quality like Ghirardelli for smooth melt
- Heavy cream – 2 tablespoons (30ml), to thin out the drizzle (optional but recommended)
In summer, I sometimes swap traditional buttermilk with a yogurt-based alternative for a tangier profile. If you’re looking to make this gluten-free, almond flour can be tried but expect a denser texture. For dairy-free options, substitute cream cheese and heavy cream with coconut-based products — it changes the vibe a bit but still tasty. These ingredients are pantry-friendly, and honestly, the cream cheese filling is what turns this cake from ordinary to spectacular.
Equipment Needed
- 9×13 inch (23×33 cm) baking pan – I find glass pans work well for even baking, but metal pans are fine too.
- Mixing bowls – at least two, one for the cake batter and one for the cream cheese filling.
- Electric mixer or stand mixer – helps to get the cream cheese filling silky smooth and the batter well combined.
- Measuring cups and spoons – precise measurement makes a big difference in baking.
- Whisk and spatula – for mixing and folding ingredients gently.
- Microwave-safe bowl or double boiler – for melting white chocolate for the drizzle.
- Cooling rack – to let the cake cool evenly before drizzling.
If you don’t have a stand mixer, an electric hand mixer works just as well for the cream cheese filling. When melting white chocolate, patience is key — use low heat or short bursts in the microwave to avoid burning. I once scorched a batch by rushing this step, so take your time! Glass pans sometimes need a bit more baking time than metal, so keep an eye on that.
Preparation Method
- Preheat your oven to 350°F (175°C). Grease your 9×13 inch (23×33 cm) pan with butter or non-stick spray and lightly dust with flour to prevent sticking.
- Mix the dry ingredients: In a large bowl, sift together 2 ½ cups (300g) all-purpose flour, 2 cups (400g) sugar, 2 tablespoons (15g) cocoa powder, 1 teaspoon (5g) baking soda, and ½ teaspoon (3g) salt. Set aside.
- Combine wet ingredients: In another bowl, whisk 1 cup (240ml) buttermilk, 1 cup (240ml) vegetable oil, 2 large eggs, 2 tablespoons (30ml) red food coloring, 1 teaspoon (5ml) vanilla extract, and 1 teaspoon (5ml) white vinegar until smooth. The batter will be bright and vibrant.
- Blend wet and dry: Slowly add the dry ingredients to the wet mixture, stirring gently until just combined. Be careful not to overmix — a few lumps are okay. The batter should be smooth and thick with a rich red color.
- Prepare cream cheese filling: In a medium bowl, beat 8 oz (225g) softened cream cheese with ⅓ cup (65g) sugar until creamy. Add 1 large egg and ½ teaspoon (2.5ml) vanilla extract; continue beating until fully combined and smooth.
- Assemble the cake: Pour half of the red velvet batter into the prepared pan and smooth it out. Drop dollops of the cream cheese filling evenly over the batter — don’t worry if it looks messy. Pour the remaining red velvet batter over the top, trying to cover most of the cream cheese but leaving some peeking through.
- Bake: Place the pan in the oven and bake for 45–50 minutes. The top should be cracked and slightly golden, and a toothpick inserted in the cake (avoiding the cream cheese pockets) should come out clean or with a few moist crumbs. If the edges start browning too fast, tent with foil.
- Cool completely: Let the cake cool in the pan on a wire rack for at least 30 minutes. This helps the cream cheese pockets set and prevents the drizzle from melting too much.
- Prepare white chocolate drizzle: In a microwave-safe bowl, heat 1 cup (170g) white chocolate chips with 2 tablespoons (30ml) heavy cream in 20-second intervals, stirring in between until smooth. The drizzle should be pourable but not too runny.
- Drizzle and serve: Using a spoon or piping bag, drizzle the white chocolate over the cooled cake in a zigzag or random pattern. Let the drizzle set for 10 minutes before slicing.
If your cream cheese filling starts to melt into the batter too much, try chilling it for 10 minutes before dolloping next time — this keeps the pockets more distinct. Also, don’t rush cooling before the drizzle; warm cake will cause the white chocolate to melt and lose its pretty shape. Trust me, the visual cracks and gooey pockets are part of the charm that makes this cake so fun.
Cooking Tips & Techniques
One trick I learned early on is to make sure your cream cheese is fully softened but not melted. If it’s too cold, it won’t blend smoothly, and if it’s too warm, it runs everywhere when baking. Room temperature cream cheese is the sweet spot.
When mixing the red velvet batter, don’t overdo the stirring. Overmixing can make the cake tough instead of tender, and you want that soft crumb that melts in your mouth. I usually stop as soon as I see no more dry spots.
Baking time can vary depending on your oven and pan type. If you notice the cake edges are browning too quickly, loosely cover with a piece of foil halfway through baking to prevent burning.
Melting the white chocolate is a delicate task. I recommend warming it in short bursts in the microwave or using a double boiler. Stir frequently to avoid scorching. Adding a splash of heavy cream makes the drizzle glossy and easier to pour.
For a cleaner slice, use a sharp knife warmed under hot water and wiped dry before cutting. This helps get through the cake and cream cheese pockets without dragging or tearing.
Finally, patience is key. Let the cake cool fully before adding the white chocolate drizzle. It might be tempting to dig in right away (been there!), but waiting makes a big difference in presentation and flavor melding.
Variations & Adaptations
- Chocolate Lovers’ Twist: Add ½ cup (85g) mini chocolate chips to the batter for extra pockets of chocolate. You can also swap the white chocolate drizzle for a classic dark chocolate ganache.
- Berry Infusion: Fold 1 cup (150g) fresh raspberries into the cream cheese filling for a tart contrast that pairs beautifully with red velvet. This is especially nice in spring and summer.
- Nutty Crunch: Sprinkle chopped pecans or walnuts over the batter before baking for a subtle crunch that balances the creamy texture.
- Gluten-Free Option: Use a 1:1 gluten-free baking flour blend instead of all-purpose flour. Expect a slightly different crumb but still delicious.
- Dairy-Free Adaptation: Substitute cream cheese with dairy-free cream cheese alternatives and use coconut cream instead of heavy cream for the drizzle.
Personally, I once made a version inspired by my love for layered desserts by turning this red velvet earthquake cake into bars topped with a thick white chocolate ganache (similar to the layers in the Chocolate Covered Strawberry Cake Tower Bites). The cream cheese pockets still shined through, but the ganache added an elegant finish perfect for celebrations.
Serving & Storage Suggestions
This red velvet earthquake cake is best served at room temperature. The cream cheese pockets are luscious and soft, so letting it sit out for about 20 minutes after chilling brings out the flavors perfectly. For presentation, the white chocolate drizzle adds a lovely visual contrast that makes the cake look as good as it tastes.
Pair it with a simple cup of coffee or a glass of cold milk for a classic combo. If you want to get fancy, a dollop of whipped cream or a scoop of vanilla ice cream makes a decadent companion.
To store, cover the cake tightly with plastic wrap or keep it in an airtight container. It stays fresh in the refrigerator for up to 4 days. Just let it come back to room temperature before serving for the best texture.
If you want to freeze it, wrap individual slices in plastic wrap and place in a freezer-safe bag or container. Thaw overnight in the fridge and warm slightly before serving. The white chocolate drizzle holds up well, but you might want to add a fresh drizzle if it dulls after freezing.
Over time, the flavors meld beautifully, especially the cream cheese and cocoa notes. So, if you can resist, letting the cake sit a few hours before digging in can make it even tastier.
Nutritional Information & Benefits
While this cake is undeniably indulgent, it does offer some nutritional perks thanks to its key ingredients. The cream cheese filling adds protein and calcium, making it a bit more satisfying than a plain cake. The use of buttermilk contributes to a tender crumb and adds some beneficial probiotics.
Estimated per serving (based on 12 servings): approximately 350 calories, 18g fat, 45g carbohydrates, and 5g protein. This is a treat best enjoyed in moderation, but its rich flavor means a small slice goes a long way.
For those mindful of allergens, this recipe contains dairy, gluten, and eggs. However, with simple substitutions like almond flour and dairy-free cream cheese, it can be adapted to suit many dietary needs.
From a wellness perspective, making desserts from scratch means you avoid preservatives and artificial additives found in many store-bought cakes. Plus, baking at home allows control over sweetness and ingredient quality — which feels good when you want a treat that’s both comforting and thoughtful.
Conclusion
At the end of the day, this Decadent Red Velvet Earthquake Cake with White Chocolate Drizzle is one of those recipes that reliably brings smiles and satisfied sighs. It’s a dessert that’s as dramatic and fun as it is delicious, striking that perfect balance between classic red velvet charm and a gooey, unexpected twist.
Feel free to make it your own — whether that means adding fresh berries, swapping the drizzle, or making it gluten-free. The recipe’s forgiving nature invites creativity without losing its soul.
I love this cake because it’s a little messy, a little surprising, and completely rewarding. It’s the kind of dessert that sparks conversation and invites sharing, whether you’re serving it for a crowd or enjoying it quietly with a cup of tea after a long day.
If you try it, I’d love to hear what variations you come up with or how it turned out for you. Sharing those moments and tweaks is what makes baking feel like a community, not just a task.
Here’s to many more sweet, cracked, and drizzled moments in your kitchen!
FAQs
What makes this cake an “earthquake” cake?
The “earthquake” name comes from the cracked, uneven surface created by the cream cheese pockets bursting through the red velvet batter during baking. It looks like the cake has been shaken up, giving it a rustic, dramatic appearance.
Can I make this cake ahead of time?
Yes! You can bake the cake a day in advance and keep it covered at room temperature or refrigerated. Add the white chocolate drizzle just before serving for the best look and flavor.
Is the white chocolate drizzle necessary?
While the drizzle adds a wonderful creamy sweetness and visual appeal, the cake is delicious on its own. However, I highly recommend trying the drizzle at least once — it really brings the whole dessert together.
How do I prevent the cream cheese filling from sinking?
Make sure your cream cheese is softened but not melted, and dollop it gently over the batter rather than mixing it in. Also, slightly chilling the filling before adding can help keep distinct pockets.
Can I use a different type of frosting or topping?
Absolutely! You can swap the white chocolate drizzle for a simple powdered sugar glaze, cream cheese frosting, or even a chocolate ganache for a richer finish.
Pin This Recipe!
Decadent Red Velvet Earthquake Cake Recipe with Easy White Chocolate Drizzle
A rich and gooey red velvet cake with molten cream cheese pockets and a silky white chocolate drizzle, perfect for any occasion and surprisingly easy to make.
- Prep Time: 15 minutes
- Cook Time: 45-50 minutes
- Total Time: 1 hour 5 minutes
- Yield: 12 servings 1x
- Category: Dessert
- Cuisine: American
Ingredients
- 2 ½ cups (300g) all-purpose flour, sifted
- 2 cups (400g) granulated sugar
- 2 tablespoons (15g) unsweetened cocoa powder, preferably Dutch-processed
- 1 teaspoon (5g) baking soda
- ½ teaspoon (3g) salt
- 1 cup (240ml) buttermilk, room temperature (or milk + 1 tablespoon vinegar)
- 1 cup (240ml) vegetable oil (canola oil preferred)
- 2 large eggs, room temperature
- 2 tablespoons (30ml) red food coloring, gel type
- 1 teaspoon (5ml) vanilla extract
- 1 teaspoon (5ml) white distilled vinegar
- 8 oz (225g) cream cheese, softened
- ⅓ cup (65g) granulated sugar
- 1 large egg
- ½ teaspoon (2.5ml) vanilla extract
- 1 cup (170g) white chocolate chips or chopped white chocolate
- 2 tablespoons (30ml) heavy cream (optional but recommended)
Instructions
- Preheat oven to 350°F (175°C). Grease a 9×13 inch (23×33 cm) baking pan with butter or non-stick spray and lightly dust with flour.
- In a large bowl, sift together flour, sugar, cocoa powder, baking soda, and salt. Set aside.
- In another bowl, whisk buttermilk, vegetable oil, eggs, red food coloring, vanilla extract, and white vinegar until smooth.
- Slowly add dry ingredients to wet mixture, stirring gently until just combined. Batter should be smooth and thick with a rich red color.
- In a medium bowl, beat softened cream cheese with sugar until creamy. Add egg and vanilla extract; beat until smooth.
- Pour half of the red velvet batter into the prepared pan and smooth out. Drop dollops of cream cheese filling evenly over the batter.
- Pour remaining red velvet batter over the top, covering most of the cream cheese but leaving some peeking through.
- Bake for 45–50 minutes until top is cracked and slightly golden. A toothpick inserted avoiding cream cheese pockets should come out clean or with a few moist crumbs. Tent with foil if edges brown too fast.
- Cool cake in pan on a wire rack for at least 30 minutes to set cream cheese pockets.
- Melt white chocolate chips with heavy cream in microwave-safe bowl in 20-second intervals, stirring until smooth and pourable.
- Drizzle white chocolate over cooled cake in zigzag or random pattern. Let drizzle set for 10 minutes before slicing.
Notes
Use room temperature cream cheese for smooth filling. Avoid overmixing batter to keep cake tender. Tent cake with foil if edges brown too quickly. Melt white chocolate slowly to avoid scorching. Chill cream cheese filling before dolloping to keep pockets distinct. Let cake cool fully before drizzling white chocolate for best presentation.
Nutrition
- Serving Size: 1 slice (1/12th of c
- Calories: 350
- Fat: 18
- Carbohydrates: 45
- Protein: 5
Keywords: red velvet cake, earthquake cake, cream cheese filling, white chocolate drizzle, easy dessert, moist cake, crowd-pleaser