It was one of those rare, quiet Sunday mornings when the kitchen felt unusually empty, and honestly, I was craving something comforting but didn’t want to spend hours fussing over dough. I’d heard about this Crispy Dutch Oven No-Knead Artisan Bread recipe from a neighbor who swore it was “life-changing” — but I was skeptical. Bread baking? Usually, it’s a whole ordeal, right? Flour everywhere, kneading for what feels like forever, and waiting anxiously to see if it actually rises. But this recipe promised something different: a no-knead method, a simple mix, and a Dutch oven doing the heavy lifting for that perfect crust. I figured, why not give it a shot?
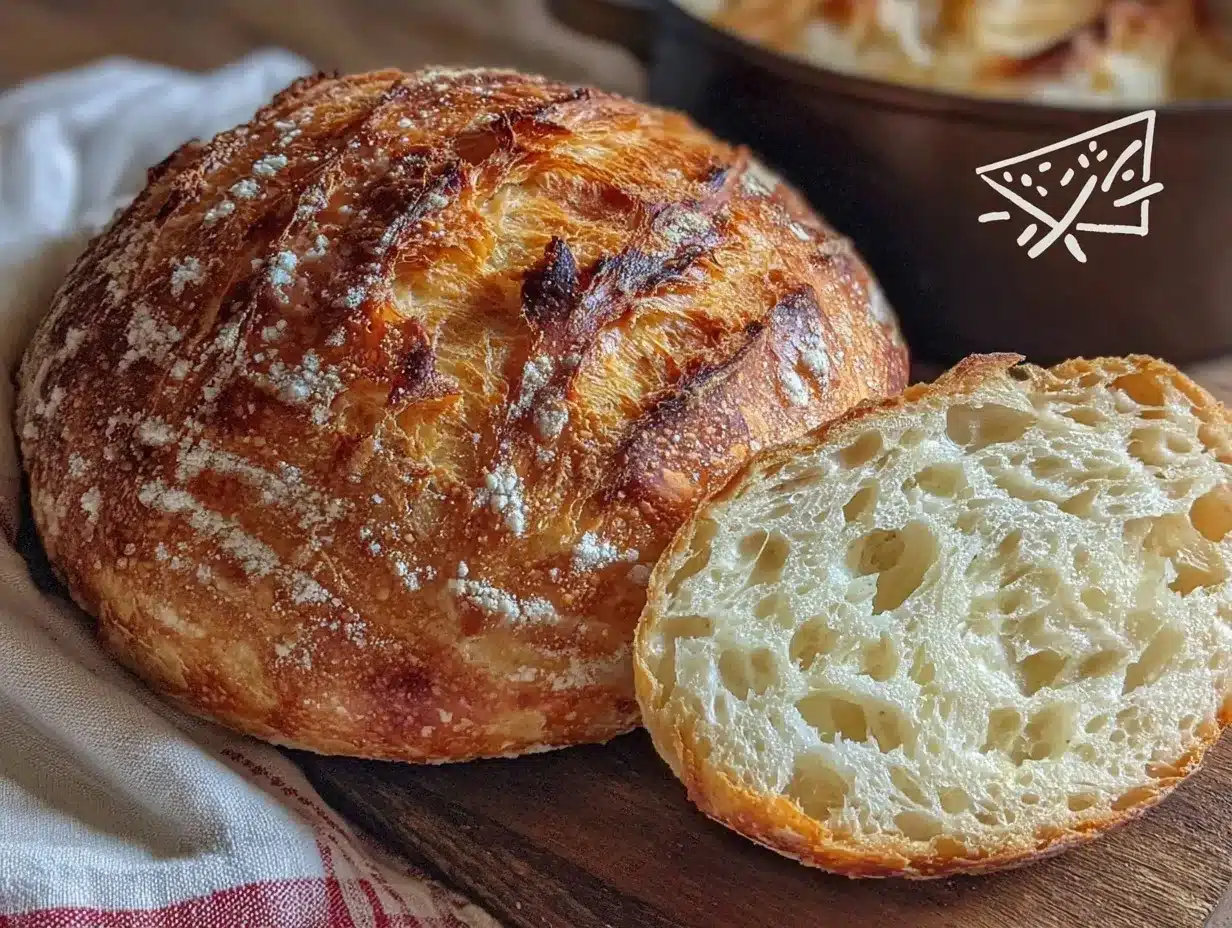
What surprised me most was how quickly the kitchen started to fill with that warm, yeasty aroma—the kind that instantly feels like home. By the time the crust cracked open with that satisfying crunch, I was hooked. Honestly, it felt like a tiny victory, having homemade artisan bread that’s crispy on the outside and soft on the inside without the usual mess and stress.
Since that first loaf, this Crispy Dutch Oven No-Knead Artisan Bread recipe has become my go-to for both quiet mornings and unexpected guests. There’s something quietly magical about pulling that golden crust from the pot, especially knowing it didn’t take hours of elbow grease to get there. It’s bread that feels special but fits right into everyday life, and that’s why it’s stuck with me.
Why You’ll Love This Recipe
- Quick & Easy: Mix it up in about 10 minutes, then let the Dutch oven do its work—perfect for busy days when you want fresh bread without fuss.
- Simple Ingredients: No fancy flour blends or secret starters needed—just basic pantry staples you probably already have on hand.
- Perfect for Any Occasion: Whether it’s a cozy breakfast, a casual sandwich, or an impressive side at dinner, this bread fits all moments.
- Crowd-Pleaser: The crispy crust and tender crumb get nods from both bread lovers and skeptics alike.
- Unbelievably Delicious: The magic of the Dutch oven creates a crust that’s crackly and golden, while the inside stays soft and airy—comfort food at its best.
- What Sets This Apart: The secret is really in the no-knead method combined with the Dutch oven’s steam-trapping effect, which bakes the bread with a bakery-style crust without needing fancy equipment or experience.
- This isn’t just bread—it’s a little moment of calm and satisfaction, turning simple ingredients into something that feels truly special.
What Ingredients You Will Need
This recipe uses simple, wholesome ingredients to deliver bold flavor and satisfying texture without the fuss. Most are pantry staples, and you can easily swap some out if needed.
- All-purpose flour – 3 cups (360 grams); I prefer King Arthur for consistent results
- Active dry yeast – 1/4 teaspoon; you can also use instant yeast if that’s what you have
- Warm water – 1 1/2 cups (355 ml), about 110°F (43°C); this wakes up the yeast
- Salt – 1 1/2 teaspoons; use fine sea salt for better distribution
- Optional: Cornmeal or flour for dusting the Dutch oven bottom to prevent sticking
If you want a gluten-free version, you can try a blend of gluten-free all-purpose flour, but the texture will be different. For a richer taste, some folks add a tablespoon of olive oil or substitute half the water with milk, but I find the classic recipe perfectly balanced as is.
Equipment Needed
- Dutch oven with lid – Ideally cast iron, about 5 to 6 quarts; it traps steam, essential for that crispy crust.
- Mixing bowl – Large enough to hold the rising dough comfortably.
- Wooden spoon or spatula – For stirring the sticky dough.
- Kitchen towel or plastic wrap – To cover the dough while it rises.
- Measuring cups and spoons – For precise ingredient amounts.
If you don’t have a Dutch oven, a heavy oven-safe pot with a lid can work, but the results might vary a bit. I’ve tried using a deep baking dish covered tightly with foil, and while it’s not quite the same, it still produces a decent crust. Keeping your Dutch oven well-seasoned will help prevent sticking and maintain that beautiful crust over time.
Preparation Method
- Mix the dough: In your large mixing bowl, combine 3 cups (360g) of all-purpose flour, 1/4 tsp active dry yeast, and 1 1/2 tsp salt. Stir to blend dry ingredients evenly.
- Add water: Pour in 1 1/2 cups (355ml) of warm water (about 110°F/43°C) gradually while stirring with a wooden spoon or spatula. The dough will be shaggy, sticky, and a bit loose—don’t worry; that’s exactly what you want.
- Cover and rest: Cover the bowl with a kitchen towel or plastic wrap and let it sit at room temperature for 12 to 18 hours. You’ll know it’s ready when the surface is dotted with bubbles and the dough has roughly doubled. It smells yeasty and alive.
- Preheat the oven: Place your Dutch oven with the lid inside in the oven and preheat to 450°F (230°C). This preheating takes about 30 minutes and is crucial for that crispy crust.
- Shape the dough: Lightly flour a clean surface and your hands. Turn the dough out gently—try not to deflate it too much—and shape it into a rough ball. Let it rest for 30 minutes while the oven heats.
- Prepare for baking: Carefully remove the preheated Dutch oven from the oven (use oven mitts!). Dust the bottom with a little flour or cornmeal to prevent sticking. Place the dough ball inside.
- Bake with lid on: Cover with the lid and bake for 30 minutes. The trapped steam helps develop the crust.
- Finish baking uncovered: Remove the lid and bake for another 15 to 20 minutes until the crust is deep golden brown and crisp. The bread should sound hollow when tapped.
- Cool: Transfer the bread to a wire rack and let it cool for at least an hour before slicing. The crumb sets during this time.
Pro tip: If your dough is too sticky to handle, dust your hands lightly with flour but avoid adding too much to keep the crumb tender. Also, don’t rush the resting time—patience here makes a huge difference.
Cooking Tips & Techniques
One of the trickiest parts of baking this bread is not overworking the dough. This no-knead recipe relies on time rather than elbow grease to develop the gluten, which is why the long rest is key. You know, the dough looks like a mess, but that’s how it should be.
Using the Dutch oven is a game-changer—its heavy lid traps steam, which mimics professional bread ovens and creates that signature crispy crust. If your crust isn’t crisp enough, try baking a bit longer uncovered, keeping a close eye to avoid burning.
Temperature matters here; too hot and the bread might brown unevenly, too cool and you lose that crust magic. I learned this the hard way the first few times, burning the bottom or ending with a pale loaf. A good oven thermometer helps.
Lastly, cooling is often overlooked. Cutting into the bread too soon results in a gummy crumb. Patience is not just a virtue here; it’s essential.
Variations & Adaptations
- Herb-Infused: Add 1-2 tablespoons of fresh chopped rosemary or thyme to the dough for an aromatic twist.
- Whole Wheat Blend: Substitute half the all-purpose flour with whole wheat flour for a nuttier flavor and denser crumb.
- Cheesy Delight: Fold in 1/2 cup shredded sharp cheddar or Parmesan right before shaping for a savory surprise.
- Gluten-Free Option: Use a gluten-free flour blend and add xanthan gum if your blend doesn’t contain it; expect a different texture but still tasty.
- Alternative Cooking Method: If you don’t have a Dutch oven, try steaming in a covered roasting pan or baking on a pizza stone with a tray of hot water beneath for steam.
Personally, I once added caramelized onions and garlic to the dough, which created a hearty loaf perfect for dipping in soup. It was a happy accident born from leftover ingredients and a craving for something savory.
Serving & Storage Suggestions
This bread is best served warm or at room temperature, with a crisp crust and tender inside showcasing its artisan texture. Slice it thick for sandwiches or thin for toasts topped with butter, jam, or olive oil.
It pairs beautifully with soups, stews, or a simple cheese board. For drinks, I like it with a cup of rich coffee or a glass of red wine depending on the occasion.
To store, wrap the loaf in a clean kitchen towel and keep at room temperature for up to two days. For longer storage, slice and freeze in an airtight bag. Toast slices straight from the freezer for a fresh-baked taste.
Reheating in a 350°F (175°C) oven for 10 minutes restores some crustiness. Over time, the flavors mellow and deepen, making leftovers perfect for hearty sandwiches.
Nutritional Information & Benefits
Each serving of this bread (about 1/12th of the loaf) contains approximately 150 calories, 30g carbohydrates, 5g protein, 1g fat, and 2g fiber. It’s a straightforward source of energy without additives or preservatives.
The simplicity of ingredients means you’re avoiding unnecessary sugars and oils common in store-bought breads. Using unbleached flour provides some B vitamins and minerals.
For those watching gluten intake, this recipe isn’t suitable unless adapted with gluten-free flour blends. It’s naturally dairy-free and vegan, making it accessible for many diets.
From a wellness perspective, homemade bread feels satisfying without the guilt of unknown additives. Plus, the act of baking itself can be a mindful, rewarding ritual.
Conclusion
This Crispy Dutch Oven No-Knead Artisan Bread recipe is proof that you don’t need to be a pro baker to enjoy fresh, crusty bread at home. It’s approachable, forgiving, and somehow turns a simple mix of flour, yeast, salt, and water into something that feels truly special.
Feel free to tweak it, add your favorite herbs or cheeses, or keep it classic. It’s a recipe that welcomes your personal touch and rewards your patience.
For me, it’s not just about the bread itself, but the moments it creates—the smell filling the kitchen, the proud slice shared with family or friends, and the quiet joy of homemade goodness.
If you give it a try, I’d love to hear how it turns out or what variations you come up with. Happy baking!
FAQs
Can I use instant yeast instead of active dry yeast?
Yes! You can substitute instant yeast in the same amount. It mixes directly into the flour without proofing.
What if my dough doesn’t rise much after 18 hours?
Your kitchen might be too cold. Try placing the dough in a warmer spot or extend the rising time. The dough should look bubbly and slightly puffed.
Can I make this bread without a Dutch oven?
You can bake it in a heavy pot or use a baking stone with steam, but results may vary. The Dutch oven helps trap steam, crucial for the crust.
How do I store leftover bread to keep it fresh?
Wrap in a kitchen towel at room temperature for a day or two. For longer storage, slice and freeze, then toast when ready.
Is this recipe suitable for gluten-free diets?
The classic recipe is not, but you can try gluten-free flour blends with xanthan gum. Texture and rise will differ.
Pin This Recipe!

Crispy Dutch Oven No-Knead Artisan Bread

A simple no-knead artisan bread recipe baked in a Dutch oven for a crispy crust and soft interior, perfect for everyday baking without the fuss.
- Prep Time: 10 minutes
- Cook Time: 45 minutes
- Total Time: 13 hours 55 minutes
- Yield: 12 servings 1x
- Category: Bread
- Cuisine: American
Ingredients
- 3 cups (360 grams) all-purpose flour
- 1/4 teaspoon active dry yeast
- 1 1/2 teaspoons salt
- 1 1/2 cups (355 ml) warm water (about 110°F / 43°C)
- Optional: cornmeal or flour for dusting the Dutch oven bottom
Instructions
- In a large mixing bowl, combine 3 cups (360g) all-purpose flour, 1/4 teaspoon active dry yeast, and 1 1/2 teaspoons salt. Stir to blend dry ingredients evenly.
- Gradually pour in 1 1/2 cups (355ml) warm water (about 110°F / 43°C) while stirring with a wooden spoon or spatula until the dough is shaggy, sticky, and loose.
- Cover the bowl with a kitchen towel or plastic wrap and let it sit at room temperature for 12 to 18 hours until the surface is dotted with bubbles and the dough has roughly doubled.
- Preheat the oven to 450°F (230°C) with the Dutch oven and lid inside for about 30 minutes.
- Lightly flour a clean surface and your hands. Turn the dough out gently and shape it into a rough ball. Let it rest for 30 minutes while the oven heats.
- Carefully remove the preheated Dutch oven from the oven, dust the bottom with flour or cornmeal to prevent sticking, and place the dough ball inside.
- Cover with the lid and bake for 30 minutes to trap steam and develop the crust.
- Remove the lid and bake for an additional 15 to 20 minutes until the crust is deep golden brown and crisp.
- Transfer the bread to a wire rack and let it cool for at least one hour before slicing.
Notes
Do not overwork the dough; the long rest develops gluten naturally. Use a well-seasoned Dutch oven to prevent sticking. Cooling the bread fully before slicing is essential to avoid a gummy crumb. If crust is not crispy enough, bake uncovered a bit longer while watching carefully. An oven thermometer helps maintain correct temperature.
Nutrition
- Serving Size: About 1/12th of the
- Calories: 150
- Sodium: 300
- Fat: 1
- Carbohydrates: 30
- Fiber: 2
- Protein: 5
Keywords: no-knead bread, Dutch oven bread, artisan bread, easy bread recipe, crispy crust bread, homemade bread