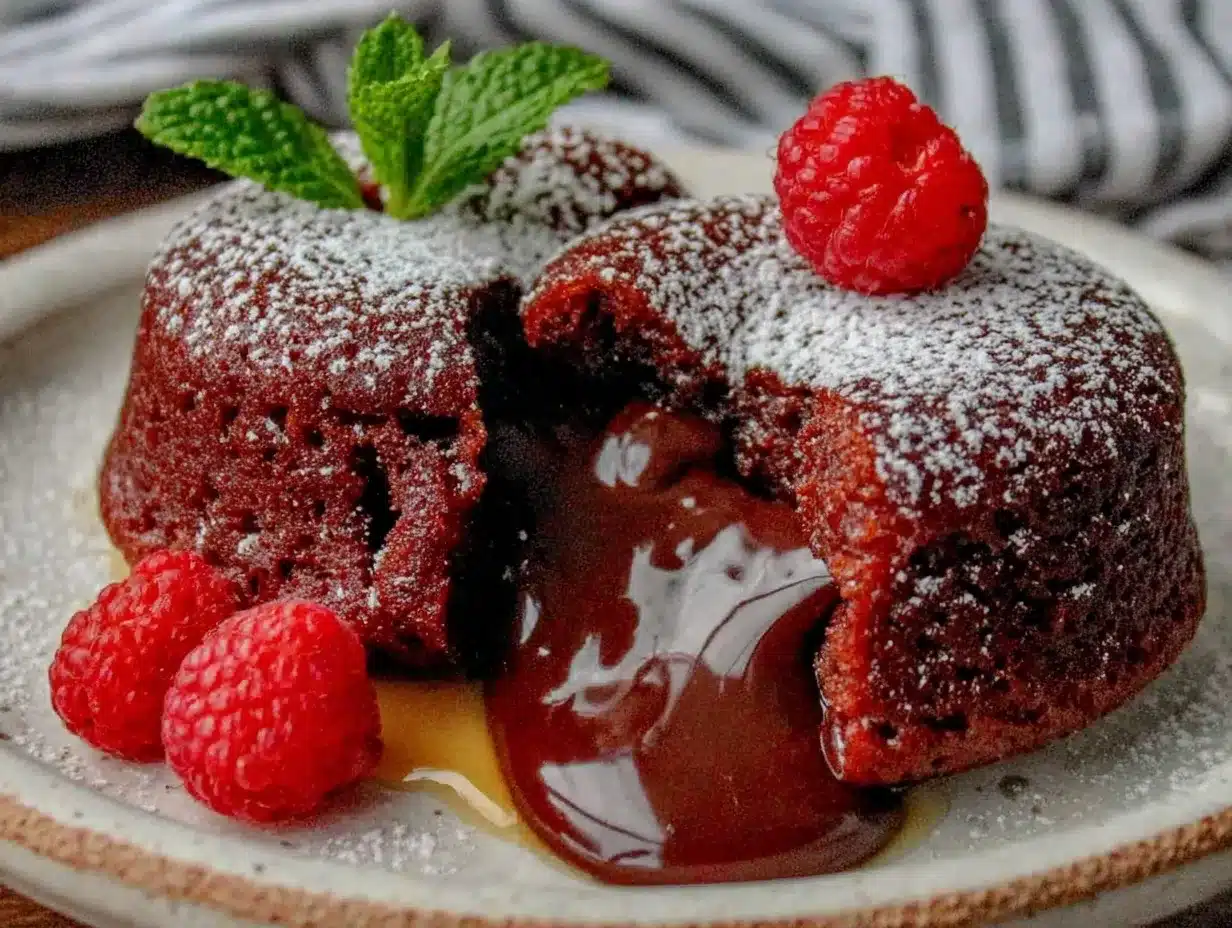
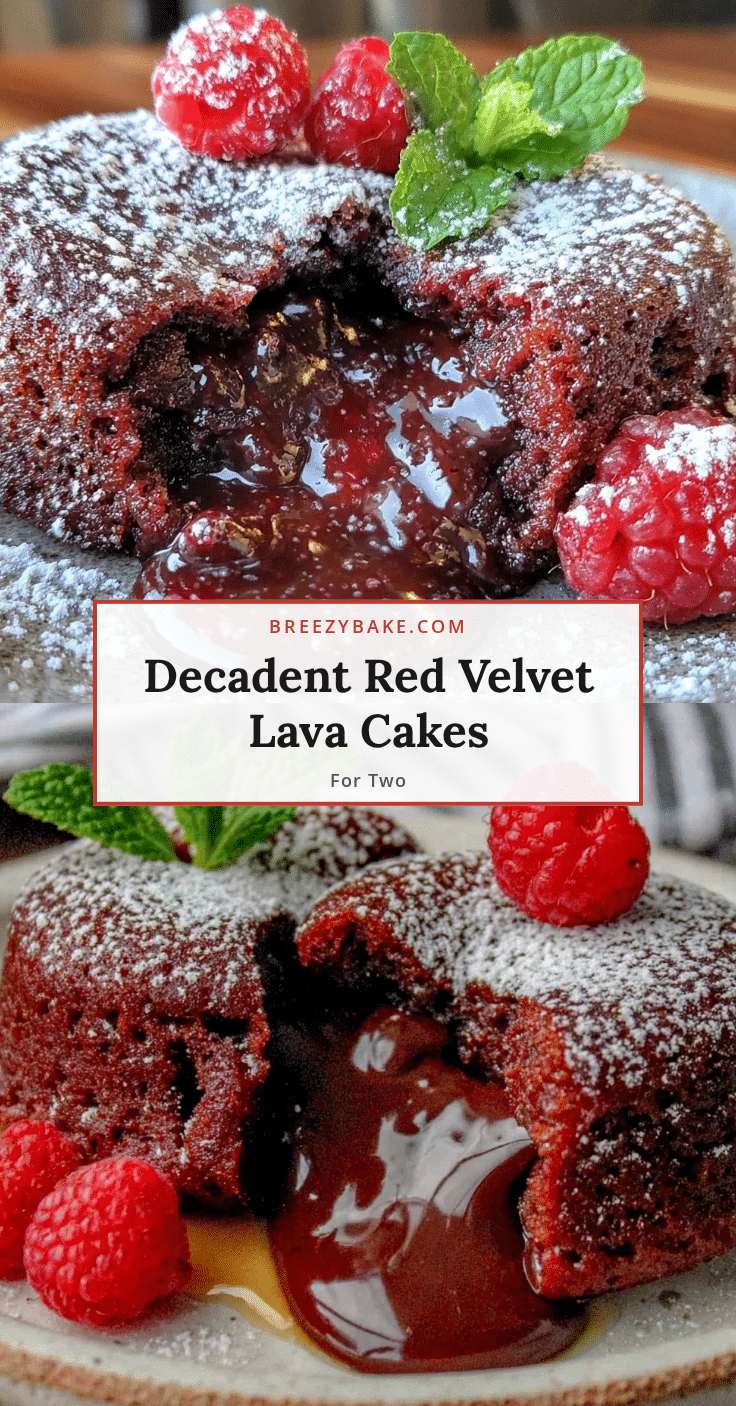
Let me tell you, the sight of molten red velvet lava oozing out from these cakes is enough to make anyone’s heart skip a beat. The moment I pulled my first batch of decadent red velvet lava cakes for two from the oven, the rich chocolate aroma mingled with a subtle tang of cream cheese that filled my kitchen, instantly hooking me. It was one of those rare moments where you pause, take a deep breath, and just smile because you know you’re onto something truly special. When I was knee-high to a grasshopper, desserts like this felt like magic—luxurious and out of reach. Years ago, I stumbled upon this recipe during a rainy weekend experiment, wanting a romantic dessert that felt fancy but was dangerously easy to make.
My family couldn’t stop sneaking these cakes off the cooling rack (and honestly, I can’t really blame them). There’s something about that warm, velvety center that feels like pure, nostalgic comfort—perfect for cozy date nights or surprising your sweetheart with a sweet treat. You know what? These decadent red velvet lava cakes for two brighten up any occasion, from Valentine’s Day to casual weekend indulgences. After testing this recipe multiple times (in the name of research, of course), it’s now a staple for family gatherings and gifting. Trust me, this dessert feels like a warm hug you’ll want to come back to again and again.
Why You’ll Love This Recipe
Honestly, I’ve tried a handful of lava cake recipes, but this one stands out for several reasons. It’s romantic, quick, and delivers that gooey, melt-in-your-mouth texture every single time.
- Quick & Easy: Comes together in under 30 minutes—perfect for busy weeknights or last-minute dessert cravings.
- Simple Ingredients: No fancy grocery trips needed; you likely already have everything in your kitchen.
- Perfect for Romantic Evenings: Ideal for date nights, anniversaries, or anytime you want to impress with minimal fuss.
- Crowd-Pleaser: Always gets rave reviews from both kids and adults alike—especially those who love chocolate and subtle red velvet flavors.
- Unbelievably Delicious: The rich red hue combined with the luscious molten center is next-level comfort food with a touch of elegance.
What makes this recipe different? It’s the balance of that classic red velvet tang with a silky, molten chocolate heart that sets it apart. Plus, I like blending a bit of cream cheese into the batter for a subtle richness that makes you close your eyes after the first bite. It’s comfort food with soul, faster, and healthier than your typical chocolate lava cake, making it perfect for impressing guests or turning a simple night into a memorable one.
What Ingredients You Will Need
This recipe uses simple, wholesome ingredients to deliver bold flavor and satisfying texture without the fuss. Most are pantry staples, and substitutions are easy if you need them.
- For the Cake Batter:
- All-purpose flour – ½ cup (60g) (for tender crumb)
- Cocoa powder – 2 tbsp (unsweetened, for rich chocolate flavor)
- Granulated sugar – ½ cup (100g) (balances the slight tang of red velvet)
- Unsalted butter – 4 tbsp (60g), melted (I recommend Kerrygold for best texture)
- Large egg – 1, room temperature (adds structure and moisture)
- Buttermilk – ¼ cup (60ml), room temperature (or use milk + 1 tsp lemon juice as substitute)
- Red food coloring – 1 tbsp (liquid or gel, use gel for vibrant color)
- Vanilla extract – ½ tsp (adds depth)
- Baking powder – ¼ tsp (for slight lift)
- Salt – a pinch (balances sweetness)
- For the Molten Center:
- Semisweet or dark chocolate – 2 oz (55g), chopped (Ghirardelli works beautifully here)
- Cream cheese – 2 tbsp (30g), softened (adds that signature red velvet creaminess)
- Optional Topping:
- Powdered sugar – for dusting
- Fresh raspberries or strawberries – for garnish
If you want a gluten-free option, use almond flour instead of all-purpose flour, but note the texture will be slightly different. For dairy-free, swap butter with coconut oil and use a plant-based milk for buttermilk.
Equipment Needed
- Two 6-ounce (180ml) ramekins or oven-safe custard dishes – perfect size for individual servings.
- Mixing bowls – one medium, one small for melting chocolate.
- Whisk and spatula – for combining ingredients smoothly.
- Microwave-safe bowl or double boiler – to gently melt the chocolate.
- Baking sheet – to place ramekins on for easy handling and catching drips.
If you don’t have ramekins, small oven-safe mugs or even silicone muffin cups work as a budget-friendly alternative. Just adjust baking time slightly. Personally, I like ceramic ramekins because they retain heat well and help produce that perfect molten center. Keep your ramekins greased and lightly dusted with cocoa powder for easy release and neat edges.
Preparation Method
- Preheat the Oven: Set your oven to 425°F (220°C). This high heat is key to getting that crisp outside and gooey inside. Grease two ramekins with butter and dust with cocoa powder to prevent sticking. Set aside.
- Melt the Chocolate: Place the chopped chocolate and cream cheese in a microwave-safe bowl. Microwave in 20-second bursts, stirring in between, until smooth and combined. You want a silky molten center, so be careful not to burn the chocolate.
- Mix Dry Ingredients: In a medium bowl, sift together flour, cocoa powder, baking powder, and salt. This ensures no lumps and an even crumb.
- Combine Wet Ingredients: In another bowl, whisk the melted butter and sugar until smooth. Add the egg, vanilla extract, red food coloring, and buttermilk. Whisk until well combined and vibrant red.
- Incorporate Dry Ingredients: Gradually add the dry ingredients into the wet, folding gently with a spatula. Mix just until combined—overmixing can make the cake tough.
- Fill the Ramekins: Spoon a couple of tablespoons of batter into each ramekin, then add a spoonful of the molten chocolate-cream cheese mixture in the center. Cover with remaining batter, spreading gently to cover the filling.
- Bake: Place ramekins on a baking sheet and bake for 12-14 minutes. The edges should be set and spring back slightly, but the center remains soft and jiggly—this means the lava is ready to flow.
- Cool Slightly and Serve: Let the cakes cool for 3-5 minutes. Run a knife around the edges, then invert onto dessert plates. Dust with powdered sugar and garnish with fresh berries if you like.
If your cakes sink too much or bake unevenly, try lowering the oven rack or checking the oven temperature with an oven thermometer. The timing is crucial: bake too long and you lose the molten center; too short and the cake is undercooked.
Cooking Tips & Techniques
Here’s the honest truth: getting lava cakes just right can be tricky—but practice makes perfect. One lesson I learned the hard way is not to overbake. The edges firm up quickly, but the center needs to stay molten. I always set a timer and peek at the cake around 12 minutes to avoid overcooking.
Use room temperature eggs and buttermilk for better batter incorporation. Cold ingredients can cause uneven baking. Also, sifting the dry ingredients is a small step that makes a noticeable difference in texture.
For melting chocolate, patience is key. I’ve burnt chocolate more than once by rushing the microwave. Stir frequently and use low heat to keep the mixture smooth.
Want an even richer flavor? Let the batter rest for 10 minutes before baking. It helps the cocoa and red food coloring bloom, deepening the color and taste.
Multitasking tip: While the cakes bake, prepare your toppings or a quick cup of coffee to serve alongside. Timing your dessert prep with the rest of the meal makes the whole experience feel seamless.
Variations & Adaptations
- Vegan Version: Use flax egg (1 tbsp ground flaxseed + 3 tbsp water) instead of egg, coconut oil for butter, and dairy-free cream cheese. Swap buttermilk for almond milk mixed with lemon juice.
- Seasonal Twist: Add fresh or frozen raspberries inside the molten center along with the chocolate for a tart contrast. In summer, swap red food coloring for pureed strawberries for natural color and flavor.
- Spiced Red Velvet: Add a pinch of cinnamon and a dash of cayenne to the dry ingredients for a warm, spicy kick that surprises the palate.
- Nutty Crunch: Fold in finely chopped toasted pecans or walnuts into the batter for added texture and flavor.
Personally, I once tried swapping the cream cheese filling with mascarpone mixed with a bit of orange zest—it was a delightful surprise that added a citrusy brightness to the rich cake. Feel free to customize based on your sweet tooth or dietary needs.
Serving & Storage Suggestions
Serve these decadent red velvet lava cakes warm, right out of the oven, for that irresistible ooey-gooey experience. A scoop of vanilla ice cream or a dollop of whipped cream pairs beautifully, balancing the richness with cool creaminess. Fresh berries or a drizzle of chocolate sauce make elegant garnishes.
Leftovers? While lava cakes are best fresh, you can cover and refrigerate them for up to 2 days. Reheat gently in a microwave for 15-20 seconds—just enough to warm the molten center without drying the cake. Avoid reheating too long or the lava effect fades.
For longer storage, you can freeze unbaked cakes in ramekins, wrapped tightly in plastic wrap and foil, for up to 1 month. Thaw in the fridge overnight before baking. Flavors actually deepen overnight, making these desserts even more satisfying the next day.
Nutritional Information & Benefits
Each decadent red velvet lava cake for two is approximately 350-400 calories, depending on exact ingredients and toppings. They provide a good dose of antioxidants from cocoa powder and contain moderate protein from eggs and cream cheese.
While indulgent, this recipe uses real butter and quality chocolate, offering more wholesome fats compared to processed alternatives. Using buttermilk adds calcium and tang without excess sugar. If you choose almond flour or dairy-free options, you can make it suitable for gluten-free or lactose-intolerant diets.
Keep in mind the presence of common allergens like gluten, dairy, and eggs. For a healthier spin, try reducing sugar slightly or using natural sweeteners, but honestly, sometimes you just want that classic red velvet richness.
Conclusion
So, why should you give these decadent red velvet lava cakes for two a try? Because they combine simple ingredients, quick prep, and that irresistible molten center to create a dessert that feels both special and comforting. Customize it your way—add spices, swap fillings, or keep it classic. Personally, this recipe has become my go-to for romantic evenings and whenever I want to treat someone without fussing for hours.
If you make this recipe, I’d love to hear how you personalized it or what moments you shared it over. Don’t be shy—drop a comment below, share your snaps, or let me know your favorite pairing. Here’s to many cozy nights filled with warm, luscious bites and sweet memories!
FAQs
Can I make these lava cakes ahead of time?
You can prepare the batter and fill the ramekins in advance, then refrigerate for up to 24 hours before baking. Just add a minute or two to the baking time if baking cold.
What if I don’t have red food coloring?
Natural alternatives include beet juice or pureed strawberries, but keep in mind the color won’t be as vivid. You can also skip it—flavor won’t change much, just the classic red velvet look.
How can I tell when the lava cakes are done?
The edges should be firm and spring back slightly when touched, but the center should still jiggle a bit. Overbaking will cook out the molten center.
Can this recipe be doubled?
Absolutely! Just double all ingredients and bake in four ramekins or a larger dish. Keep an eye on baking time—it might need a few extra minutes.
What’s the best chocolate to use for the molten center?
Choose a good-quality semisweet or dark chocolate with at least 60% cocoa for rich flavor and smooth melting. Ghirardelli or Valrhona are great options I personally like.
Pin This Recipe!
Decadent Red Velvet Lava Cakes for Two
These decadent red velvet lava cakes feature a gooey molten chocolate and cream cheese center, perfect for romantic evenings or cozy date nights. Quick and easy to make with simple ingredients, they deliver a rich, melt-in-your-mouth texture every time.
- Prep Time: 10 minutes
- Cook Time: 14 minutes
- Total Time: 24 minutes
- Yield: 2 servings 1x
- Category: Dessert
- Cuisine: American
Ingredients
- ½ cup all-purpose flour (60g)
- 2 tbsp unsweetened cocoa powder
- ½ cup granulated sugar (100g)
- 4 tbsp unsalted butter (60g), melted
- 1 large egg, room temperature
- ¼ cup buttermilk (60ml), room temperature (or milk + 1 tsp lemon juice)
- 1 tbsp red food coloring (liquid or gel)
- ½ tsp vanilla extract
- ¼ tsp baking powder
- Pinch of salt
- 2 oz semisweet or dark chocolate (55g), chopped
- 2 tbsp cream cheese (30g), softened
- Optional toppings: powdered sugar for dusting, fresh raspberries or strawberries for garnish
Instructions
- Preheat the oven to 425°F (220°C). Grease two 6-ounce ramekins with butter and dust with cocoa powder to prevent sticking. Set aside.
- Place chopped chocolate and cream cheese in a microwave-safe bowl. Microwave in 20-second bursts, stirring between, until smooth and combined. Set aside.
- In a medium bowl, sift together flour, cocoa powder, baking powder, and salt.
- In another bowl, whisk melted butter and sugar until smooth. Add egg, vanilla extract, red food coloring, and buttermilk. Whisk until well combined and vibrant red.
- Gradually fold dry ingredients into wet ingredients with a spatula until just combined. Do not overmix.
- Spoon a couple tablespoons of batter into each ramekin. Add a spoonful of the molten chocolate-cream cheese mixture in the center. Cover with remaining batter, spreading gently.
- Place ramekins on a baking sheet and bake for 12-14 minutes until edges are set and spring back slightly but centers remain soft and jiggly.
- Let cakes cool for 3-5 minutes. Run a knife around edges and invert onto dessert plates. Dust with powdered sugar and garnish with fresh berries if desired.
Notes
Do not overbake to maintain the molten center. Use room temperature eggs and buttermilk for better batter incorporation. Let batter rest 10 minutes before baking for deeper color and flavor. If cakes sink or bake unevenly, adjust oven rack or check oven temperature. For gluten-free, substitute almond flour; for dairy-free, use coconut oil and plant-based milk.
Nutrition
- Serving Size: 1 lava cake (half of
- Calories: 375
- Sugar: 25
- Sodium: 180
- Fat: 22
- Saturated Fat: 13
- Carbohydrates: 38
- Fiber: 3
- Protein: 6
Keywords: red velvet lava cake, molten lava cake, romantic dessert, easy dessert, chocolate lava cake, cream cheese lava cake, date night dessert