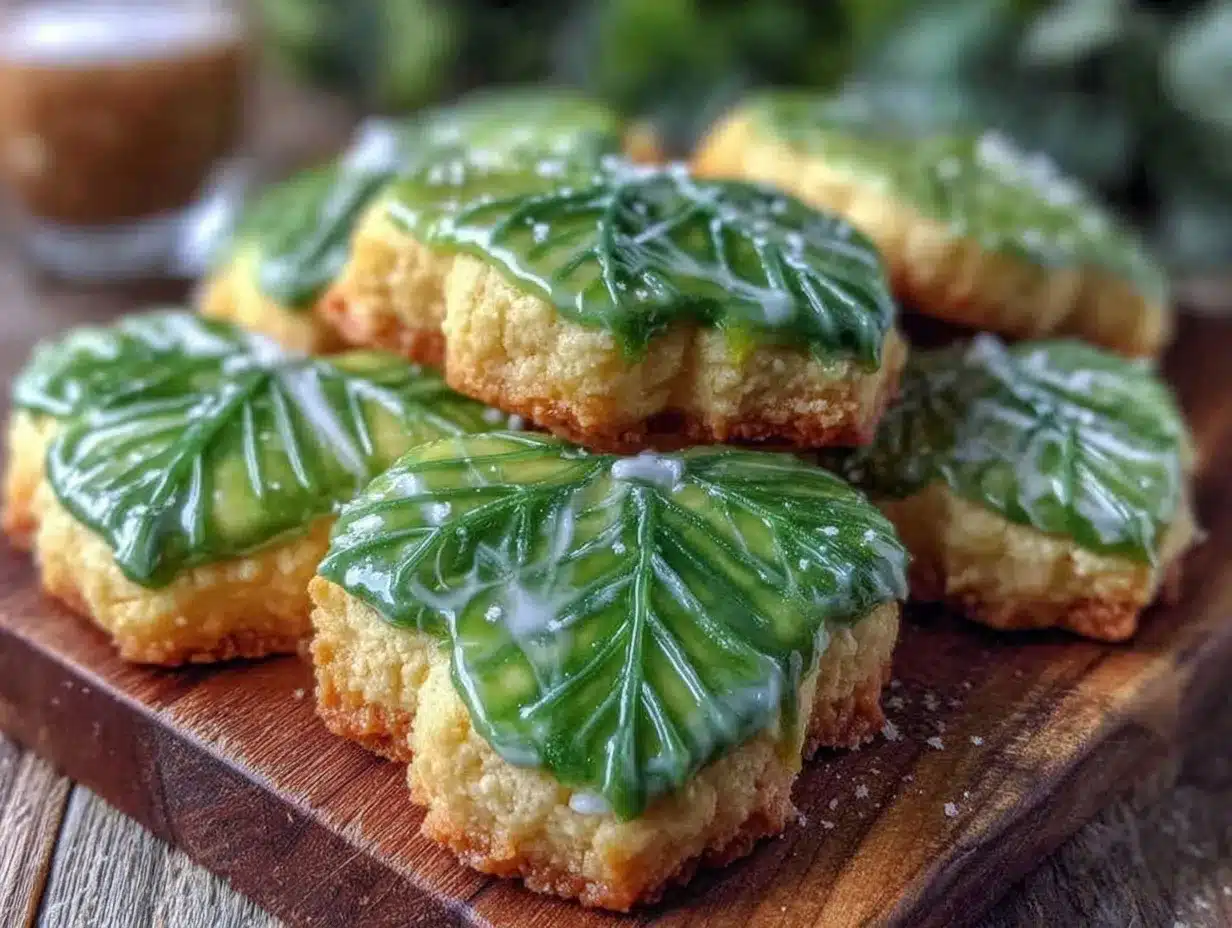
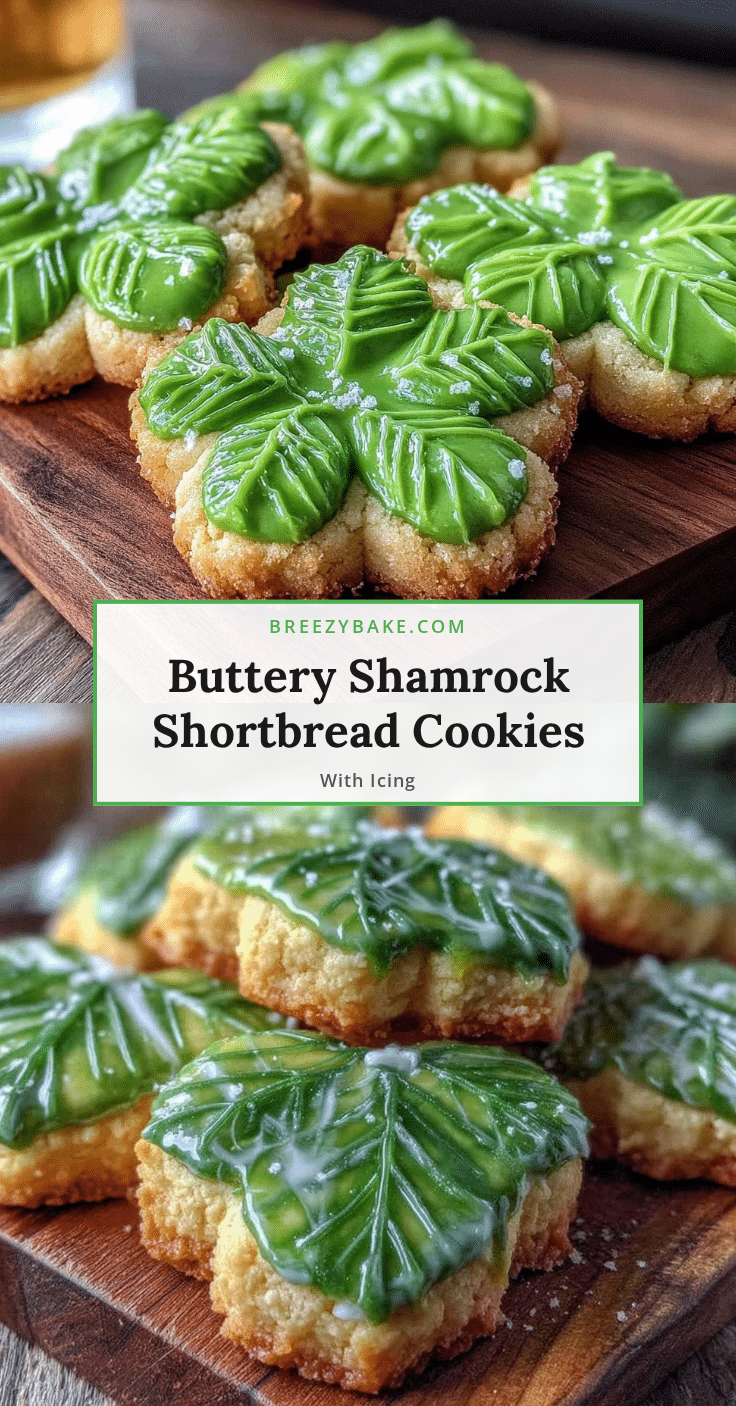
“Are you sure about all that green food coloring?” my partner asked, glancing skeptically at the bowl of royal icing I was whisking late one chilly evening. Honestly, I wasn’t either—green icing that actually looked appetizing isn’t exactly my forte. But I was determined to make these shamrock-shaped shortbread cookies feel special, not just any cookie with a splash of dye slapped on top. The whole idea began as a last-minute whim when I realized St. Patrick’s Day was sneaking up, and I had zero festive treats ready.
I grabbed my trusty shortbread recipe—one I’d perfected over many weekends—and decided to shape the dough into shamrocks. Then came the royal icing challenge. After a few trial runs (and some rather sad, blotchy green blobs), I landed on a smooth, glossy icing that held its shape and tasted just right. These cookies quickly went from a skeptical experiment to the star of a small gathering, vanishing faster than I could snap a photo.
What surprised me most was how this recipe became a comfort in the chaos of last-minute plans and the overwhelming urge to create something joyful. The buttery shortbread paired with that bright, sweet-tangy green royal icing hits just the right note of nostalgic and fresh. It’s the kind of recipe that makes you want to slow down, savor the moment, and maybe even share a few laughs over decorating mishaps. This isn’t just a cookie—it’s a little green celebration that stuck around long after the crumbs were gone.
Why You’ll Love This Recipe
Honestly, these perfect shamrock-shaped shortbread cookies with green royal icing have become my go-to for festive baking, and here’s why they might just be your new favorite too:
- Quick & Easy: The dough comes together in under 15 minutes, and the cookies bake in about 12 minutes—ideal for busy days when you want something special without fuss.
- Simple Ingredients: No fancy or hard-to-find items here. Basic pantry staples like butter, sugar, and flour make this recipe very accessible.
- Perfect for Celebrations: Whether it’s a St. Patrick’s Day party or just a fun afternoon activity, these cookies bring that festive spirit in a sweet, buttery bite.
- Crowd-Pleaser: Kids and adults alike can’t resist the tender crumb and that glossy green icing. Plus, the shamrock shape adds a playful touch everyone notices.
- Unbelievably Delicious: The buttery richness of the shortbread isn’t overshadowed by the icing—it’s a harmonious balance of texture and flavor that makes you close your eyes after the first bite.
What sets this recipe apart is the royal icing technique. I’ve tweaked the consistency to be just right—not too stiff to pipe, but firm enough to hold those crisp shamrock edges. Plus, the green shade is vibrant but natural, thanks to a subtle mix of gel food colorings rather than overwhelming liquid dyes. If you want a festive touch that feels homemade and thoughtful, this is the recipe you’ll want to keep on hand.
It’s also a recipe that invites creativity—you can jazz up your shortbread with a sprinkle of flaky sea salt or a hint of lemon zest for a little twist. And if you enjoy the process as much as the result, you might find yourself baking shamrocks all March long (I know I did, alongside my mint chocolate cake jar parfaits that pair wonderfully at any festive table).
What Ingredients You Will Need
This recipe uses simple, wholesome ingredients to deliver that classic shortbread flavor with a festive twist. Most are pantry staples, and substitutions are easy if you have dietary preferences.
- Unsalted butter, softened (about 1 cup or 227g) – I prefer European-style butter for its creaminess.
- Granulated sugar, ½ cup (100g) – provides that subtle sweetness and helps with the cookie’s crisp edge.
- Pure vanilla extract, 1 teaspoon – adds warmth and depth to the buttery base.
- All-purpose flour, 2 cups (250g) – use a trusted brand like King Arthur for consistent texture.
- Salt, ¼ teaspoon – balances the sweetness.
For the royal icing:
- Powdered sugar, 2 cups (240g) – sifted to avoid lumps for smooth icing.
- Egg whites, from 2 large eggs (or 4 tablespoons pasteurized egg whites) – for that perfect meringue base.
- Lemon juice, 1 teaspoon – brightens the flavor and helps with drying consistency.
- Gel food coloring, green – I use a mix of leaf green and a touch of yellow for a fresh hue, avoiding artificial liquid dyes that can thin the icing.
If you’re looking for gluten-free options, almond flour can replace the all-purpose flour with a slightly different texture but delicious result. For a dairy-free version, swap butter with a plant-based spread that’s solid at room temperature. If you prefer less sweet icing, reduce powdered sugar slightly, but note it may affect the firmness.
Equipment Needed
- Mixing bowls: A medium and small bowl for dough and icing preparation.
- Electric mixer or stand mixer: Makes creaming butter and whipping egg whites so much easier.
- Rolling pin: Essential for rolling out dough evenly to about ¼-inch thickness.
- Shamrock-shaped cookie cutter: A must-have to get those perfect little leaves and stem shapes. If you don’t have one, a small heart cutter can work to make a clover shape with some creativity.
- Baking sheets: Non-stick or lined with parchment paper for easy cookie transfer and cleanup.
- Piping bags and tips: For the royal icing, a small round tip (like Wilton #2 or #3) is ideal for outlining and flooding.
- Sifter: To avoid lumps in powdered sugar, a fine mesh sieve is handy.
I personally find that using a silicone baking mat makes lifting the cookies off the sheet less stressful, especially with delicate shapes. If you don’t have a stand mixer, a hand mixer works fine, though beating the egg whites by hand is a bit of a workout! For budget-conscious bakers, simple plastic piping bags with a cut tip are great alternatives to reusable ones.
Preparation Method
- Prepare the dough: In a medium bowl, cream together the softened unsalted butter (1 cup / 227g) and granulated sugar (½ cup / 100g) using an electric mixer on medium speed until light and fluffy, about 3-4 minutes. This step is key for tender, crumbly shortbread.
- Add vanilla: Mix in 1 teaspoon pure vanilla extract until just combined.
- Combine dry ingredients: In a separate bowl, whisk together 2 cups (250g) all-purpose flour and ¼ teaspoon salt.
- Mix dry with wet: Gradually add the flour mixture to the butter mixture, mixing on low speed until the dough barely comes together. Avoid overmixing to keep the cookies tender.
- Chill the dough: Flatten the dough into a disk, wrap in plastic wrap, and refrigerate for at least 30 minutes. Chilling prevents spreading and helps achieve those crisp shamrock edges.
- Preheat oven: Set your oven to 350°F (175°C). Line baking sheets with parchment paper or silicone mats.
- Roll and cut: On a lightly floured surface, roll out chilled dough to about ¼ inch (6mm) thickness. Use your shamrock cookie cutter to press out shapes, transferring them carefully to the baking sheets.
- Bake: Bake for 10-12 minutes, until the edges just begin to turn golden. The centers should remain pale. Remove and let cool completely on the baking sheet before decorating.
- Make royal icing: While cookies cool, whisk 2 cups (240g) sifted powdered sugar with 2 large egg whites and 1 teaspoon lemon juice in a clean bowl. Beat until stiff peaks form and icing is glossy, about 7-8 minutes on medium-high speed.
- Color the icing: Stir in your green gel food coloring a little at a time until you reach your desired shade. Remember, icing darkens as it dries.
- Pipe and decorate: Fill piping bags fitted with small round tips. Outline each shamrock cookie first, then flood the inside with thinner icing (thin with a few drops of water if needed). Let the icing dry completely, at least 2 hours, before stacking or storing.
Pro tip: If you see tiny air bubbles in your icing, pop them with a toothpick before piping for a smooth finish. Also, don’t skip chilling the dough; it makes cutting and handling the shamrocks so much easier. I like to keep my piping bag upright in a tall glass between cookies to avoid mess and save time.
Cooking Tips & Techniques
Getting the perfect shortbread texture and royal icing finish takes a few little tricks I’ve picked up over time.
- Butter temperature matters: Softened butter should still be cool, not melting. This helps the dough hold its shape and gives that tender crumb.
- Don’t overwork the dough: Mix just until combined to avoid tough cookies.
- Chilling is key: Shortbread dough is sticky and soft, chilling firms it up for cleaner cuts and less spreading.
- Keep flour handy for rolling: Lightly dust your work surface and rolling pin to prevent sticking but don’t overdo it or the dough dries out.
- Royal icing consistency: For outlining, keep it thick so lines hold. For flooding, thin it with a drop or two of water until it flows smoothly but isn’t runny.
- Dry time patience: Let your decorated cookies dry overnight if possible. This prevents smudging and gives that glossy finish.
- Practice piping on parchment: If you’re new to royal icing, test your pressure and flow on scrap paper first.
I once rushed the drying time and ended up with a sticky, blotchy mess—lesson learned! Also, multitasking by preparing the icing while the cookies bake saves time and keeps the workflow smooth. For consistent results, I even weigh my dough to make sure each cookie is about the same size, which helps them bake evenly.
Variations & Adaptations
Feeling adventurous or catering to different tastes? Here are some ways to switch things up:
- Flavor twists: Add a teaspoon of lemon zest to the dough for a bright, citrusy note that pairs beautifully with the green icing.
- Chocolate dipped: Instead of royal icing, dip half the cookie in melted dark or white chocolate for a rich contrast.
- Vegan version: Use dairy-free butter and substitute the egg whites in the royal icing with aquafaba (chickpea water) whipped to stiff peaks for an egg-free glaze.
- Gluten-free adaptation: Swap all-purpose flour with a gluten-free blend; expect a slightly crumblier texture but just as tasty.
- Seasonal colors: For a spring twist, try pastel royal icing shades, or add edible glitter for sparkle.
One time, I made these cookies using my homemade mint cream cheese bars recipe as a base for the frosting flavor—talk about a festive combo! Adjusting the icing thickness slightly also lets you experiment with different decorating styles, from simple flooding to intricate piping patterns.
Serving & Storage Suggestions
These shamrock shortbread cookies are best served at room temperature to enjoy that buttery melt-in-your-mouth feel. Arrange them on a festive platter or stack with parchment paper layers to keep them pristine.
Pair them with a hot cup of tea, coffee, or even a minty cocktail for a full celebration vibe. They also complement other St. Patrick’s Day treats like my green velvet bars beautifully.
To store, keep the cookies in an airtight container at room temperature for up to 5 days. If you want to keep them longer, freeze the undecorated cookies in a single layer, wrapped tightly, for up to 3 months. Decorated cookies freeze best after the icing has fully dried—wrap carefully in layers of parchment and foil.
When reheating, avoid the microwave as it can soften the icing; instead, let the cookies come to room temperature naturally to maintain texture. The flavors actually deepen after a day, so if you can wait, that’s ideal!
Nutritional Information & Benefits
Each cookie (based on a batch of 24) clocks in at approximately 150 calories, with 8 grams of fat, 18 grams of carbohydrates, and 1 gram of protein. The main ingredients—unsalted butter and sugar—mean these are definitely an indulgence, but the short ingredient list ensures no artificial additives.
Butter provides fat-soluble vitamins like A and E, and the lemon juice in the icing adds a bit of vitamin C and brightness without calories. For those watching gluten intake, the almond flour variation offers a grain-free option.
While royal icing does contain egg whites, using pasteurized egg whites makes it safe for most people. Always be mindful of allergies and adjust accordingly with substitutes like aquafaba.
From a wellness perspective, these cookies are a treat meant to be enjoyed mindfully, perfect for sharing and creating joyful moments rather than daily snacking.
Conclusion
These perfect shamrock-shaped shortbread cookies with green royal icing have a way of turning a simple moment into something a bit magical. The buttery crumb, crisp edges, and that smooth, shiny green icing come together to create a treat that’s both festive and timeless. Whether you’re baking for a party or just to brighten an ordinary day, this recipe invites you to slow down and enjoy the little joys of baking and sharing.
Don’t be afraid to tweak the flavors or colors to suit your mood or occasion. I’ve found myself coming back to this recipe year after year—not just because it tastes great, but because it’s a small, sweet tradition that brings a smile every time.
If you try these cookies, I’d love to hear how they turned out or what fun variations you came up with. Baking’s always better when it’s a shared experience—so drop a comment or share your photos. Here’s to many happy cookie moments ahead!
FAQs
- Can I make the cookie dough ahead of time?
Yes! You can prepare the dough, wrap it tightly, and refrigerate for up to 48 hours before rolling and baking. - How do I store decorated shortbread cookies?
Store them in an airtight container at room temperature for up to 5 days. Make sure the royal icing is fully dry before stacking. - What if I don’t have a shamrock cookie cutter?
A small heart-shaped cutter can be arranged creatively to mimic shamrocks, or you could freehand the shape if you’re feeling artistic! - Is royal icing safe to eat raw?
Using pasteurized egg whites or meringue powder is recommended to avoid any risk from raw egg whites. - Can I use food coloring other than green?
Absolutely! Feel free to experiment with any colors to match different holidays or themes.
Pin This Recipe!
Perfect Shamrock-Shaped Shortbread Cookies with Green Royal Icing

These festive shamrock-shaped shortbread cookies feature a tender, buttery crumb topped with smooth, glossy green royal icing, perfect for St. Patrick’s Day celebrations or any joyful occasion.
- Prep Time: 15 minutes
- Cook Time: 12 minutes
- Total Time: 45 minutes
- Yield: 24 cookies 1x
- Category: Dessert
- Cuisine: American
Ingredients
- 1 cup (227g) unsalted butter, softened (preferably European-style)
- ½ cup (100g) granulated sugar
- 1 teaspoon pure vanilla extract
- 2 cups (250g) all-purpose flour
- ¼ teaspoon salt
- For the royal icing:
- 2 cups (240g) powdered sugar, sifted
- Egg whites from 2 large eggs or 4 tablespoons pasteurized egg whites
- 1 teaspoon lemon juice
- Green gel food coloring (mix of leaf green and a touch of yellow recommended)
Instructions
- In a medium bowl, cream together the softened unsalted butter and granulated sugar using an electric mixer on medium speed until light and fluffy, about 3-4 minutes.
- Mix in the pure vanilla extract until just combined.
- In a separate bowl, whisk together the all-purpose flour and salt.
- Gradually add the flour mixture to the butter mixture, mixing on low speed until the dough barely comes together. Avoid overmixing.
- Flatten the dough into a disk, wrap in plastic wrap, and refrigerate for at least 30 minutes.
- Preheat oven to 350°F (175°C). Line baking sheets with parchment paper or silicone mats.
- On a lightly floured surface, roll out chilled dough to about ¼ inch (6mm) thickness. Use a shamrock-shaped cookie cutter to cut shapes and transfer them carefully to the baking sheets.
- Bake for 10-12 minutes, until edges just begin to turn golden but centers remain pale. Let cool completely on the baking sheet.
- While cookies cool, whisk powdered sugar, egg whites, and lemon juice in a clean bowl until stiff peaks form and icing is glossy, about 7-8 minutes on medium-high speed.
- Stir in green gel food coloring gradually until desired shade is reached.
- Fill piping bags fitted with small round tips. Outline each shamrock cookie, then flood the inside with thinner icing (thin with a few drops of water if needed).
- Let the icing dry completely, at least 2 hours, before stacking or storing.
Notes
Use softened but cool butter to help dough hold shape. Chill dough at least 30 minutes to prevent spreading. For royal icing, keep outlining icing thick and flooding icing thinner but not runny. Let decorated cookies dry overnight if possible for best finish. Pop air bubbles in icing with a toothpick before piping. Dough can be prepared up to 48 hours ahead and refrigerated. For gluten-free, substitute almond flour; for dairy-free, use plant-based butter and aquafaba for royal icing.
Nutrition
- Serving Size: 1 cookie
- Calories: 150
- Fat: 8
- Carbohydrates: 18
- Protein: 1
Keywords: shamrock cookies, shortbread cookies, royal icing, St. Patrick's Day, festive cookies, green icing, homemade cookies