My sister had sworn off sugar cookies for nearly a decade. “Too dry,” she’d say, waving a dismissive hand at the holiday tins I’d bring to family gatherings. “They’re just vehicles for frosting, and honestly, the cookie part is never worth the effort.” She was so adamant about it that I stopped bothering to defend my annual baking tradition. Then last November, I found her standing at my kitchen counter at two in the afternoon on a Tuesday—caught red-handed, literally, with a smear of royal icing on her chin and a half-eaten leaf-shaped cookie in her hand. She didn’t even try to explain. She just pointed at the tray and mumbled, “These are different.”
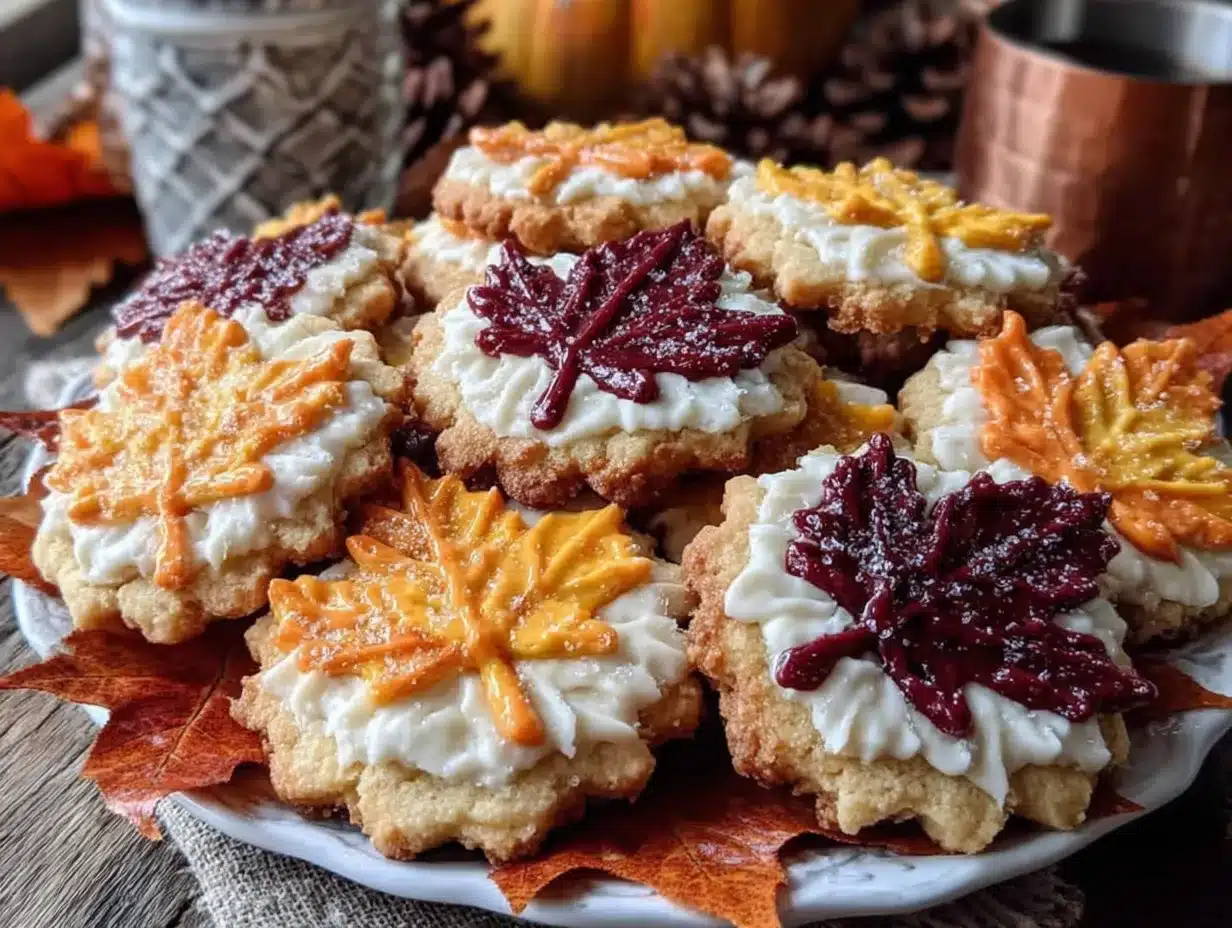
That was the moment these Beautiful Thanksgiving Sugar Cookies with Royal Icing Leaves stopped being just another recipe in my rotation. They became the recipe that proved me wrong, too—because honestly, I used to think sugar cookies were more about looks than taste. You know that feeling when something looks so pretty you almost don’t want to eat it? That was me, every year, staring at my own cookies. I’d spend hours piping intricate leaves in burnt orange and deep burgundy, and then I’d wrap them up without ever tasting one myself. I was so focused on the presentation that I forgot the cookie underneath mattered just as much.
But here’s what I figured out after one particularly frustrating batch that spread into blobs instead of leaves: the cookie itself has to be worth eating. Not just edible, but genuinely craveable. Soft in the center with the slightest snap at the edges, buttery without being greasy, and sturdy enough to hold detailed royal icing without crumbling into a thousand pieces when you bite into it. I tweaked that recipe for months—trying different ratios of butter to sugar, chilling times, baking temperatures—until I landed on something that made even my cookie-skeptic sister sneak back for thirds. And the royal icing leaves? They’re the kind of detail that makes people stop and stare, but they’re actually forgiving enough for a beginner to master. So if you’ve been on the fence about making Thanksgiving cookies that look like they came from a bakery window, let me tell you: this is the version worth trying.
Why You’ll Love This Recipe
Let me be honest with you—I’ve tested a lot of sugar cookie recipes over the years. Some were too soft to hold their shape, others tasted like cardboard with food coloring, and a few were so finicky with the icing that I wanted to throw my piping bags across the kitchen. This one? It’s the Goldilocks of Thanksgiving cookies, and here’s why it works.
- No Spread, No Stress : These cookies hold their shape beautifully during baking, which means your carefully cut turkey, leaf, and pumpkin shapes actually look like what you intended. No blobby disasters.
- Buttery, Not Boring : The cookie itself has real flavor—a hint of vanilla and almond that makes it taste like something special, not just a delivery system for icing.
- Royal Icing That Actually Sets : My recipe gives you a glossy, smooth finish that hardens completely in about 4-6 hours, so you can stack, gift, or transport your cookies without smudging your hard work.
- Perfect for a Thanksgiving Activity : Whether you’re baking solo for a Friendsgiving dessert table or getting the kids involved before the big meal, the decorating part is genuinely fun and meditative.
- Make-Ahead Friendly : You can bake the cookies up to a week in advance and freeze them, then decorate whenever you have a free afternoon. The decorated cookies last for weeks if stored properly.
What makes this recipe different from every other sugar cookie tutorial you’ve seen is the technique. I use a combination of powdered sugar and granulated sugar in the dough—trust me on this—and a brief chill before rolling that makes the dough an absolute dream to work with. No sticking, no cracking, no wrestling with flour every two seconds. And the royal icing? I spent a year perfecting the consistency so it flows like honey but holds a sharp edge when you pipe it. That’s the secret to those crisp, clean leaf veins that look so professional.
This is the kind of recipe that makes you close your eyes after the first bite. It’s comfort food dressed up in autumn colors—butter and sugar transformed into something that feels like a hug. Perfect for impressing your mother-in-law, keeping the kids occupied while the turkey rests, or just treating yourself to a quiet afternoon of piping and listening to a good podcast.
What Ingredients You Will Need
This recipe uses simple, pantry-friendly ingredients to create cookies that taste as good as they look. I’ve tested these ratios more times than I care to admit, so trust me when I say each one plays a specific role in getting that perfect texture and flavor.
For the Sugar Cookies
- Unsalted butter, softened (1 cup / 226g) — I prefer Kerrygold or Plugrà for the richest flavor. Make sure it’s truly softened, not melted, or your cookies will spread.
- Granulated sugar (1 cup / 200g) — Regular white sugar gives the cookies that slight crunch on the edges.
- Powdered sugar (1/2 cup / 60g) — This is my secret ingredient. It makes the cookies tender and keeps them from spreading too much.
- Large egg (1, room temperature) — Room temperature egg incorporates more evenly into the butter mixture.
- Vanilla extract (2 teaspoons) — Pure vanilla, not imitation, if you can swing it. It makes a noticeable difference.
- Almond extract (1/4 teaspoon) — Just a whisper of almond makes people wonder what that “special something” is. Don’t skip it.
- All-purpose flour (2 1/2 cups / 312g) — Spoon and level your flour; don’t scoop directly from the bag or you’ll end up with dry cookies.
- Baking powder (1/2 teaspoon) — Helps the cookies puff just slightly without losing their shape.
- Salt (1/4 teaspoon) — Balances the sweetness and enhances the butter flavor.
For the Royal Icing
- Powdered sugar (4 cups / 480g) — Sift it first to avoid lumps. Trust me on this one.
- Meringue powder (3 tablespoons) — This is what gives royal icing its structure and shine. I use Wilton brand and it’s never failed me.
- Warm water (6-8 tablespoons) — Add gradually; the exact amount depends on humidity.
- Vanilla extract (1/2 teaspoon) — Optional, but I like a hint of flavor in the icing too.
- Gel food coloring (assorted autumn colors: burnt orange, deep red, golden yellow, brown, green) — Americolor or Wilton gels work best. Avoid liquid food coloring—it thins the icing too much.
For Decorating
- Piping bags (disposable or reusable) — I like the 12-inch size for better control.
- Piping tips (#2 or #3 round tips for outlining and flooding, #1 for fine details like leaf veins) — You can also use tipless bags and snip the corner.
- Small squeeze bottles — Game-changer for flooding large areas. I got a set of 4 on Amazon for under $10.
- Couplers — Makes switching between tips a breeze.
- Toothpicks or scribe tool — For popping air bubbles and guiding icing into corners.
- Parchment paper or silicone baking mats — Silpat mats give the most even browning.
Equipment Needed
You don’t need a professional bakery setup to make these cookies look stunning, but having the right tools makes the process infinitely less frustrating. Here’s what I actually use and recommend.
- Stand mixer or hand mixer — A stand mixer with the paddle attachment makes creaming butter and sugar effortless, but a hand mixer works perfectly too. I’ve made these cookies with both.
- Rolling pin with thickness guides — The adjustable rings are worth their weight in gold. They ensure your dough is perfectly even, which means your cookies bake uniformly. I use a wooden rolling pin with silicone rings I bought separately.
- Thanksgiving-themed cookie cutters — Look for leaf shapes (maple, oak, simple teardrop), turkey silhouettes, pumpkins, acorns, and cornucopia shapes. I found a 10-piece autumn set on Amazon that covers everything.
- Baking sheets — Heavy-duty, light-colored aluminum sheets give the most even baking. Dark sheets can over-brown the bottoms.
- Cooling racks — Essential for letting cookies cool completely before icing. I have three wire racks so I can rotate batches quickly.
- Parchment paper — Lining your baking sheets prevents sticking and makes cleanup a breeze.
- Piping bags and tips — As mentioned above, a #2 tip for outlining and a #3 or #4 for flooding will get you through most designs.
- Squeeze bottles — I resisted these for years, thinking they were unnecessary. Now I can’t imagine flooding cookies without them. So much faster and cleaner.
- Small offset spatula — Great for lifting cookies off the counter and for spreading thicker icing if needed.
If you don’t have a stand mixer, don’t let that stop you. I made these cookies for years with just a hand mixer and a bowl. The key is to cream the butter and sugar long enough—about 3 minutes on medium speed—until it’s light and fluffy. Your arm might get a workout, but the cookies will turn out just as good.
Preparation Method
Alright, let’s get into the actual process. I’m going to walk you through this step by step, with all the little details I wish someone had told me when I first started making decorated sugar cookies.
Make the Cookie Dough
- Cream the butter and sugars. In the bowl of your stand mixer fitted with the paddle attachment, beat the softened butter, granulated sugar, and powdered sugar together on medium speed for 3 minutes until light, pale, and fluffy. Scrape down the sides and bottom of the bowl at least once. The mixture should look almost like whipped frosting at this point.
- Add the egg and extracts. Beat in the egg, vanilla extract, and almond extract on medium speed until fully combined, about 30 seconds. Scrape the bowl again. Don’t overmix here—you just want everything incorporated.
- Combine the dry ingredients. In a separate medium bowl, whisk together the flour, baking powder, and salt. This ensures the baking powder is evenly distributed so you don’t get weird puffy spots in your cookies.
- Add dry ingredients to wet. With the mixer on low speed, gradually add the flour mixture, about a third at a time, mixing just until the dough comes together. The dough will look crumbly at first, then it will form a cohesive mass. Stop mixing as soon as you no longer see streaks of flour. Overmixing develops gluten and makes tough cookies.
- Divide and chill. Turn the dough out onto a lightly floured surface and divide it in half. Flatten each half into a disc about 1-inch thick, wrap tightly in plastic wrap, and refrigerate for at least 1 hour. Overnight is even better. Chilling is non-negotiable—it prevents spreading and makes the dough infinitely easier to roll.
Roll and Cut the Cookies
- Preheat your oven to 350°F (175°C). Line two baking sheets with parchment paper or silicone mats.
- Roll out the dough. Lightly flour your work surface and rolling pin. Place one disc of chilled dough on the floured surface. Roll it out to an even 1/4-inch thickness. If you have rolling pin rings, use them. If not, place two wooden spoons or rulers of the same thickness on either side of the dough to guide your rolling pin.
- Cut your shapes. Dip your cookie cutters in flour before each cut to prevent sticking. Press straight down without twisting—twisting seals the edges and can cause uneven baking. Place the cut shapes on your prepared baking sheets, spacing them about 2 inches apart.
- Chill the cut cookies. Here’s a pro tip: once your baking sheet is full of cut cookies, pop it in the freezer for 10 minutes while you reroll the scraps. This extra chill guarantees they hold their shape. I learned this the hard way after a batch of turkeys turned into mutant blobs.
- Bake. Bake the chilled cookies for 8-10 minutes, rotating the pan halfway through. The cookies are done when the edges are just barely starting to turn golden. The centers will look slightly underdone—that’s perfect. They’ll continue to set as they cool.
- Cool completely. Let the cookies cool on the baking sheet for 5 minutes, then transfer them to a wire rack to cool completely. Do not even think about icing them until they are 100% cool. Warm cookies will melt your royal icing into a puddle.
Make and Prepare the Royal Icing
- Mix the dry ingredients. In the bowl of your stand mixer (or a large bowl if using a hand mixer), combine the sifted powdered sugar and meringue powder. Whisk them together to break up any lumps.
- Add water and vanilla. Add 6 tablespoons of warm water and the vanilla extract. Mix on low speed until combined, then increase to medium-high speed and beat for 5-7 minutes. The icing should be thick, glossy, and form stiff peaks when you lift the beater. If it’s too thick to flow, add water one teaspoon at a time. If it’s too thin, add more sifted powdered sugar.
- Separate and color. Divide the icing into separate bowls for each color you want to use. For Thanksgiving leaves, I typically make burnt orange, deep red, golden yellow, brown, and forest green. Use gel food coloring—a tiny dab goes a long way. Stir thoroughly with a small spatula until the color is uniform.
- Adjust consistency for flooding. For outlining, you want a stiff consistency that holds its shape when piped. For flooding (filling in the cookie), thin the icing by adding water a few drops at a time until it flows like honey and a ribbon of icing settles back into itself within 10 seconds when you lift the spatula. This is called the “10-second rule” and it’s the most important skill in cookie decorating.
- Fill piping bags or squeeze bottles. Transfer your outlining icing to piping bags fitted with #2 tips. Put your flooding icing into squeeze bottles or piping bags with slightly larger tips (#3 or #4).
Decorate the Cookies
- Outline the shape. Using your stiff icing, pipe a border around the edge of each cookie. Hold the tip slightly above the cookie and let the icing fall onto the surface. Guide it gently—don’t drag the tip through the icing. For leaf shapes, outline the entire leaf. For turkeys, outline the body and feathers separately.
- Flood the area. Fill the outlined area with your thinner flooding icing. Start at the edges and work your way inward. Use a toothpick or scribe tool to guide the icing into corners and pop any air bubbles. Work quickly—the icing sets fast.
- Add details while wet. For leaf veins, use your stiff green or brown icing with a #1 tip and pipe lines onto the wet flooding icing. The lines will sink in slightly and create a smooth, professional finish. For turkey feathers, pipe dots or lines in contrasting colors onto the wet icing and drag a toothpick through them to create feathered patterns.
- Let dry completely. Place the decorated cookies on a baking sheet and let them dry, uncovered, at room temperature for 4-6 hours, or overnight. The icing should be completely hard to the touch before you stack or store them. Patience is hard, I know, but it’s worth it.
Cooking Tips & Techniques
I’ve made every mistake in the book with sugar cookies, so you don’t have to. Here are the things I wish I’d known from the beginning.
The biggest mistake is skipping the chill. I know you’re in a hurry. I know you want to get these cookies in the oven. But if you don’t chill the dough for at least an hour before rolling, and then chill the cut cookies for 10 minutes before baking, your leaves will spread into amorphous blobs. I learned this the hard way when I tried to rush a batch for a cookie exchange and ended up with cookies that looked like sad, deflated potatoes. The chill solidifies the butter, which means the cookies spread less and hold their shape.
Flour your cutters, not just your surface. Dipping your cookie cutters in flour before each cut prevents the dough from sticking to the cutter and pulling up the edges. If your cookies have ragged edges after cutting, that’s usually the culprit. Also, resist the urge to twist the cutter—press straight down and lift straight up.
The 10-second rule for icing consistency. This is the single most important thing to master for royal icing. When you lift your spatula, a ribbon of icing should fall back into the bowl and the surface should smooth out within 10 seconds. If it takes longer, your icing is too thick and will leave ridges. If it disappears faster, it’s too thin and will run off the edges of your cookies. Adjust with tiny amounts of water or powdered sugar until you hit that sweet spot.
Work in an assembly line. When decorating, outline all your cookies of one shape first, then flood them all. This way the outlining icing has time to set slightly, creating a dam for the flooding icing. If you outline and flood one cookie at a time, you’ll drive yourself crazy and your consistency will suffer.
Use a scribe tool for air bubbles. Those tiny bubbles that appear in your flooding icing are the enemy of a smooth finish. Pop them immediately with a toothpick or scribe tool before they dry. I keep a toothpick in my hand at all times while flooding.
Variations & Adaptations
One of the best things about this recipe is how flexible it is. Here are some ways to make it your own.
Dietary Adaptations: For a dairy-free version, substitute the butter with a high-quality vegan butter stick (like Miyoko’s or Earth Balance). The texture will be slightly different—a touch less tender—but still delicious. For gluten-free cookies, use a 1:1 gluten-free flour blend that contains xanthan gum. I’ve had good results with King Arthur Measure for Measure. The dough will be a bit more fragile, so handle it gently and chill it well.
Flavor Variations: Switch up the extracts to match the season. Try 1 teaspoon of maple extract instead of vanilla for a distinctly autumn flavor. Add 1/2 teaspoon of cinnamon or pumpkin pie spice to the dough for a spiced cookie. A pinch of nutmeg in the royal icing is lovely on leaf-shaped cookies.
Design Variations: Beyond leaves, try making acorns (use a teardrop cutter and add a chocolate chip for the stem), pumpkins (use a round or scalloped cutter and pipe vertical lines), or simple “thankful” circles with piped lettering. For a quick and stunning look, dip the edges of round cookies in colored sanding sugar before baking—no icing required.
No-Icing Option: If royal icing feels intimidating, these cookies are also beautiful simply sprinkled with coarse sanding sugar in autumn colors before baking. The sugar adds sparkle and crunch without any piping. I’ve done this for years when I’m short on time and they still look festive.
One of my favorite personal variations came about by accident. I had leftover royal icing in several colors and didn’t want to waste it, so I spooned dollops of each color into the same piping bag. The result was a marbled effect that looked like autumn leaves—gorgeous and completely unique. Now I do it on purpose.
Serving & Storage Suggestions
These cookies are as practical as they are beautiful, which is why I love them for Thanksgiving entertaining.
Serving: Arrange decorated cookies on a tiered serving stand or a large wooden board for a stunning centerpiece. They’re perfect on a dessert table alongside pumpkin pie and apple crisp, or as a take-home favor for guests. For a Friendsgiving cookie exchange, pack them in clear cellophane bags tied with twine—they make gifts that look like you spent hours at a bakery.
Storage: Once the royal icing is completely dry and hard (after 4-6 hours), you can stack the cookies between layers of parchment paper in an airtight container. They’ll stay fresh at room temperature for up to 2 weeks. Do not refrigerate them—the humidity in the fridge can soften the royal icing and make it tacky.
Freezing: You have two options here. You can freeze the baked, undecorated cookies for up to 3 months. Wrap them tightly in plastic wrap and then foil, then thaw at room temperature before icing. Or you can freeze the decorated cookies for up to 2 months. Place them in a single layer in an airtight container with parchment between layers. Thaw in the container at room temperature to prevent condensation from forming on the icing.
Reheating: These are served at room temperature, so no reheating needed. If you want to refresh the cookies before serving (say, if they’ve been stored for a week), place them on a baking sheet in a 300°F oven for 3-4 minutes, then cool completely. This crisps up the edges slightly without melting the icing.
One thing I’ve noticed: the flavors actually meld and improve after a day or two. The almond extract in the cookies and the vanilla in the icing seem to marry together into something even more delicious. So don’t stress about making these the day before your Thanksgiving dinner—they might actually be better that way.
Nutritional Information & Benefits
Let’s be real—these are sugar cookies with royal icing. They’re a treat, not a health food, and that’s okay. But I do want to give you a realistic picture of what you’re working with.
Per cookie (approximately 2.5-inch leaf shape, with icing): approximately 120-150 calories, 5-6g fat, 18-20g carbohydrates, 1g protein. These numbers will vary based on the size of your cookies and how much icing you use.
Ingredient Benefits: The butter provides a small amount of vitamin A, and the egg adds a touch of protein. The almond extract gives that lovely flavor without any additional sugar. And honestly? The biggest benefit here is the joy of the process. There’s something genuinely meditative about piping royal icing—it forces you to slow down, focus on something beautiful, and create with your hands. In the chaos of Thanksgiving prep, that quiet hour of decorating can be a real gift to yourself.
Dietary Considerations: This recipe contains gluten, dairy, and eggs. For gluten-free or dairy-free adaptations, see the variations section above. The royal icing uses meringue powder, which contains dried egg whites, so it’s not suitable for those with egg allergies. You can substitute aquafaba (the liquid from a can of chickpeas) for the meringue powder and water, but the consistency is trickier to master.
My personal philosophy? These cookies are for special occasions. They’re not an everyday snack, and they shouldn’t be. But when you do make them, make them count—use the best butter, take the time to chill the dough, and enjoy every step. That’s the real nutritional value.
Conclusion
These Beautiful Thanksgiving Sugar Cookies with Royal Icing Leaves are more than just a pretty dessert—they’re a tradition in the making. They’re the cookies that prove even the biggest skeptic can be won over by a recipe that’s been tested, tweaked, and perfected. They’re the project you can tackle solo on a quiet afternoon or turn into a messy, joyful activity with kids and friends.
What I love most about this recipe is how forgiving it is once you understand the basic principles. Chill the dough. Master the 10-second rule. Don’t rush the drying time. Follow those three rules, and you’ll end up with cookies that look like they came from a boutique bakery but taste like they came from a grandmother’s kitchen—warm, buttery, and made with love.
I’d love to hear how your cookies turn out. Did you try a color combination I haven’t thought of? Did your kids invent a new design that surprised you? Drop a comment below and share your creations—I read every single one and I genuinely get excited seeing what you come up with. And if you’re feeling generous, share this recipe with a friend who needs a little Thanksgiving inspiration. Happy baking, and may your royal icing always be the perfect consistency!
Frequently Asked Questions
Can I make the dough ahead of time?
Absolutely. You can refrigerate the dough discs for up to 3 days before rolling and baking. You can also freeze the dough for up to 3 months—just wrap it tightly in plastic wrap and then foil. Thaw in the refrigerator overnight before rolling.
Why did my cookies spread in the oven?
This almost always happens because the dough wasn’t chilled enough. Make sure you chill the dough for at least 1 hour before rolling, and then chill the cut cookies on the baking sheet for 10-15 minutes before they go into the oven. If your kitchen is warm, pop the whole baking sheet in the fridge or freezer.
How do I get the royal icing to dry faster?
You can speed up the drying process by placing the decorated cookies in front of a fan on low speed. Just make sure the fan isn’t blowing directly on the cookies—you want air circulation, not a wind tunnel. A dehumidifier in the room also helps. Never put royal icing cookies in the refrigerator or oven to dry them—the humidity will ruin the finish.
Can I use store-bought royal icing instead of making my own?
You can, but I don’t recommend it. Store-bought royal icing in a can has a different consistency and doesn’t set as hard. It’s also less stable for detailed piping. Homemade royal icing with meringue powder is actually easier to work with and gives a much more professional result. I promise it’s worth the extra 10 minutes.
How far in advance can I make these for Thanksgiving?
You can bake the cookies up to a week ahead and store them unfrosted in an airtight container at room temperature. Decorate them 2-3 days before serving. Once decorated, they’ll stay fresh for up to 2 weeks if stored properly. I usually bake the weekend before Thanksgiving and decorate the Tuesday before—that way I have one less thing to worry about on the big day.
Pin This Recipe!

50+ Beautiful Thanksgiving Sugar Cookies with Royal Icing

These soft, buttery sugar cookies hold their shape beautifully and are decorated with glossy royal icing in autumn colors. Perfect for Thanksgiving gatherings, cookie exchanges, or a fun decorating activity with family.
- Prep Time: 1 hour 30 minutes
- Cook Time: 10 minutes
- Total Time: 2 hours (plus 4-6 hours drying time)
- Yield: 24-36 cookies (depending on cutter size) 1x
- Category: Dessert
- Cuisine: American
Ingredients
- 1 cup (226g) unsalted butter, softened
- 1 cup (200g) granulated sugar
- 1/2 cup (60g) powdered sugar
- 1 large egg, room temperature
- 2 teaspoons vanilla extract
- 1/4 teaspoon almond extract
- 2 1/2 cups (312g) all-purpose flour
- 1/2 teaspoon baking powder
- 1/4 teaspoon salt
- 4 cups (480g) powdered sugar, sifted
- 3 tablespoons meringue powder
- 6–8 tablespoons warm water
- 1/2 teaspoon vanilla extract (optional)
- Gel food coloring (burnt orange, deep red, golden yellow, brown, green)
Instructions
- Cream the butter and sugars: In a stand mixer with paddle attachment, beat softened butter, granulated sugar, and powdered sugar on medium speed for 3 minutes until light and fluffy. Scrape bowl.
- Add the egg and extracts: Beat in egg, vanilla extract, and almond extract on medium speed until combined, about 30 seconds. Scrape bowl.
- Combine dry ingredients: In a separate bowl, whisk together flour, baking powder, and salt.
- Add dry to wet: With mixer on low, gradually add flour mixture, mixing just until dough comes together. Do not overmix.
- Divide and chill: Turn dough onto floured surface, divide in half, flatten into discs, wrap in plastic, and refrigerate at least 1 hour (overnight is better).
- Preheat oven to 350°F (175°C). Line baking sheets with parchment or silicone mats.
- Roll out dough: On floured surface, roll one disc to 1/4-inch thickness. Use rolling pin rings or guides for even thickness.
- Cut shapes: Dip cookie cutters in flour, press straight down without twisting. Place cut shapes 2 inches apart on prepared sheets.
- Chill cut cookies: Place baking sheet in freezer for 10 minutes before baking to prevent spreading.
- Bake: Bake chilled cookies for 8-10 minutes, rotating pan halfway. Edges should be just barely golden. Centers will look slightly underdone.
- Cool completely: Let cookies cool on sheet for 5 minutes, then transfer to wire rack. Do not ice until completely cool.
- Make royal icing: In mixer bowl, combine sifted powdered sugar and meringue powder. Add 6 tablespoons warm water and vanilla. Mix on low, then beat on medium-high for 5-7 minutes until thick and glossy with stiff peaks.
- Color icing: Divide icing into bowls for each color. Add gel food coloring and stir until uniform.
- Adjust consistency: For outlining, keep stiff. For flooding, thin with water a few drops at a time until it flows like honey and settles within 10 seconds (10-second rule).
- Fill piping bags: Put outlining icing in bags with #2 tips. Put flooding icing in squeeze bottles or bags with #3 or #4 tips.
- Outline cookies: Pipe a border around each cookie with stiff icing.
- Flood cookies: Fill outlined areas with flooding icing. Use toothpick to guide into corners and pop bubbles.
- Add details while wet: Pipe leaf veins or other details with stiff icing using #1 tip. For patterns, pipe dots and drag toothpick through.
- Dry completely: Let decorated cookies dry uncovered at room temperature for 4-6 hours or overnight until icing is hard.
Notes
Chilling the dough is non-negotiable to prevent spreading. The 10-second rule for royal icing consistency is crucial. Cookies can be baked up to a week ahead and stored unfrosted. Decorated cookies keep for up to 2 weeks in an airtight container at room temperature. Do not refrigerate. For dairy-free, use vegan butter. For gluten-free, use 1:1 gluten-free flour blend with xanthan gum.
Nutrition
- Serving Size: 1 cookie (2.5-inch l
- Calories: 135
- Sugar: 13
- Sodium: 45
- Fat: 5.5
- Saturated Fat: 3.5
- Carbohydrates: 19
- Fiber: 0.3
- Protein: 1
Keywords: Thanksgiving sugar cookies, royal icing cookies, autumn cookies, decorated sugar cookies, leaf cookies, holiday baking, Thanksgiving dessert


