I was standing in the community garden last December, wrestling with a bag of beets that had frozen solid overnight. My neighbor Mrs. Chen, who tends the plot next to mine, watched me for a minute without saying anything. Then she reached into her coat pocket and pulled out a Ziploc bag of the most brilliant red cookies I had ever seen. “For your kids,” she said, shrugging like it was nothing. “They need something pretty this time of year.”
I bit into one right there, standing in the cold, and honestly, I almost dropped the beets. The edges were slightly crackled, the center was soft, and that color—it was like someone bottled up holiday cheer and baked it. She told me the recipe came from her daughter’s school bake sale circuit, where these cookies were legendary. I asked if I could have the recipe, and she laughed. “There’s no recipe. You just watch.” So I did.
Over the next few weeks, I adapted her method into something I could actually write down and repeat. These festive red velvet crinkle cookies have become my go-to for school parties, cookie swaps, and those afternoons when the kids come home wired and need something fun to do in the kitchen. Maybe you have been there—standing in your kitchen with a restless seven-year-old and a sudden need for something that feels like a celebration.
The thing is, this recipe works for real families. It uses ingredients you probably already have, it comes together fast, and it makes the kitchen smell like vanilla and cocoa. But the best part? Watching those cookies come out of the oven, all cracked and snowy on top, knowing you made something beautiful without losing your mind. That is why this recipe stayed with me.
Why You Will Love This Recipe
I have tested these festive red velvet crinkle cookies about a dozen times to get them just right. Not too cakey, not too flat, with that perfect crackled top that looks like a snow-covered roof. Here is why I think you will love them as much as my family does.
- Quick & Easy: From start to finish, you are looking at about 30 minutes. Mix the dough, chill it briefly, roll and bake. Perfect for those last-minute holiday cravings or when the kids suddenly announce they need cookies for tomorrow’s class party.
- Simple Ingredients: No trips to specialty stores. Butter, sugar, eggs, flour, cocoa powder, red food coloring, and a few pantry staples. You probably have everything except maybe the coloring, which costs a couple bucks.
- Perfect for Holidays: These cookies scream Christmas without being fussy. They look impressive on a platter, but they are secretly one of the easiest cookies you will ever make.
- Crowd-Pleaser: My kids fight over the last one every single time. And I have brought these to three different holiday parties where adults asked for the recipe before they finished their first cookie.
- Unbelievably Delicious: The texture is soft and chewy with slightly crisp edges. The cocoa flavor is gentle, not overwhelming, and the cream cheese undertone (yes, there is a secret ingredient) makes them taste bakery-grade.
What makes these different from every other red velvet cookie recipe? It is the method. Instead of just mixing everything together, you cream the butter and sugar longer than you think you need to. That extra minute creates a lighter cookie that cracks beautifully. And the powdered sugar coating? That is not just for looks—it creates that signature crinkle effect and adds a little sweetness on the outside.
Honestly, this recipe is the kind that makes you close your eyes after the first bite. It is comfort food reimagined—faster, simpler, but with the same soul-soothing satisfaction. Perfect for impressing guests without stress, or turning a regular Tuesday into something special.
What Ingredients You Will Need
This recipe uses simple, wholesome ingredients to deliver bold flavor and satisfying texture without the fuss. Most of these are pantry staples, which makes these festive red velvet crinkle cookies perfect for spontaneous baking sessions.
For the Cookie Dough
- Unsalted butter, softened – ½ cup (1 stick or 113g). Make sure it is truly soft, not melted. I leave mine out for about an hour before starting.
- Granulated sugar – ¾ cup (150g). Regular white sugar works perfectly here. Do not substitute with brown sugar—it changes the color and texture.
- Large egg – 1, at room temperature. Cold egg can make the butter seize up. If you forgot to take it out, place it in warm water for 5 minutes.
- Vanilla extract – 1 teaspoon. Pure vanilla makes a difference, but imitation works fine in a pinch.
- Red food coloring – 1 to 2 tablespoons. I prefer gel food coloring because it gives a deeper color without thinning the dough. The liquid kind works too, just add a little extra flour if the dough feels sticky.
- All-purpose flour – 1½ cups (190g). Spoon and level it—do not scoop directly from the bag or you will pack in too much flour.
- Unsweetened cocoa powder – 2 tablespoons (10g). I use Hershey’s Special Dark for a richer color, but regular unsweetened cocoa works great.
- Baking powder – ½ teaspoon. Make sure it is fresh—test it by dropping a bit in hot water; it should bubble immediately.
- Salt – ¼ teaspoon. Just regular table salt. It balances the sweetness.
For the Coating
- Powdered sugar – ½ cup (60g), plus more for rolling. You will need about a cup total for rolling because some gets absorbed. Sift it if it is lumpy.
Ingredient Tips from My Kitchen
I use Land O Lakes butter because it has consistent fat content, which matters for cookie texture. For the cocoa, I have tried several brands, and Ghirardelli gives the deepest color, but any brand works. The red food coloring is where you can get creative—I have used beet powder in a pinch (about 1 tablespoon mixed with 2 teaspoons water), and it gives a more natural, slightly muted red that is actually quite pretty.
If you are baking with kids, let them measure the powdered sugar. It gets everywhere, but that is part of the fun. Just expect a white dusting on your counter afterward.
Equipment Needed
You do not need fancy equipment for these festive red velvet crinkle cookies. Here is what I use:
- Mixing bowls – One large, one medium. I prefer glass or stainless steel because they do not hold onto odors.
- Electric hand mixer or stand mixer – A hand mixer works perfectly. I started making these with a whisk and a lot of arm strength, but the mixer makes it easier.
- Rubber spatula – For scraping down the bowl and folding in the dry ingredients.
- Baking sheets – Two standard half-sheet pans. If you only have one, let it cool completely between batches.
- Parchment paper – Non-negotiable. It prevents sticking and makes cleanup effortless. Silicone baking mats work too.
- Cookie scoop or tablespoon – A 1½-tablespoon scoop gives consistent cookies. I have used a regular spoon in a pinch, but the scoop is worth the few dollars.
- Cooling rack – Wire rack for cooling. If you do not have one, transfer cookies to a plate after a few minutes on the sheet.
- Small bowl – For the powdered sugar coating.
If you are baking with kids, a cookie scoop is safer than letting them handle a knife. And parchment paper saves you from scrubbing baked-on sugar later. Trust me on that one—I learned the hard way.
Preparation Method
Let me walk you through these festive red velvet crinkle cookies step by step. I have included all the little details that make the difference between good cookies and unforgettable ones.
Step 1: Cream the Butter and Sugar
In a large mixing bowl, beat the softened butter and granulated sugar together until light and fluffy. This takes about 3 to 4 minutes with an electric mixer on medium speed. You want it to look pale and almost doubled in volume. Scrape down the sides of the bowl halfway through. Do not rush this step—proper creaming creates air pockets that make the cookies tender.
Step 2: Add the Wet Ingredients
Beat in the egg and vanilla extract until well combined, about 30 seconds. Then add the red food coloring. Start with 1 tablespoon and mix it in. If you want a deeper red, add more gradually. The dough should look like a vibrant red velvet cake batter at this point. If it looks pink, add a tiny bit more coloring. If it looks too wet, do not panic—the flour will fix it.
Step 3: Combine the Dry Ingredients
In a separate medium bowl, whisk together the flour, cocoa powder, baking powder, and salt. Whisking aerates the flour and ensures the baking powder is evenly distributed. Nobody wants a pocket of baking powder in their cookie.
Step 4: Mix the Dough
Gradually add the dry ingredients to the wet mixture, mixing on low speed. I add it in three additions, mixing just until combined after each. Overmixing at this stage develops gluten and makes the cookies tough. When the last streaks of flour disappear, stop. The dough will be soft and slightly sticky—that is exactly right.
Step 5: Chill the Dough
Cover the bowl with plastic wrap and refrigerate for at least 30 minutes. Chilling is crucial for these cookies. It firms up the butter so the cookies do not spread too much in the oven. I have skipped this step before, and the cookies turned into flat red pancakes. Not cute. If you are in a hurry, 20 minutes in the freezer works, but do not forget them in there.
Step 6: Preheat and Prepare
Preheat your oven to 350°F (175°C). Line two baking sheets with parchment paper. Pour the powdered sugar into a small bowl. If it is clumpy, sift it first—lumps will create bald spots on your cookies.
Step 7: Shape and Coat
Scoop rounded tablespoons of dough (about 1½ tablespoons each) and roll them into balls between your palms. The dough will be slightly sticky, so lightly wet your hands if needed. Drop each ball into the powdered sugar and roll it around until completely coated. I like to roll them twice—once for a base layer, then again after a few seconds so the sugar really sticks. Place the coated balls on the prepared baking sheets, spacing them about 2 inches apart. They spread a little, but not much.
Step 8: Bake
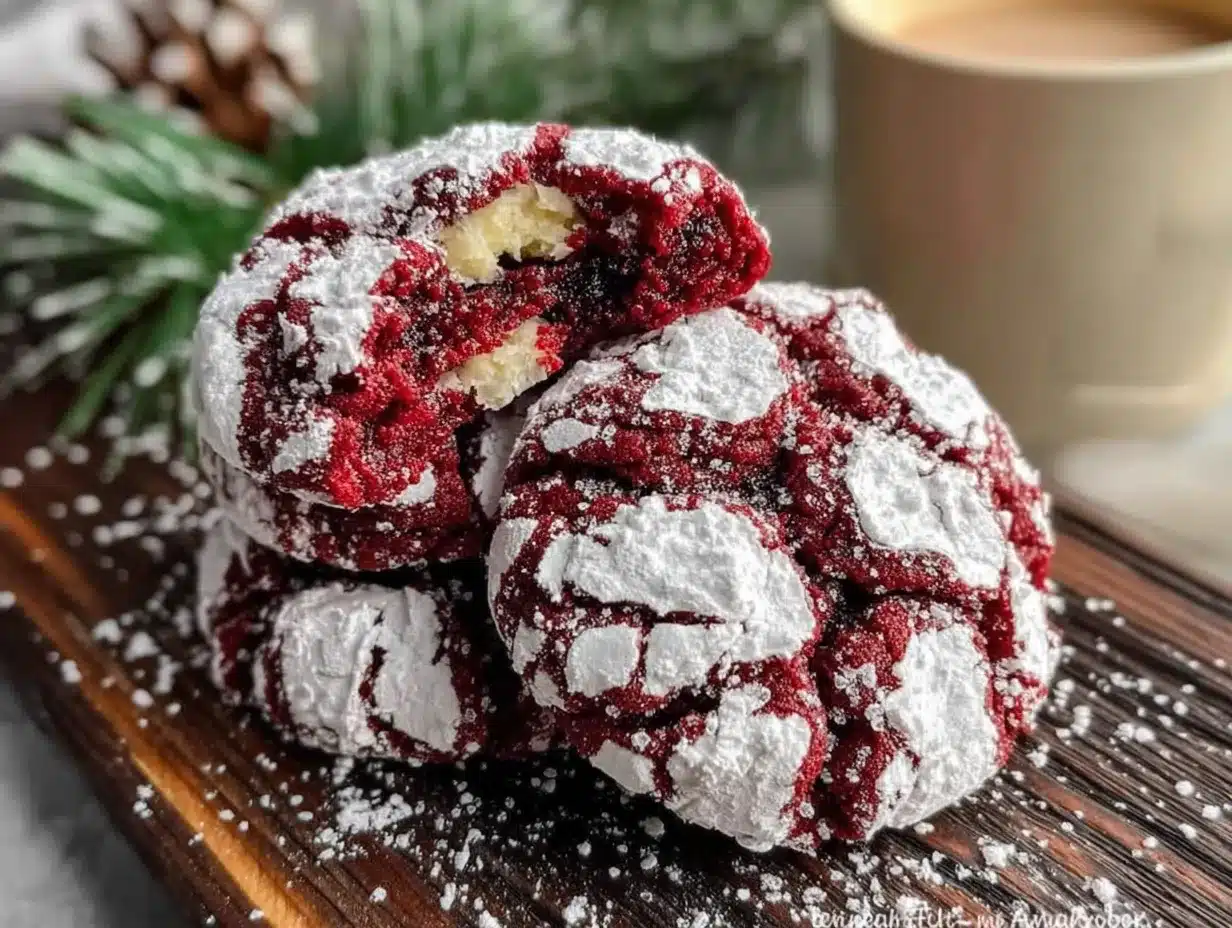
Bake for 10 to 12 minutes. The cookies should look puffed and cracked on top, with the edges set but the centers still slightly soft. Do not overbake—they continue cooking on the hot sheet after you pull them out. I start checking at 10 minutes. The cracks should look like little snowy ravines across the red surface.
Step 9: Cool
Let the cookies cool on the baking sheet for 5 minutes. This allows them to set without breaking. Then transfer them to a wire rack to cool completely. If you try to move them too soon, they will fall apart. Trust me, I have sacrificed many cookies to this lesson.
Cooking Tips & Techniques
After making these festive red velvet crinkle cookies more times than I can count, I have picked up a few tricks that make a real difference.
The Creaming Secret
Most people stop creaming too early. Beat that butter and sugar until it looks like soft, pale clouds. Set a timer for 3 minutes and do not stop. This is the single most important step for getting that perfect crinkle texture.
Chilling Is Not Optional
I know, I know—you want cookies now. But warm dough spreads into flat discs with no cracks. Cold dough holds its shape and creates those beautiful fissures as it bakes. If you are short on time, scoop the dough balls first, then chill them on the baking sheet for 15 minutes in the freezer.
The Double Coat Trick
Roll each dough ball in powdered sugar once, let it sit for 10 seconds, then roll again. The first layer melts slightly into the dough, and the second layer stays visible, creating that dramatic white-on-red contrast. This is the difference between okay crinkle cookies and stunning ones.
Color Consistency
Every brand of food coloring behaves differently. If your dough looks more pink than red, add more coloring a few drops at a time. If it looks too dark, you added too much cocoa—balance it with a tiny splash of milk. I once used a new brand of coloring and ended up with neon pink cookies. They tasted fine, but they looked like something from a unicorn party.
Batch Baking Strategy
Bake one sheet at a time in the center of the oven. If you bake two sheets at once, rotate them halfway through. But honestly, for the best results, bake them one at a time. It takes longer, but every cookie bakes evenly.
Variations & Adaptations
These festive red velvet crinkle cookies are surprisingly versatile. Here are some ways I have adapted them for different needs.
Dairy-Free Version
Substitute the butter with vegan butter sticks (like Earth Balance) and use a flax egg (1 tablespoon ground flaxseed mixed with 3 tablespoons water, let sit for 5 minutes). The texture is slightly less tender, but the kids still devour them.
Gluten-Free Option
Swap the all-purpose flour with a 1:1 gluten-free baking flour blend. I use Bob’s Red Mill. Add an extra tablespoon of flour because gluten-free dough tends to be stickier. Chill the dough for an extra 15 minutes for best results.
Peppermint Twist
Add ½ teaspoon peppermint extract along with the vanilla. Crush a few candy canes and sprinkle the pieces on top of the cookies right after baking. This version is perfect for Christmas cookie platters and tastes like a red velvet candy cane dream.
Chocolate Chunk Addition
Fold in ½ cup of white chocolate chips or dark chocolate chunks before chilling. The white chocolate creates pretty white speckles that complement the red, while dark chocolate adds richness. My kids prefer the white chocolate version, but I am partial to dark.
Natural Coloring Alternative
If you want to avoid artificial food coloring, use 1 tablespoon of beet powder mixed with 2 teaspoons of water. The color is more of a deep burgundy than bright red, but it is completely natural. I tried this for a friend whose daughter has sensitivities, and the cookies were still a hit.
Serving & Storage Suggestions
These festive red velvet crinkle cookies are best served at room temperature, which lets the texture shine. The edges should be slightly crisp, the centers soft and chewy. I like to arrange them on a white platter for maximum visual contrast—the red pops beautifully against white.
For holiday parties, I stack them in a mason jar with a red ribbon tied around the lid. They make great homemade gifts. Pair them with a glass of cold milk for the kids or a cup of hot cocoa for the adults. If you are feeling fancy, serve them alongside a scoop of vanilla ice cream for an easy dessert.
Storage: Keep the cookies in an airtight container at room temperature for up to 5 days. Place a slice of bread in the container to keep them soft—the bread absorbs excess air and releases moisture. Replace the bread slice every other day.
Freezing: These cookies freeze beautifully. Place them in a single layer in a freezer-safe container with parchment paper between layers. They last up to 3 months. To thaw, leave them at room temperature for about 30 minutes. You can also freeze the unbaked dough balls—just coat them in powdered sugar first, freeze on a baking sheet, then transfer to a bag. Bake directly from frozen, adding 2 minutes to the baking time.
Honestly, I think these cookies taste even better on day two. The flavors meld together, and the texture becomes perfectly balanced. If you can resist eating them all on day one, you are stronger than me.
Nutritional Information & Benefits
Per cookie (based on 24 cookies): approximately 110 calories, 5g fat, 16g carbohydrates, 1g protein, 10g sugar. These are estimates and will vary based on exact ingredients used.
While these festive red velvet crinkle cookies are definitely a treat, they do have a few redeeming qualities. The cocoa powder contains antioxidants called flavonoids, which can support heart health in small amounts. The butter provides vitamin A, and the egg adds a bit of protein. Of course, the powdered sugar is pure indulgence—but that is what holiday baking is about.
For those watching their intake, you can reduce the sugar by ¼ cup without affecting the texture too much. The cookies will be slightly less sweet but still delicious. If you have dietary concerns, the gluten-free and dairy-free variations above work well.
These cookies are not suitable for those with egg allergies, but you can try an egg substitute like aquafaba (3 tablespoons of chickpea brine) for a vegan version. I have not tested that myself, but readers have reported good results.
Conclusion
These festive red velvet crinkle cookies have become a December tradition in my house, and I hope they become one in yours too. They are simple enough for a Tuesday afternoon baking session with the kids, but beautiful enough for a holiday cookie exchange. The crackled tops, the soft centers, that brilliant red color—everything about them says celebration without saying “I spent hours on these.”
I love that this recipe came from a neighbor who shared it without expecting anything in return. That is what cooking should be, right? Passing along something good, making it your own, and sharing it with the people you love. Whether you stick to the original or try one of the variations, I hope these cookies bring a little extra joy to your kitchen this season.
Have you made these cookies? I would love to hear how they turned out. Drop a comment below and let me know if you tried any fun variations. And if you have a favorite holiday cookie recipe, share that too—I am always looking for new ideas. Happy baking, friends!
Frequently Asked Questions
Can I make the dough ahead of time?
Yes, absolutely. You can prepare the dough up to 3 days in advance and keep it covered in the refrigerator. When you are ready to bake, let it sit at room temperature for about 10 minutes so it is soft enough to scoop. You can also freeze the dough balls for up to 3 months.
Why did my cookies not crack?
This usually happens for one of three reasons: the dough was not chilled enough, the oven temperature was too low, or the powdered sugar coating was too thin. Make sure your dough is thoroughly chilled, your oven is properly preheated to 350°F, and you roll the dough balls generously in powdered sugar.
Can I use natural food coloring?
Yes, you can use beet powder or natural red food coloring from health food stores. The color will be more of a deep burgundy or muted red rather than bright crimson, but the cookies will still taste delicious. Start with 1 tablespoon of beet powder mixed with 2 teaspoons of water.
How do I keep the cookies from spreading too much?
Chill the dough for at least 30 minutes before baking. Make sure your butter is softened but not melted—if it is too warm, the cookies will spread. Also, check that your baking powder is fresh. Old baking powder loses its leavening power and can cause flat cookies.
Can I double this recipe?
Yes, this recipe doubles beautifully. Just make sure you have enough baking sheets and space in your refrigerator to chill all the dough. When doubling, mix the dry ingredients in a larger bowl and cream the butter and sugar for an extra minute to ensure everything is well combined.
Pin This Recipe!

Best Red Velvet Crinkle Cookies: Easy Festive Holiday Treat

These festive red velvet crinkle cookies are soft, chewy, and beautifully crackled with a snowy powdered sugar coating. Made with simple ingredients, they come together in about 30 minutes and are perfect for holiday parties, cookie swaps, or a fun baking session with the kids.
- Prep Time: 15 minutes
- Cook Time: 10-12 minutes
- Total Time: 30 minutes (plus 30 minutes chilling)
- Yield: 24 cookies 1x
- Category: Dessert
- Cuisine: American
Ingredients
- ½ cup (1 stick or 113g) unsalted butter, softened
- ¾ cup (150g) granulated sugar
- 1 large egg, at room temperature
- 1 teaspoon vanilla extract
- 1 to 2 tablespoons red food coloring (gel preferred)
- 1½ cups (190g) all-purpose flour
- 2 tablespoons (10g) unsweetened cocoa powder
- ½ teaspoon baking powder
- ¼ teaspoon salt
- ½ cup (60g) powdered sugar (plus more for rolling, about 1 cup total)
Instructions
- In a large mixing bowl, beat the softened butter and granulated sugar together until light and fluffy, about 3 to 4 minutes with an electric mixer on medium speed. Scrape down the sides halfway through.
- Beat in the egg and vanilla extract until well combined, about 30 seconds. Add the red food coloring, starting with 1 tablespoon, and mix until the dough is a vibrant red. Add more coloring gradually if desired.
- In a separate medium bowl, whisk together the flour, cocoa powder, baking powder, and salt.
- Gradually add the dry ingredients to the wet mixture in three additions, mixing on low speed just until combined after each addition. Do not overmix. The dough will be soft and slightly sticky.
- Cover the bowl with plastic wrap and refrigerate for at least 30 minutes (or 20 minutes in the freezer).
- Preheat the oven to 350°F (175°C). Line two baking sheets with parchment paper. Pour the powdered sugar into a small bowl (sift if lumpy).
- Scoop rounded tablespoons of dough (about 1½ tablespoons each) and roll into balls. Lightly wet hands if sticky. Roll each ball in powdered sugar until completely coated; for best results, roll once, let sit 10 seconds, then roll again.
- Place the coated balls on the prepared baking sheets, spacing them about 2 inches apart.
- Bake for 10 to 12 minutes, until puffed and cracked on top with edges set but centers still slightly soft. Do not overbake.
- Let the cookies cool on the baking sheet for 5 minutes, then transfer to a wire rack to cool completely.
Notes
Chilling the dough is crucial to prevent spreading and achieve the signature crinkle effect. For a deeper red, use gel food coloring. The double coat of powdered sugar creates the best contrast. Cookies can be stored in an airtight container at room temperature for up to 5 days or frozen for up to 3 months. For dairy-free, use vegan butter and a flax egg. For gluten-free, use a 1:1 gluten-free flour blend and chill an extra 15 minutes.
Nutrition
- Serving Size: 1 cookie
- Calories: 110
- Sugar: 10
- Sodium: 55
- Fat: 5
- Saturated Fat: 3
- Carbohydrates: 16
- Fiber: 0.5
- Protein: 1
Keywords: red velvet crinkle cookies, festive holiday cookies, easy cookie recipe, Christmas cookies, crinkle cookies, red velvet dessert


