There used to be a tiny French patisserie tucked away on a side street in Portland, called Lune et Soleil, that made the most ethereal meringue cookies I have ever tasted. They were these perfect little clouds, so light they’d practically dissolve on your tongue, and every October, they’d shape them into the cutest little ghosts for Halloween. When the owners retired and the shop closed back in 2019, I felt a genuine pang of loss. I mean, it sounds silly to mourn a cookie, but those ghost meringues were a whole tradition for me.
After maybe a dozen attempts—some that turned into sad, sticky puddles, others that looked more like lumpy snowmen than ghosts—I finally cracked the code. Honestly, the secret was less about the recipe and more about patience and a completely dry, low-humidity day. Let me tell you, the first time I pulled a perfect, crisp, white ghost out of my own oven, I almost cried. It was a Tuesday night, and I was standing there in my fuzzy slippers, holding a baking sheet like it was made of gold.
These Cozy Ghost Meringue Cookies are my love letter to that little shop. They are crisp, sweet, and melt-in-your-mouth wonderful, with a tiny bit of melted chocolate for the eyes that makes them look just spooky enough. Maybe you’ve been there, chasing a flavor from a closed-down spot or a vacation you took years ago. This is that recipe for me. These little guys are the perfect way to bring a touch of cozy, nostalgic magic to your Halloween without all the scary stuff. They are the treat you leave out for the “good” spirits, you know?
Why You’ll Love This Recipe
Let’s be honest, not all Halloween treats are created equal. Some are a mess to make, others are loaded with artificial dyes, and a few are just plain terrifying to look at. These Cozy Ghost Meringue Cookies are the exact opposite. They are the cozy, comforting, and incredibly cute Halloween project you didn’t know you needed. I’ve tested this method more times than I can count, and it’s foolproof if you follow a few simple rules.
- Incredibly Easy & Quick: The active prep time is only about 15 minutes. The oven does most of the work, slowly baking them to perfection while you sip some cider. It’s the perfect low-effort, high-reward recipe.
- Simple, Wholesome Ingredients: You only need four basic ingredients: egg whites, sugar, cream of tartar, and vanilla. No scary additives, no neon food coloring, and no trips to a specialty store.
- Perfect for a Cozy Halloween Night: These aren’t for a wild party. They are for a quiet night in, watching Hocus Pocus with a cup of tea. They embody the “hygge” of the spooky season.
- A Guaranteed Crowd-Pleaser: Kids and adults alike go wild for their cute shape and sweet, airy crunch. They vanish faster than any candy bar I’ve ever set out.
- Unbelievably Delicious & Light: They are like a sweet, vanilla-scented cloud that dissolves into pure happiness. The texture is so unique and satisfying, it feels like a special occasion.
What makes this version different from the rest? It’s the specific technique of using a Swiss meringue method (gently heating the sugar and whites) which creates a more stable, marshmallow-like interior that doesn’t weep or crack. This isn’t just another meringue cookie—it’s my best version, born from a dozen failed attempts and a deep, personal craving for that perfect patisserie ghost.
What Ingredients You Will Need
This recipe uses the simplest of ingredients to create something truly magical. The key is in the quality and temperature of these few items. It’s a beautiful example of how a little technique can transform pantry staples into something spectacular.
- 4 Large Egg Whites: These are the structural foundation of our ghosts. For the best volume, make sure your eggs are at room temperature. Cold eggs just won’t whip up as high or as stable. I like to separate my eggs when they are cold and then let the whites sit on the counter for 30 minutes.
- 1 Cup (200g) Granulated Sugar: Not powdered sugar, not brown sugar—just plain, fine granulated sugar. This dissolves into the egg whites to create the structure. I actually prefer a superfine sugar (often called “caster” sugar) if you can find it, as it dissolves even faster. You can make your own by pulsing regular sugar in a food processor for a few seconds.
- 1/2 Teaspoon Cream of Tartar: This is your secret weapon. It’s an acid that stabilizes the egg white foam, preventing it from deflating and helping it hold its shape. It also gives the cookies a slightly whiter, brighter look. If you don’t have it, you can substitute 1 teaspoon of white vinegar or lemon juice, but cream of tartar is really best.
- 1 Teaspoon Pure Vanilla Extract: This adds a warm, cozy flavor that makes these feel like a hug. I recommend using pure vanilla extract, not imitation, for the most authentic and rich taste. A vanilla bean paste would also be incredible, giving you those little specks of vanilla.
- 1/4 Cup Mini Dark Chocolate Chips (for the faces): These are for the ghost’s eyes and mouth. Dark chocolate chips are perfect because they are sturdy enough to press in without melting too much on the warm meringue. You can also use a piping bag with melted chocolate for more precise faces, but chips are easier and more rustic.
Equipment Needed
You don’t need a professional pastry kitchen to make these, but a few key tools will make the process much smoother. I’ve learned the hard way that using the wrong bowl can be a recipe for disaster.
- Stand Mixer or Hand Mixer: A stand mixer with a whisk attachment is the gold standard here. It frees up your hands and provides consistent power. A hand mixer works perfectly fine too, but you’ll need to hold it for 8-10 minutes, so get comfortable.
- Large, Clean Glass or Metal Mixing Bowl: This is crucial. Plastic bowls can hold onto oils and grease, which will completely prevent your egg whites from whipping up. Make sure your bowl and whisk are spotlessly clean and completely dry. A drop of water or a speck of yolk will ruin the whole batch.
- Piping Bag with a Large Round Tip (Wilton 1A or similar): This is the best way to get the classic ghost shape. A piping bag is cheap and reusable. If you don’t have one, a sturdy zip-top bag with a small corner snipped off works in a pinch, but the shapes won’t be as defined.
- Baking Sheets and Parchment Paper: Parchment paper is non-negotiable. It prevents the meringues from sticking and makes clean-up a breeze. Do not use wax paper or a silicone mat that hasn’t been tested—parchment is the most reliable.
- Cooling Rack: Essential for letting the meringues cool completely and dry out without trapping moisture underneath.
Preparation Method
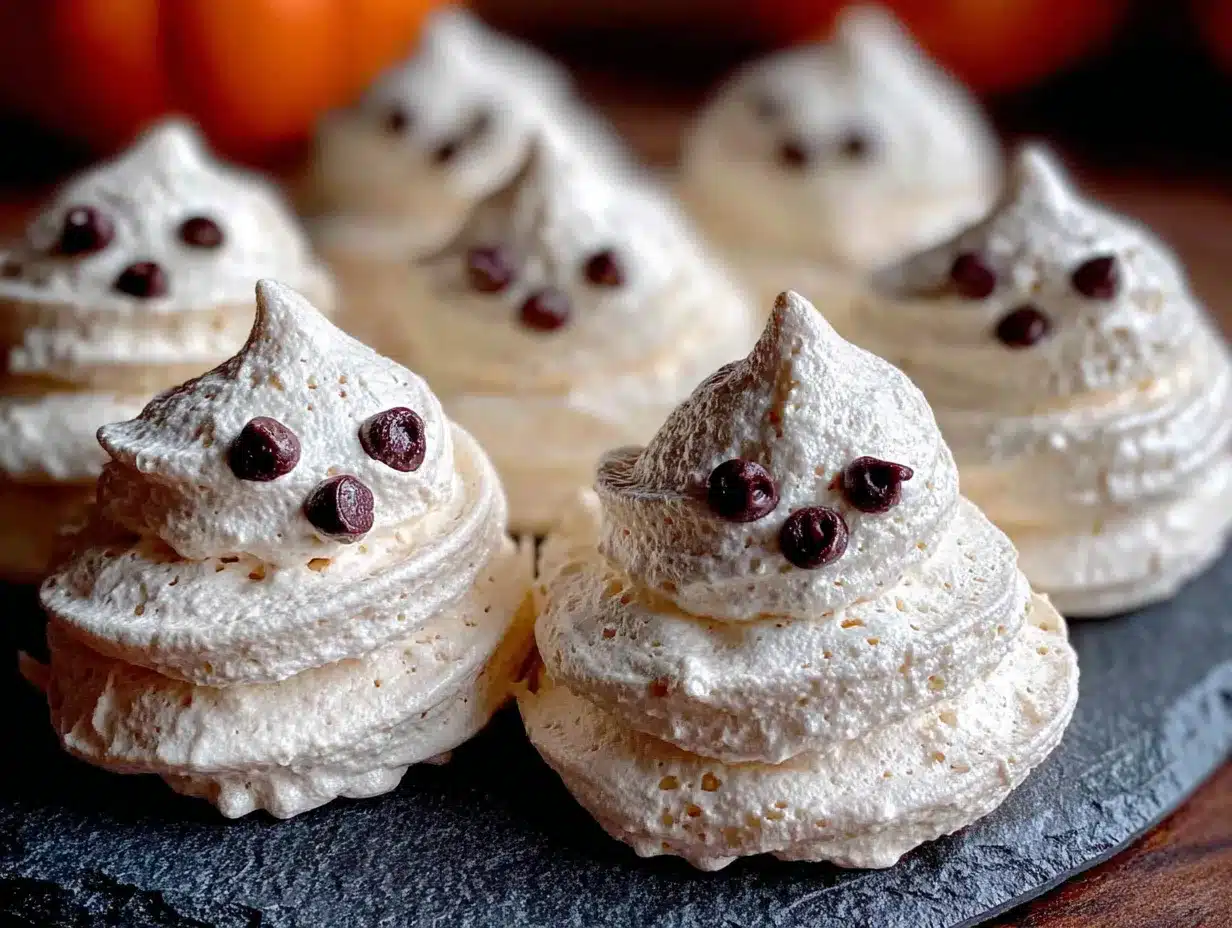
Alright, let’s make some ghosts! This process is more about patience than skill. Trust the steps, and you’ll be rewarded with the cutest, most delicious Halloween treat.
- Preheat and Prep: First, preheat your oven to 200°F (95°C). Yes, that low! We are drying the meringues, not baking them. Line two large baking sheets with parchment paper. Set them aside.
- Make the Swiss Meringue Base: In your impeccably clean mixing bowl, combine the room-temperature egg whites, granulated sugar, and cream of tartar. Whisk them together by hand just until combined. Place the bowl over a pot of simmering water (make sure the bowl doesn’t touch the water). Whisk constantly and gently until the sugar has completely dissolved and the mixture is warm to the touch, about 130-140°F (55-60°C). You can test this by rubbing a tiny bit between your fingers—it should feel smooth, not gritty. This step is non-negotiable for a stable meringue.
- Whip to Stiff Peaks: Carefully transfer the bowl to your stand mixer fitted with the whisk attachment. Start on medium-low speed and gradually increase to medium-high. Whip until the mixture becomes thick, glossy, and forms stiff, proud peaks. This will take 8-10 minutes. The bowl should feel cool to the touch by the end. A good test is to lift the whisk—the meringue should stand up straight without flopping over. Add the vanilla extract in the last 30 seconds of whipping.
- Pipe the Ghosts: Transfer the meringue to your piping bag fitted with the large round tip. Hold the bag perpendicular to the baking sheet, about 1/2 inch above the surface. Squeeze out a tall, fat dollop, about 1.5 inches wide. Stop squeezing, and then pull the bag straight up and away to create a little peak on top. This is the ghost’s head! Repeat, leaving about 1 inch of space between each ghost. You can also make smaller ones for baby ghosts.
- Add the Faces: Now for the fun part! Working quickly before the meringue starts to form a skin, gently press two mini chocolate chips into the “face” area for eyes, and one or two for a little “O” shaped mouth. Don’t push them in too deep, or they’ll just sink. Just nestle them on the surface.
- Bake Low and Slow: Place the baking sheets in the preheated oven. Bake for 90 minutes to 2 hours. Do not open the oven door for the first hour! The meringues are done when they are firm, dry, and easily peel off the parchment paper. They should not be brown at all—just a pure, snowy white.
- Cool Completely: Turn the oven off and crack the door open. Let the meringues cool completely inside the oven for at least an hour. This helps them dry out even more and prevents cracking from a sudden temperature change. Once cool, they are ready to enjoy!
Cooking Tips & Techniques
I have made every mistake in the book with meringues, so let me save you the trouble. Here are the hard-learned lessons that guarantee success.
- Humidity is the Enemy: Do not make these on a rainy or humid day. The sugar attracts moisture from the air, and your meringues will become sticky and chewy instead of crisp. Wait for a dry, cool day for the best results.
- No Yolk Allowed: If even a tiny speck of egg yolk gets into your whites, they will never whip up. It’s best to separate each egg into a small bowl first and then add the white to your main bowl. That way, one bad egg doesn’t ruin the whole batch.
- Patience is a Virtue: I once tried to speed up the process by baking at 300°F. The result was a tray of flat, brown, weeping puddles. The low, slow bake is what creates that perfect, dry, airy texture. Trust the time.
- Check for “Weeping”: If you see little beads of sugar syrup forming on the surface of your meringues while they bake (called “weeping”), your oven is too hot or the sugar wasn’t fully dissolved. Always use the double boiler method for a foolproof Swiss meringue.
Variations & Adaptations
Once you’ve mastered the basic ghost, the possibilities are endless. Here are a few of my favorite ways to change things up for different moods and dietary needs.
- Pumpkin Spice Ghosts: Add 1 teaspoon of pumpkin pie spice and a pinch of cinnamon to the sugar before heating. These smell like fall in a cookie and are perfect for a cozy Halloween night.
- Vegan Meringue Ghosts: You can absolutely make these vegan! Use the liquid from a can of chickpeas (aquafaba) instead of egg whites. Use 3/4 cup of aquafaba and follow the same Swiss meringue method. It works like magic, though the texture is slightly different.
- Peppermint Meringue Ghosts: For a wintery twist, substitute the vanilla extract with 1/2 teaspoon of peppermint extract. Crush up a candy cane and sprinkle the dust on the ghosts right after piping. They look like they’ve been caught in a little snowstorm!
- Chocolate Dipped Ghosts: Once the meringues are completely cool, dip the bottoms in melted dark or white chocolate and let them set on parchment paper. This adds a wonderful richness and a beautiful, finished look.
Serving & Storage Suggestions
These little guys are best served with a bit of theatricality. They are a showstopper on any Halloween dessert table.
- Serving: Serve them at room temperature on a beautiful platter. They look amazing piled high in a glass jar or arranged on a cake stand. They are perfect for a Halloween party, a movie night, or even as a fun, edible gift for friends and neighbors.
- Storage: This is the most important part. Store them in an airtight container at room temperature. Do not refrigerate them! The fridge is humid and will make them sticky. Layer them between sheets of parchment paper to prevent them from breaking. They will stay crisp and perfect for up to 2 weeks if kept dry.
- Freezing: Yes, you can freeze them! Place them in a single layer in a freezer-safe container with parchment between layers. They will last for up to 3 months. Let them thaw at room temperature for about 30 minutes before serving. They won’t lose any of their crunch.
Nutritional Information & Benefits
While these are a treat, they are a much lighter option than a dense, buttery cookie or a slice of cake. They are naturally fat-free and gluten-free, making them a great option for many dietary needs.
| Nutrient | Per Cookie (approx.) |
|---|---|
| Calories | 25-30 |
| Fat | 0g |
| Sugar | 6g |
| Protein | 0.5g |
The main ingredient, egg whites, are a fantastic source of high-quality protein and are low in calories. They are also a good source of riboflavin and selenium. The cream of tartar is a natural byproduct of winemaking, so you can feel a little fancy about that. Honestly, they are a “healthy” indulgence in the world of Halloween sweets—just pure, simple joy without the heavy feeling afterward.
Conclusion
These Cozy Ghost Meringue Cookies are more than just a recipe; they are a little piece of edible nostalgia. They bring back the magic of that little patisserie for me, and I hope they create a new, cozy tradition for you. They are proof that the best treats don’t need to be complicated—just made with a little patience and a lot of heart.
I encourage you to make them your own. Add a little cinnamon, dip them in chocolate, or just enjoy them for their pure, snowy-white cuteness. Please, when you make them, come back and tell me how it went! Leave a comment below and let me know if your family loved them as much as mine does. Happy haunting and happy baking!
Frequently Asked Questions
Can I use liquid egg whites from a carton?
I don’t recommend it. Carton egg whites are pasteurized differently and often have stabilizers that prevent them from whipping up to the same stiff, stable peaks as fresh egg whites. For the best texture and volume, stick with fresh eggs.
My meringues are sticky and chewy. What went wrong?
This almost always means they weren’t baked long enough or the humidity was too high. They need to be completely dried out. If they are sticky, you can pop them back into a 200°F oven for another 20-30 minutes. Also, avoid making them on a rainy day!
Can I use powdered sugar instead of granulated sugar?
No, powdered sugar contains cornstarch, which will alter the texture and prevent the meringue from becoming glossy and smooth. Granulated sugar or superfine sugar is the only way to go for a classic, crisp meringue.
How do I get my meringues perfectly white?
The key to white meringues is a low oven temperature and the cream of tartar. The cream of tartar helps to stabilize the whites and prevent them from browning. Also, make sure your vanilla is clear or use a clear vanilla extract to avoid any off-white coloring.
Can I make the ghost faces with something other than chocolate chips?
Absolutely! You can use black gel food coloring to paint on the faces after they are baked. Or, you can pipe on melted dark chocolate using a small piping bag. Chocolate chips are just the easiest, most kid-friendly option.
Pin This Recipe!
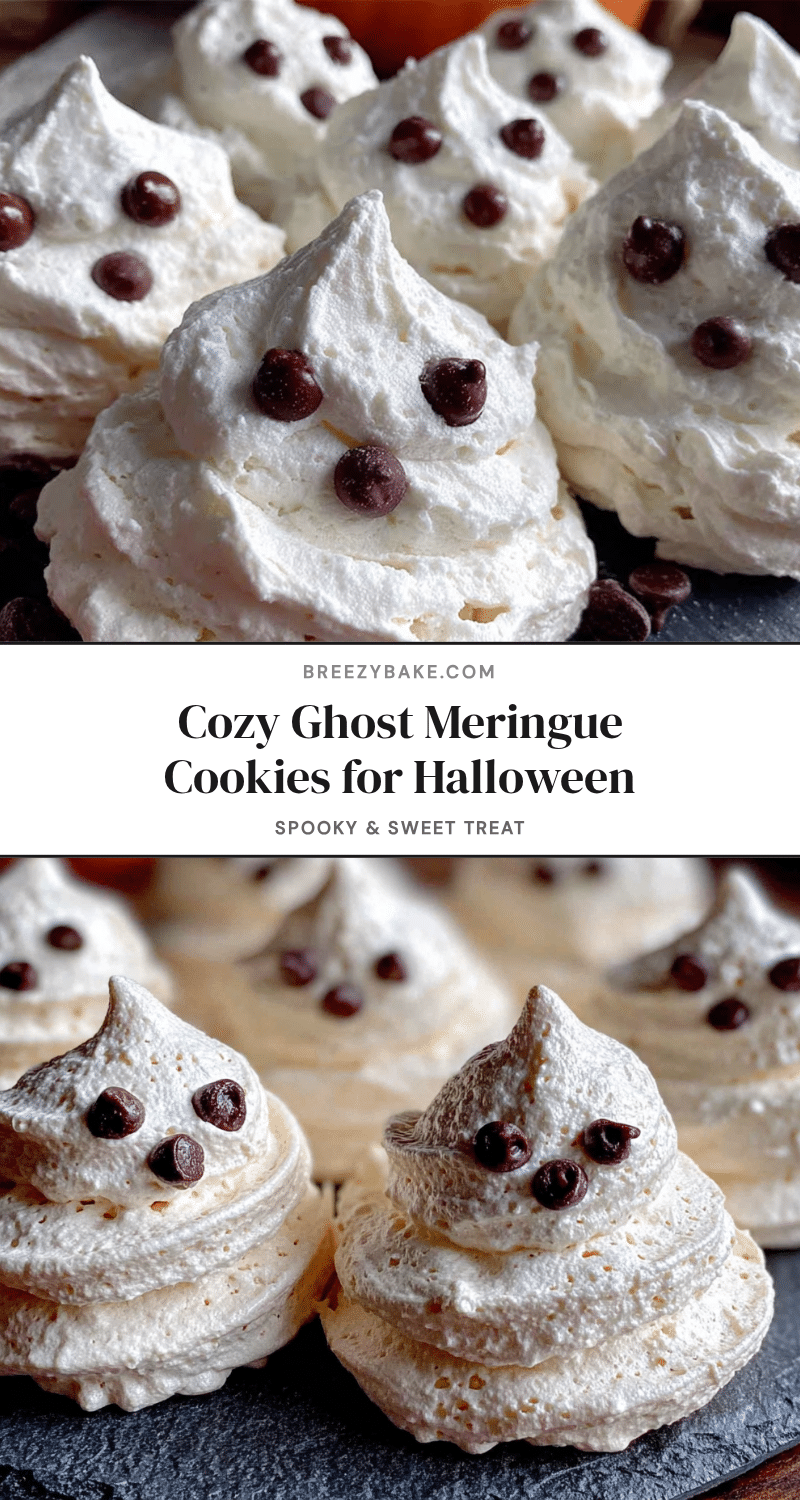
Cozy Ghost Meringue Cookies: Easy Halloween Treat
These Cozy Ghost Meringue Cookies are crisp, sweet, and melt-in-your-mouth wonderful, with a tiny bit of melted chocolate for the eyes that makes them look just spooky enough. They are the perfect way to bring a touch of cozy, nostalgic magic to your Halloween without all the scary stuff.
- Prep Time: 15 minutes
- Cook Time: 1 hour 30 minutes to 2 hours
- Total Time: 2 hours 45 minutes to 3 hours 15 minutes
- Yield: 24 cookies 1x
- Category: Dessert
- Cuisine: French
Ingredients
- 4 large egg whites, at room temperature
- 1 cup (200g) granulated sugar (preferably superfine/caster sugar)
- 1/2 teaspoon cream of tartar
- 1 teaspoon pure vanilla extract
- 1/4 cup mini dark chocolate chips (for the faces)
Instructions
- Preheat your oven to 200°F (95°C). Line two large baking sheets with parchment paper.
- In a clean mixing bowl, combine the room-temperature egg whites, granulated sugar, and cream of tartar. Whisk by hand until combined.
- Place the bowl over a pot of simmering water (bowl should not touch the water). Whisk constantly until the sugar has completely dissolved and the mixture is warm to the touch, about 130-140°F (55-60°C). Test by rubbing a bit between your fingers—it should feel smooth, not gritty.
- Transfer the bowl to a stand mixer fitted with the whisk attachment. Start on medium-low speed and gradually increase to medium-high. Whip until the mixture becomes thick, glossy, and forms stiff, proud peaks, about 8-10 minutes. The bowl should feel cool to the touch. Add the vanilla extract in the last 30 seconds of whipping.
- Transfer the meringue to a piping bag fitted with a large round tip (e.g., Wilton 1A). Hold the bag perpendicular to the baking sheet, about 1/2 inch above the surface. Squeeze out a tall, fat dollop, about 1.5 inches wide. Stop squeezing, then pull the bag straight up and away to create a little peak on top. Repeat, leaving about 1 inch of space between each ghost.
- Working quickly, gently press two mini chocolate chips into the ‘face’ area for eyes, and one or two for a little ‘O’ shaped mouth. Do not push them in too deep.
- Place the baking sheets in the preheated oven. Bake for 90 minutes to 2 hours. Do not open the oven door for the first hour. The meringues are done when they are firm, dry, and easily peel off the parchment paper. They should be pure white, not brown.
- Turn the oven off and crack the door open. Let the meringues cool completely inside the oven for at least an hour. Once cool, they are ready to enjoy.
Notes
Do not make these on a rainy or humid day. Ensure no egg yolk gets into the whites. The low, slow bake is crucial for the perfect texture. Store in an airtight container at room temperature for up to 2 weeks. Can be frozen for up to 3 months.
Nutrition
- Serving Size: 1 cookie
- Calories: 2530
- Sugar: 6
- Sodium: 10
- Carbohydrates: 6
- Protein: 0.5
Keywords: Halloween, ghost, meringue, cookies, easy, treat, gluten-free, low-fat


