My mouth’s already watering for that creamy, spicy punch from the hatch chili chicken enchilada casserole — and I haven’t even started cooking yet. Honestly, there’s something about the way the scent of roasted hatch chilies gently seeps through the kitchen that triggers instant comfort vibes. I’ve got the chicken all shredded and the spicy melted cheese ready to be smothered over layers of tortillas and that velvety, green chili cream sauce. The great thing? This isn’t one of those complicated casseroles that demand you be a culinary genius. Nope, it’s the kind of recipe that makes total sense to my busy brain — bold flavors, creamy textures, and enough kick to remind me I’m eating something with character.
What really seals the deal for me is how the heat from those hatch chilies blends perfectly with the creamy sauce, creating this addictive balance. It’s not just about the spice—it’s about that smooth, cheesy melt that wraps around every bite. And yeah, I’ve tried a handful of enchilada casseroles before, but this one stands out because it respects the hatch chili’s unique flavor. It’s smoky and fresh, not just fiery for the sake of it.
After a long day, this casserole feels like a warm hug in food form, yet it’s bright enough to keep me coming back for seconds without feeling weighed down. Plus, it’s been a hit every single time I’ve served it at family dinners — even my pickiest cousin who usually sneers at anything green gave it a thumbs up. That’s when you know a recipe’s got something special going on. I guess it sticks with me because it’s that rare find: comfort food with a spark of excitement, not just the same old creamy chicken dish. It’s the kind of meal that quietly promises to make your dinner feel a little less routine, a little more memorable.
Why You’ll Love This Recipe
Let’s be real—this creamy hatch chili chicken enchilada casserole isn’t your average weeknight meal. I’ve spent plenty of time tweaking it to get everything just right, and here’s why I keep coming back:
- Quick & Easy: You’ll have this casserole ready in about 45 minutes, perfect for those nights when you want something hearty but can’t spend hours in the kitchen.
- Simple Ingredients: No need to hunt down fancy spices or odd veggies. Most of the ingredients are pantry staples or easy-to-find items, especially if you love Mexican flavors.
- Perfect for Cozy Dinners: Whether it’s a chilly evening or a casual family gathering, this casserole hits all the right notes with its creamy texture and spice balance.
- Crowd-Pleaser: This dish has a reputation for disappearing fast, even with a mix of spice-sensitive and adventurous eaters around the table.
- Unbelievably Delicious: The way that spicy melted cheese melts into the creamy hatch chili sauce is honestly a little addictive—it’s comfort food with a punch.
What really makes this recipe stand apart is the creamy sauce made with roasted hatch chilies blended right into the mix—this gives it a fresh, smoky flavor you don’t get from plain green chilies or canned sauces. The method of layering tortillas with shredded chicken and that spicy cheese melt means every forkful is packed with texture and flavor, not just a soggy casserole. I even swapped in a little sour cream to smooth out the heat, which took it to another level.
This recipe is the kind of dish that quietly earns its spot on your regular rotation. It feels special without the fuss, and once you nail the balance of spice and creaminess, it’s hard to let go. It’s a cozy, satisfying meal that makes you want to linger at the table a bit longer, savoring each bite.
What Ingredients You Will Need
This recipe uses simple, wholesome ingredients to deliver bold flavor and satisfying texture without the fuss. Most of these are pantry staples or fresh finds that let the hatch chili shine without overpowering the dish.
- For the Chicken Filling:
- 2 cups cooked chicken, shredded (rotisserie chicken works great here; I prefer organic for flavor)
- 1 cup diced onions, finely chopped
- 2 cloves garlic, minced
- 1 tablespoon olive oil (for sautéing)
- 1 teaspoon ground cumin (adds warmth and depth)
- Salt and pepper, to taste
- For the Creamy Hatch Chili Sauce:
- 1 cup roasted hatch chilies, peeled and chopped (fresh if you can find them, or jarred ones in a pinch)
- 1 cup sour cream (for creaminess and mellowing heat)
- 1 cup chicken broth (preferably low sodium)
- 1 tablespoon all-purpose flour (to thicken)
- 2 tablespoons unsalted butter
- 1 teaspoon chili powder (to complement the hatch chili flavor)
- Salt, to taste
- For Assembly:
- 8-10 corn tortillas (use fresh if possible, or lightly toasted to avoid sogginess)
- 2 cups shredded cheddar cheese (or a spicy Mexican blend for that melty kick; I like Sargento’s sharp cheddar)
- 1 cup shredded Monterey Jack cheese (adds creaminess and melt)
- Fresh cilantro, chopped (optional garnish)
- 1-2 fresh jalapeños, sliced (for extra heat, optional)
If you want to make this gluten-free, swap the flour for cornstarch or a gluten-free flour blend. For a dairy-free version, try coconut yogurt instead of sour cream and a plant-based shredded cheese. The key is to keep the balance between creamy and spicy intact so the casserole still delivers that comforting richness.
Equipment Needed
- Large skillet or sauté pan – for cooking the onions, garlic, and chicken filling
- Medium saucepan – to prepare the creamy hatch chili sauce
- 9×13-inch casserole dish – ideal size for layering and baking
- Mixing bowls – for combining ingredients
- Sharp knife and cutting board – for chopping chili, onions, and jalapeños
- Measuring cups and spoons – for accuracy, especially with spices and liquids
- Optional: Blender or food processor – if you prefer a super smooth sauce, blending the hatch chilies with the sour cream works wonders
I personally use a cast iron skillet for the chicken filling because it distributes heat evenly and gives the onions a nice caramelized edge. For the sauce, a non-stick saucepan makes cleanup much easier (trust me on that one). If you don’t have a 9×13 casserole dish handy, an 8×8 will work too, just expect thicker layers and slightly longer baking time.
Preparation Method

- Preheat your oven to 375°F (190°C). This gives plenty of time for your casserole to bake to bubbly perfection while you prep the filling and sauce.
- Make the chicken filling: Heat 1 tablespoon of olive oil in a large skillet over medium heat. Add the diced onions and cook for about 3-4 minutes until translucent. Toss in the minced garlic and cook another minute, careful not to burn it. Stir in the shredded chicken, cumin, salt, and pepper. Cook for 5 minutes, stirring occasionally, until everything’s heated through and aromatic. Set aside.
- Prepare the creamy hatch chili sauce: In a medium saucepan, melt 2 tablespoons of unsalted butter over medium heat. Whisk in 1 tablespoon of flour and cook for 1-2 minutes to form a roux—this will thicken your sauce nicely. Slowly whisk in the chicken broth, making sure no lumps form. Add the roasted hatch chilies, sour cream, chili powder, and salt. Simmer gently for 5-7 minutes, stirring often, until the sauce is creamy and slightly thickened. If you want it smoother, use a blender to puree the sauce before mixing with the rest.
- Warm the tortillas: To prevent sogginess, warm the corn tortillas either in a dry skillet or wrapped in a damp towel in the microwave for about 20 seconds. This makes them pliable and easier to layer.
- Assemble the casserole: Spread a thin layer of the creamy hatch chili sauce on the bottom of your casserole dish. Place 3-4 tortillas on top, overlapping slightly. Spoon half the chicken filling evenly over the tortillas, then drizzle with a third of the sauce. Sprinkle a generous layer of shredded cheddar and Monterey Jack cheese. Repeat the layers once more: tortillas, chicken filling, sauce, and cheese. Finish with a final layer of tortillas, the remaining sauce, and the rest of the cheese on top.
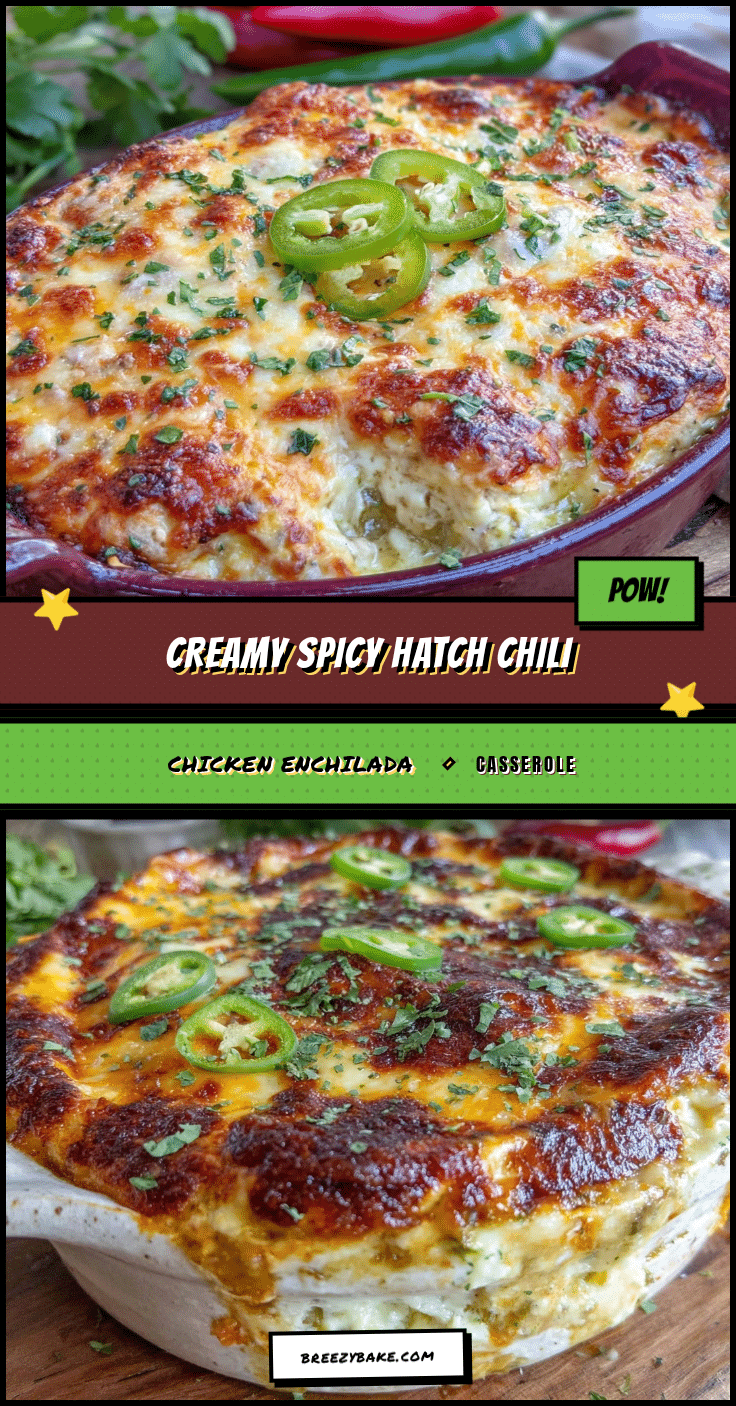
- Bake: Place the casserole in the preheated oven and bake for 25-30 minutes. You’ll know it’s ready when the cheese on top is melted, bubbly, and starts to turn golden brown at the edges.
- Garnish and serve: Let the casserole rest for 5-10 minutes before serving. Sprinkle with fresh cilantro and sliced jalapeños if you want extra heat. This gives the layers time to set, making it easier to cut and serve.
Pro tip: If the top starts browning too fast, loosely cover with foil halfway through baking. Also, when shredding the chicken, try to keep the pieces fairly uniform—that way, every bite has balanced texture and flavor.
Cooking Tips & Techniques
This recipe really shines when you get the layering and sauce consistency right. Here’s what I’ve learned from multiple attempts (and a few small disasters):
- Roasting hatch chilies: If you’re using fresh hatch chilies, roast them on a grill or under the broiler until the skin blisters and chars. Then seal them in a plastic bag for 10 minutes to loosen the skin for easy peeling. This step is key for that smoky, authentic flavor.
- Balancing heat and creaminess: Hatch chilies can vary in heat from mild to pretty spicy. Taste as you go, especially when adding chili powder and jalapeños. Adding sour cream to the sauce tames the heat without dulling the flavor.
- Avoid soggy tortillas: Warming the tortillas before layering keeps them pliable and prevents them from soaking up too much sauce. It’s a simple trick, but makes a big difference in texture.
- Cheese blend matters: Mixing a sharper cheddar with Monterey Jack adds flavor complexity and creaminess. Avoid pre-shredded cheese with anti-caking agents as it tends to melt less smoothly.
- Timing is everything: Let the casserole rest before serving. I’ve rushed this step, and the layers slip apart. Waiting helps it hold together and flavors meld.
- Multitasking tip: While the sauce simmers, prep your chicken filling and warm tortillas. It keeps things moving efficiently without stress.
One time, I skipped the roux step for the sauce and ended up with a runny mess. Lesson learned: that little flour-butter combo is essential for body and richness. Also, don’t be shy with seasoning—hatch chili dishes can sometimes need a pinch more salt to pop.
Variations & Adaptations
This casserole is pretty flexible, so feel free to make it your own depending on what you have on hand or what flavors you’re craving.
- Vegetarian version: Swap the chicken for sautéed mushrooms, black beans, or roasted veggies like zucchini and corn. Add extra cheese or a bit of smoky paprika for depth.
- Low-carb adaptation: Use low-carb tortillas or layer with thin slices of zucchini or eggplant instead of tortillas. This cuts carbs but keeps the creamy, cheesy goodness intact.
- Seasonal twist: In summer, fresh roasted hatch chilies are unbeatable, but in off-season, jarred or frozen chilies work well. You might also add fresh corn kernels for a sweet crunch.
- Extra spicy: Add diced chipotle peppers in adobo or a few dashes of hot sauce into the sauce. Just be ready with some extra sour cream on the side!
- Personal favorite: I sometimes stir in a handful of fresh spinach into the chicken filling for a pop of color and nutrition—no one notices the greens, but it boosts the meal.
For a fun change, you can try layering the casserole in individual ramekins for personalized portions, perfect for game day or dinner parties. Speaking of game day, if you like bold chicken dishes with a spicy kick, you might appreciate the flavor punch in my crispy Super Bowl chicken nacho crust pizza recipe too.
Serving & Storage Suggestions
This casserole is best served warm, right out of the oven, with just a little cooling time to let it set. It pairs beautifully with simple sides like a fresh green salad or Mexican street corn for a full meal. I also love serving it alongside a chilled, creamy dessert like the chocolate-covered strawberry ice cream mousse cups to balance the heat.
Leftovers store well in the fridge for up to 3 days, tightly covered. Reheat individual portions in the microwave or oven until warmed through. The casserole’s flavors actually deepen overnight, making second-day servings even better (if you can wait that long!).
For longer storage, freeze in airtight containers for up to 2 months. Thaw overnight in the fridge before reheating. To keep the top cheese layer from drying out, cover with foil during reheating.
Nutritional Information & Benefits
This creamy hatch chili chicken enchilada casserole is a delicious way to get protein, some veggies, and a dose of spice all in one dish. Here’s a rough estimate per serving (serves 6):
| Calories | ~380 kcal |
|---|---|
| Protein | 30 g |
| Fat | 18 g |
| Carbohydrates | 22 g |
| Fiber | 3 g |
Chicken provides lean protein, while hatch chilies bring vitamins A and C, plus antioxidants. The sour cream adds calcium and richness without too many extra calories. If you want to lighten it up, swap half the sour cream with Greek yogurt.
This casserole can fit nicely into gluten-free and lower-carb diets with simple tweaks, making it a versatile family meal option. Just watch for allergens in cheese or tortilla ingredients if needed.
Conclusion
This creamy hatch chili chicken enchilada casserole with spicy melted cheese has become my go-to when I want a cozy meal that feels a little special. The balance of smoky hatch chili heat and that rich, cheesy creaminess is something I keep coming back to — it’s comforting without being boring.
Feel free to tweak the spice level or add your favorite veggies to make it your own. I love how adaptable this dish is, plus it’s straightforward enough to whip up even on busy nights. Honestly, it’s one of those recipes that quietly wins hearts around the dinner table.
When you make this casserole, I’d love to hear how you customize it or what sides you pair it with—sharing those little tweaks is half the fun. So go ahead, give this recipe a try and enjoy every creamy, spicy bite!
FAQs About Creamy Hatch Chili Chicken Enchilada Casserole
Can I use canned green chilies instead of fresh hatch chilies?
Yes, canned green chilies can work in a pinch, but fresh or roasted hatch chilies give a smokier, more vibrant flavor that really makes the dish stand out.
How spicy is this casserole?
It has a mild to medium heat level thanks to the hatch chilies and chili powder. You can adjust the spice by adding or omitting jalapeños or using milder chilies.
Can I prepare this casserole ahead of time?
Absolutely! Assemble it the day before, cover tightly, and refrigerate. When ready, bake it a little longer (about 35-40 minutes) until bubbly and heated through.
What’s the best way to reheat leftovers?
Reheat in the oven at 350°F (175°C) covered with foil to keep moisture, or microwave individual portions until hot and cheese is melty.
Is this recipe gluten-free?
Using corn tortillas and swapping the flour in the sauce for cornstarch or gluten-free flour makes this casserole gluten-free-friendly.
Pin This Recipe!
Creamy Hatch Chili Chicken Enchilada Casserole

A creamy, spicy casserole featuring shredded chicken, roasted hatch chilies, and melted cheese layered with tortillas for a comforting and flavorful meal.
- Prep Time: 15 minutes
- Cook Time: 30 minutes
- Total Time: 45 minutes
- Yield: 6 servings 1x
- Category: Main Course
- Cuisine: Mexican
Ingredients
- 2 cups cooked chicken, shredded (rotisserie chicken preferred)
- 1 cup diced onions, finely chopped
- 2 cloves garlic, minced
- 1 tablespoon olive oil
- 1 teaspoon ground cumin
- Salt and pepper, to taste
- 1 cup roasted hatch chilies, peeled and chopped
- 1 cup sour cream
- 1 cup chicken broth (preferably low sodium)
- 1 tablespoon all-purpose flour (or cornstarch/gluten-free flour for gluten-free version)
- 2 tablespoons unsalted butter
- 1 teaspoon chili powder
- 8–10 corn tortillas
- 2 cups shredded cheddar cheese (or spicy Mexican blend)
- 1 cup shredded Monterey Jack cheese
- Fresh cilantro, chopped (optional garnish)
- 1–2 fresh jalapeños, sliced (optional for extra heat)
Instructions
- Preheat your oven to 375°F (190°C).
- Make the chicken filling: Heat olive oil in a large skillet over medium heat. Cook diced onions for 3-4 minutes until translucent. Add minced garlic and cook for 1 minute. Stir in shredded chicken, cumin, salt, and pepper. Cook for 5 minutes until heated through. Set aside.
- Prepare the creamy hatch chili sauce: Melt butter in a medium saucepan over medium heat. Whisk in flour and cook for 1-2 minutes to form a roux. Slowly whisk in chicken broth, ensuring no lumps form. Add roasted hatch chilies, sour cream, chili powder, and salt. Simmer gently for 5-7 minutes until sauce thickens. Optionally blend for a smoother sauce.
- Warm the tortillas in a dry skillet or microwave wrapped in a damp towel for about 20 seconds to make them pliable.
- Assemble the casserole: Spread a thin layer of sauce on the bottom of a 9×13-inch casserole dish. Layer 3-4 tortillas overlapping slightly. Spoon half the chicken filling over tortillas, drizzle with a third of the sauce, and sprinkle with shredded cheddar and Monterey Jack cheese. Repeat layers once more. Finish with a final layer of tortillas, remaining sauce, and cheese on top.
- Bake in the preheated oven for 25-30 minutes until cheese is melted, bubbly, and golden brown at the edges.
- Let the casserole rest for 5-10 minutes before serving. Garnish with fresh cilantro and sliced jalapeños if desired.
Notes
To avoid soggy tortillas, warm them before layering. Roasting hatch chilies enhances smoky flavor. Let casserole rest before serving to set layers. Cover with foil if cheese browns too quickly. For gluten-free, substitute flour with cornstarch or gluten-free flour. For dairy-free, use coconut yogurt and plant-based cheese. Adjust spice by adding or omitting jalapeños.
Nutrition
- Serving Size: 1/6 of casserole
- Calories: 380
- Fat: 18
- Carbohydrates: 22
- Fiber: 3
- Protein: 30
Keywords: hatch chili, chicken enchilada casserole, creamy, spicy, melted cheese, Mexican casserole, comfort food