“Why can’t we just dip the pretzels in white chocolate and then drizzle the dark chocolate on top?” my friend Jen asked me last October.
I started to explain why that wouldn’t work — that the chocolate would slide off, that the pretzel rods were too smooth, that you needed a proper coating technique. Then I stopped. Honestly? I had no good reason. I was just used to doing it the complicated way, the way I’d seen on fancy baking blogs. I grabbed the bag of pretzel rods and said, “You know what? Let’s try it.”
That Tuesday afternoon, standing in my cluttered kitchen with Halloween napkins scattered across the counter and a bowl of melted white chocolate that was definitely too hot, Jen proved me completely wrong. The chocolate clung perfectly. The drizzle stayed put. And the best part? We didn’t need a single special tool or piping bag. I used a fork — the same one I’d just eaten lunch with.
These Easy Chocolate Mummy Wrapped Pretzel Rods are now my go-to for every Halloween gathering. They’re the kind of snack that makes people stop mid-conversation and say, “Wait, you made these?” I mean, they look like you spent hours fussing, but let me tell you — they come together in about 20 minutes flat. Maybe you’ve been there, scrolling through complicated Halloween recipes and feeling that familiar knot of dread. This isn’t that. This is the recipe that makes you look like a kitchen hero with almost zero effort.
The first time I brought these to a friend’s costume party, they disappeared before the punch bowl was even set up. Someone actually asked if I’d taken a class. I just smiled and said, “Nope, just listened to my friend Jen.”
Why You’ll Love This Recipe
Let’s face it — Halloween treats can be a total pain. Between melting candy melts, dealing with sticky caramel, and trying to make things look “spooky,” most recipes leave you with a sink full of dishes and a headache. These mummy pretzel rods are the exact opposite of that.
- Quick & Easy: From start to finish, you’re looking at about 20 minutes of active work. The hardest part is waiting for the chocolate to set, and honestly, you can just throw them in the fridge and forget about them.
- Simple Ingredients: Three ingredients. I’m not kidding. Pretzel rods, white chocolate or candy melts, and dark chocolate for the eyes. That’s it. No fancy baking supply store run required.
- Perfect for Halloween Parties: These are the ultimate spooky party snack. They’re portable, they don’t get messy, and they fit right in with any Halloween spread — from casual potlucks to full-on costume bashes.
- Crowd-Pleaser: Kids love them, adults love them, and people who claim they “don’t like sweets” will still grab one. The salty-sweet combo is basically irresistible.
- Unbelievably Delicious: There’s something about that crunchy pretzel rod wrapped in creamy white chocolate with those little dark chocolate eyes staring back at you. It’s comfort food with a spooky twist.
What makes these different from every other Halloween treat out there? It’s the texture. You get that satisfying snap from the pretzel, then the smooth melt of white chocolate, and then that tiny pop of dark chocolate. It’s a party in your mouth — and I don’t say that lightly. These are the kind of treats that make you close your eyes after the first bite, even if you’re standing in a room full of people.
What Ingredients You Will Need
This recipe keeps things beautifully simple. You’ll only need a handful of ingredients, and they’re all easy to find at any grocery store. Here’s what you’ll need to make these adorable (and slightly creepy) mummy pretzel rods.
- Pretzel Rods (1 standard bag, about 12-16 rods) – Look for thick, sturdy pretzel rods that won’t snap easily when you dip them. I personally like the Snyder’s of Hanover brand — they hold up well and have that perfect salty crunch. If you can only find thin pretzel sticks, just be extra gentle during dipping.
- White Chocolate Melting Wafers (12 ounces) – You can use white chocolate chips, but I highly recommend melting wafers or candy melts. They melt smoother and set up firmer without needing to temper. Ghirardelli white chocolate melting wafers are my go-to — they have that rich, creamy flavor without being overly sweet. If you’re using white chocolate chips, add a teaspoon of coconut oil to help them melt smoothly.
- Dark Chocolate Melting Wafers (4 ounces) – These are for the mummy eyes. You could also use semi-sweet chocolate chips or even milk chocolate if that’s what you have. I prefer dark chocolate because it contrasts beautifully against the white chocolate and adds a richer flavor. Wilton dark candy melts work great here.
- Optional Decorations – A little sprinkle of edible glitter or sanding sugar can make these extra special for parties. Just dust them on while the white chocolate is still wet.
One thing I learned the hard way — don’t use white chocolate that’s past its expiration date. It seizes up and turns into this grainy, clumpy mess that’s impossible to work with. Trust me, I had to toss an entire batch two Halloweens ago. Fresh ingredients make all the difference here.
Equipment Needed
You don’t need a fancy kitchen setup for these mummy pretzel rods. Here’s what you’ll actually use:
- Microwave-Safe Bowls (2 small bowls) – One for the white chocolate, one for the dark chocolate. Glass or ceramic works best.
- Parchment Paper or Wax Paper – For setting the dipped pretzels on. Parchment paper is non-stick and makes cleanup a breeze.
- Baking Sheet – To hold the parchment paper and give the pretzels a flat surface to set on. A cookie sheet works perfectly.
- Fork or Dipping Tool – A regular dinner fork is all you need. You can buy special dipping tools, but honestly? A fork does the same job for free.
- **Small Piping Bag or Zip-Top Bag** – For the dark chocolate drizzle. A tiny corner snipped off a sandwich bag works perfectly. No need to buy piping bags.
- Spatula or Butter Knife – For scraping excess chocolate off the pretzels. A rubber spatula is gentler, but a butter knife works too.
I’ve been using the same tired baking sheet for years, and it still works perfectly. Don’t feel like you need to buy anything special. The first time I made these, I used a chopstick to drizzle the chocolate because I couldn’t find my piping bag. It worked like a charm.
Preparation Method

Alright, let’s get to the fun part. Here’s how to make these spooky little mummies step by step.
- Prep your workspace. Line a baking sheet with parchment paper. Make sure it’s big enough to hold all your pretzel rods without them touching each other. Clear your counter — you’ll need room to work quickly once the chocolate is melted.
- Melt the white chocolate. Put your white chocolate melting wafers in a microwave-safe bowl. Microwave in 30-second intervals, stirring well after each interval. It usually takes about 1-2 minutes total. Stop when the chocolate is mostly melted — you can stir it until it’s completely smooth. Don’t overheat it, or it’ll seize up and turn grainy. (I may or may not have learned this the hard way.)
- Dip the pretzels. Hold one pretzel rod by the end and dip it into the melted white chocolate. Use a spoon to help coat it if needed, or just roll it around in the bowl. Lift it out and let the excess chocolate drip back into the bowl. You want a nice even coating, but you don’t need it to be perfectly smooth — the mummy look actually benefits from some texture.
- Set the dipped pretzels. Place each dipped pretzel rod on the parchment-lined baking sheet. Leave a little space between each one so they don’t stick together. If you want, you can use a toothpick to gently create some “bandage” lines in the chocolate while it’s still wet. This gives them that wrapped mummy look.
- Melt the dark chocolate. In a separate microwave-safe bowl, melt your dark chocolate wafers the same way — 30-second intervals, stirring in between. Be careful not to overheat it.
- Create the mummy eyes. Transfer the melted dark chocolate to a small piping bag or a zip-top bag with a tiny corner snipped off. Pipe two small dots onto each pretzel rod for the mummy’s eyes. You can make them cute and round or a little messy — either way works.
- Add the bandage lines. Using the same piping bag, drizzle thin lines of dark chocolate across the white chocolate coating to look like mummy bandages. Don’t overthink this — a few random lines in different directions looks perfectly spooky.
- Let them set. Place the baking sheet in the refrigerator for about 15-20 minutes, or until the chocolate is completely firm. If you’re in a hurry, you can pop them in the freezer for 5-10 minutes, but watch them closely so the chocolate doesn’t crack.
- Serve or store. Once the chocolate is set, you can arrange them on a platter or store them in an airtight container. They’re ready to eat immediately!
One thing I always do — I make a few extra because someone will definitely want to “test” one before the party starts. It’s usually me.
Cooking Tips & Techniques
After making these mummy pretzel rods for three Halloweens in a row, I’ve picked up a few tricks that make the process even easier.
Don’t skip the parchment paper. I tried wax paper once because I ran out of parchment, and the chocolate stuck to it. Parchment paper is non-negotiable here. It saves you from peeling chocolate off your counter later.
Work in small batches. If you’re making a big batch, only melt half the white chocolate at a time. It starts to thicken as it cools, and dipping becomes harder. Freshly melted chocolate gives you a smoother coating every time.
Use a cooling rack trick. Instead of placing the dipped pretzels directly on parchment, you can set them on a wire cooling rack over a baking sheet. This lets excess chocolate drip off and gives you a cleaner finish. Just slide a piece of parchment under the rack for easy cleanup.
Temperature matters. If your kitchen is warm, the chocolate will take longer to set. Pop the baking sheet in the fridge for faster results. If it’s cold outside, they’ll set on the counter in about 30 minutes. I’ve made these in both conditions, and the fridge method is my favorite — it’s just faster.
Don’t overpipe the eyes. I made the mistake of piping huge chocolate dots the first time, and they looked more like creepy spiders than mummies. Small dots — about the size of a pea — look perfect. You can always add more, but you can’t take them away.
My biggest failure: Last year, I tried to speed things up by melting the chocolate on the stovetop. The bottom layer scorched, and the whole batch tasted burnt. Microwave is the way to go — it’s faster and more controlled. Learn from my mistakes, friends.
Variations & Adaptations
One of the best things about this recipe is how easy it is to customize. Here are some fun variations I’ve tried over the years.
- Ghost Pretzels: Skip the dark chocolate bandages and just pipe two big eyes and a little “boo” mouth. They look adorable and are even faster to make.
- Pumpkin Spice Mummies: Add a teaspoon of pumpkin pie spice to the white chocolate before melting. It gives them a warm, fall flavor that pairs beautifully with the salty pretzel.
- Gluten-Free Option: Use gluten-free pretzel rods. They’re available at most grocery stores now, and they work exactly the same way. The taste is slightly different, but still delicious.
- Colored Mummies: Add a drop of orange or green food coloring to the white chocolate for a festive twist. Gel food coloring works best — liquid coloring can seize the chocolate.
- Nut-Free Version: These are naturally nut-free as long as you check the labels on your chocolate. Most white chocolate wafers are nut-free, but always double-check if you’re serving someone with allergies.
- Dark Chocolate Mummies: Swap the white chocolate for dark or milk chocolate, and use white chocolate for the bandages and eyes. It’s a fun reversal that looks just as spooky.
My personal favorite variation? The pumpkin spice version. I made them for a fall harvest party, and they disappeared in record time. Something about that warm spice and salty pretzel combo just works.
Serving & Storage Suggestions
These mummy pretzel rods are designed to be the star of your Halloween party spread. Here’s how to serve them like a pro.
Serving Temperature: Serve them at room temperature. The chocolate is firm but not hard, and the pretzel stays perfectly crunchy. If you’ve refrigerated them, let them sit out for about 5 minutes before serving.
Presentation Ideas: Arrange them standing up in a tall glass jar or a pumpkin-shaped bowl for maximum visual impact. You can also lay them on a platter with some fake spider webs or plastic spiders scattered around. For a fun touch, tie a little orange or black ribbon around the bottom of each pretzel rod.
What to Serve Alongside: These pair beautifully with other Halloween treats like caramel apples, popcorn balls, or pumpkin-shaped cookies. For drinks, try apple cider, hot chocolate, or a spooky punch. The salty-sweet combo also works great with savory snacks like cheese platters or veggie trays.
Storage Instructions: Store them in an airtight container at room temperature for up to 5 days. If your kitchen is warm, keep them in the refrigerator — they’ll last up to 2 weeks. Layer them between sheets of parchment paper so they don’t stick together.
Freezing: You can freeze these for up to 3 months. Place them in a single layer on a baking sheet and freeze until solid, then transfer to a freezer-safe bag or container. Thaw at room temperature for about 15 minutes before serving.
One thing I’ve noticed — the flavors actually get better after a day or two. The chocolate sets up perfectly, and the pretzel stays crunchy. So feel free to make these a day ahead of your party.
Nutritional Information & Benefits
Let’s be real — these are a treat, not a health food. But here’s what you should know if you’re keeping an eye on nutrition.
Estimated Nutritional Values (per pretzel rod):
- Calories: 180-220
- Fat: 10-12g
- Carbohydrates: 22-26g
- Protein: 2-3g
- Sugar: 14-18g
- Sodium: 200-300mg
Health Benefits: The pretzel rods provide a small amount of iron and B vitamins from the enriched flour. Dark chocolate contains antioxidants called flavonoids, which are good for heart health in moderation. White chocolate has calcium from the milk solids. But honestly? These are about joy and celebration, not daily nutrition.
Dietary Considerations: These are naturally nut-free and egg-free. They can be made gluten-free with gluten-free pretzel rods. They are not dairy-free (white chocolate contains milk solids), but you could use dairy-free white chocolate alternatives if needed.
Potential Allergens: Contains milk (white chocolate) and wheat (pretzels). May contain traces of soy and tree nuts depending on the brand. Always check labels if serving someone with allergies.
I personally believe in balance. Enjoy these at your Halloween party, savor every bite, and don’t stress about the numbers. That’s my wellness perspective — food should bring joy.
Conclusion
These Easy Chocolate Mummy Wrapped Pretzel Rods are proof that Halloween treats don’t have to be complicated to be impressive. With just three ingredients and about 20 minutes, you can create a snack that looks like it came from a professional bakery. The salty crunch of the pretzel, the creamy sweetness of the white chocolate, and those adorable little dark chocolate eyes — it’s a combination that never gets old.
I love this recipe because it’s forgiving. If your drizzle is a little messy, that just makes the mummy look more authentic. If your eyes are uneven, it adds character. There’s no pressure to be perfect here — just have fun with it.
I’d love to hear how yours turn out! Did you add any fun variations? Did your kids help make them? Drop a comment below and share your spooky creations. And if you’re looking for more Halloween inspiration, check out our spooky Halloween punch recipe or these easy pumpkin-shaped cookies for the full party spread.
Now go make some mummies — your Halloween guests will thank you!
Frequently Asked Questions
Can I use milk chocolate instead of white chocolate?
Absolutely! Milk chocolate works great for the coating. Just use white chocolate for the bandages and eyes to keep that mummy look. The flavor will be richer and sweeter.
How far in advance can I make these?
You can make them up to 5 days ahead and store them in an airtight container at room temperature. If you want to prep even earlier, freeze them for up to 3 months.
Why did my white chocolate seize up?
White chocolate seizes when it gets too hot or when water gets into it. Always microwave in short intervals, and make sure your bowls are completely dry. A teaspoon of coconut oil can help smooth it out if it starts to thicken.
Can I use pretzel sticks instead of rods?
Yes, but be careful — pretzel sticks are thinner and more fragile. Dip them gently and let them set on parchment paper. They’ll still look adorable, just smaller.
How do I keep the chocolate from cracking?
Don’t freeze them for too long. If you’re in a hurry, 5-10 minutes in the freezer is plenty. Let them sit at room temperature for a few minutes before serving to prevent cracking.
Pin This Recipe!
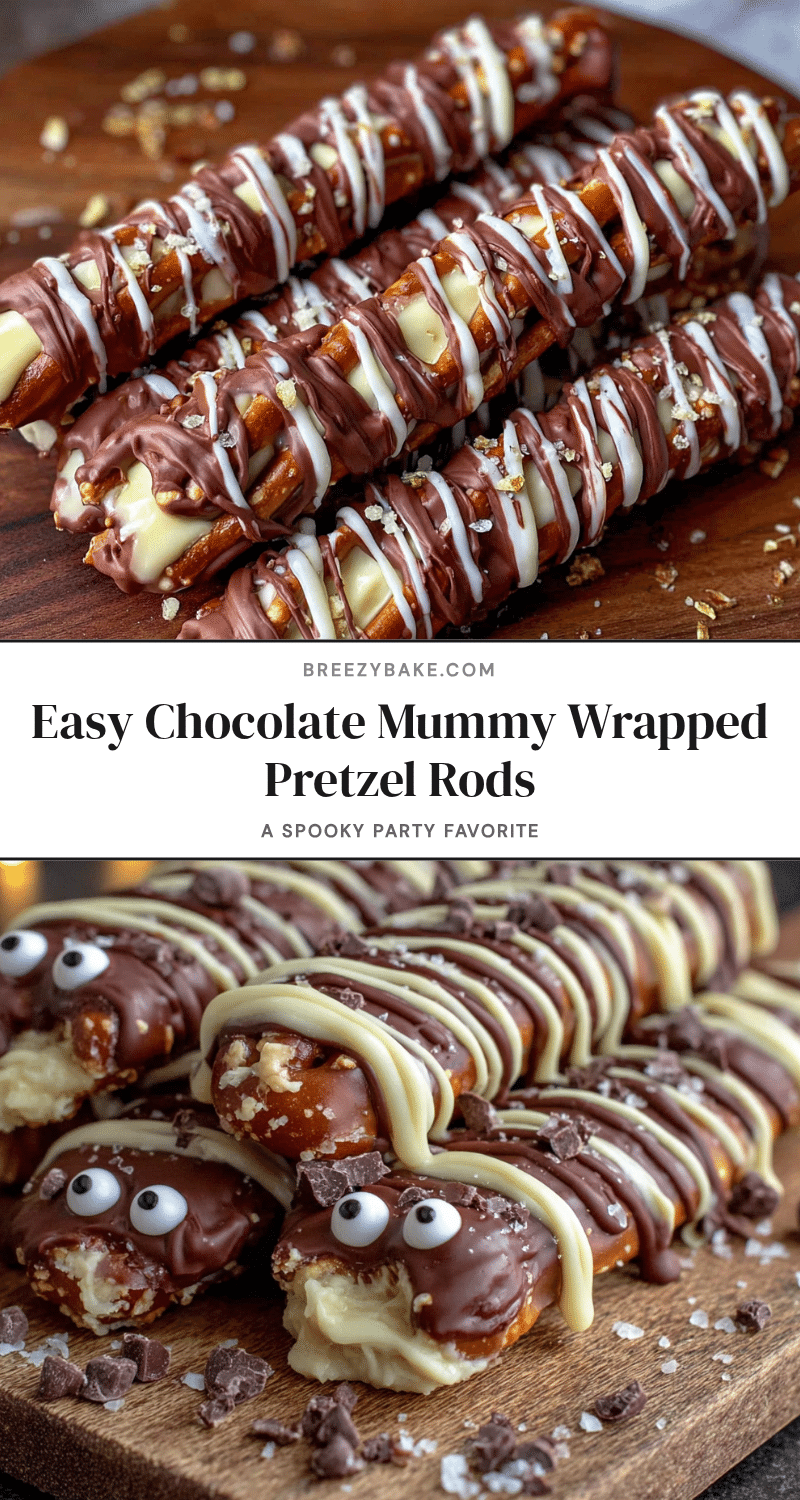
Easy Chocolate Mummy Pretzel Rods: Best Spooky Party Snack
These Easy Chocolate Mummy Wrapped Pretzel Rods are the ultimate Halloween party snack. With just three ingredients and about 20 minutes, you can create a spooky treat that looks like it came from a professional bakery.
- Prep Time: 20 minutes
- Cook Time: 0 minutes
- Total Time: 20 minutes (plus 15-20 minutes setting time)
- Yield: 12-16 servings 1x
- Category: Dessert
- Cuisine: American
Ingredients
- 1 standard bag pretzel rods (about 12–16 rods)
- 12 ounces white chocolate melting wafers
- 4 ounces dark chocolate melting wafers
- Optional: edible glitter or sanding sugar for decoration
Instructions
- Prep your workspace: Line a baking sheet with parchment paper. Make sure it’s big enough to hold all your pretzel rods without them touching each other.
- Melt the white chocolate: Put white chocolate melting wafers in a microwave-safe bowl. Microwave in 30-second intervals, stirring well after each interval, until mostly melted (about 1-2 minutes total). Stir until completely smooth.
- Dip the pretzels: Hold one pretzel rod by the end and dip it into the melted white chocolate. Use a spoon to help coat it if needed. Lift it out and let excess chocolate drip back into the bowl.
- Set the dipped pretzels: Place each dipped pretzel rod on the parchment-lined baking sheet, leaving space between each one. Optionally, use a toothpick to create ‘bandage’ lines in the wet chocolate.
- Melt the dark chocolate: In a separate microwave-safe bowl, melt dark chocolate wafers in 30-second intervals, stirring in between, until smooth.
- Create the mummy eyes: Transfer melted dark chocolate to a small piping bag or zip-top bag with a tiny corner snipped off. Pipe two small dots onto each pretzel rod for the mummy’s eyes.
- Add the bandage lines: Using the same piping bag, drizzle thin lines of dark chocolate across the white chocolate coating to look like mummy bandages.
- Let them set: Place the baking sheet in the refrigerator for about 15-20 minutes, or until the chocolate is completely firm. Alternatively, freeze for 5-10 minutes.
- Serve or store: Once set, arrange on a platter or store in an airtight container.
Notes
Don’t overheat the chocolate or it will seize. Work in small batches if making a large quantity. For a cleaner finish, use a wire cooling rack over a baking sheet. Small pea-sized dots work best for the eyes. The flavors actually improve after a day or two.
Nutrition
- Serving Size: 1 pretzel rod
- Calories: 200
- Sugar: 16
- Sodium: 250
- Fat: 11
- Saturated Fat: 7
- Carbohydrates: 24
- Fiber: 1
- Protein: 2.5
Keywords: Halloween treats, mummy pretzels, chocolate pretzel rods, easy Halloween snack, spooky party snack, white chocolate pretzels, no-bake dessert


