My sister-in-law Jen wasn’t trying to impress anyone. I’d stopped by to drop off a casserole dish I’d borrowed, and the smell of something toasty and familiar hit me before I even got through the mudroom. It was late October, and her kitchen counters were covered in a pile of crescent roll tubes, hot dog packages, and—this is the part that made me stop—a bag of candy eyeballs sitting right next to a block of cheddar cheese.
“Oh, those,” she said when she saw me staring. She was mid-phone call with her mom, holding the receiver between her ear and shoulder while she rolled a strip of dough around a hot dog. “They’re just for the kids’ Halloween party.” Just for the kids’ Halloween party. Like she wasn’t in the middle of creating the most ridiculously fun thing I’d seen all season. I mean, honestly, I’ve spent hours on complicated Halloween desserts that looked impressive but took forever. She was done in fifteen minutes.
You know that feeling when you see someone make something so simple and so perfect that you feel a little jealous you didn’t think of it first? That was me, standing in her kitchen, watching her casually wrap hot dogs like they were ancient Egyptian relics. She handed me one right out of the oven—the dough was golden and flaky, the cheese eyes had melted just enough to look slightly creepy, and the whole thing tasted like the best part of a state fair. “You want the recipe?” she asked, already knowing the answer.
These spooky mummy hot dogs with cheese eyes have become my go-to for every Halloween gathering since. They’re the kind of recipe that makes people smile before they even take a bite. And honestly, they’re so easy that you’ll feel like you’re getting away with something.
Why You’ll Love This Recipe
Let me tell you why these little guys have earned a permanent spot in my Halloween rotation. I’ve tested this recipe about six times now—trying different doughs, different cheeses, different wrapping techniques—and every single time, they disappear faster than anything else on the table.
- Quick & Easy : From start to finish, you’re looking at about 25 minutes. That’s faster than most Halloween decorations take to put up, and way more satisfying.
- Simple Ingredients : You need exactly five things—hot dogs, crescent roll dough, cheese slices, mustard, and candy eyeballs (or olive slices, if you’re feeling fancy). That’s it.
- Perfect for Halloween Parties : Whether it’s a classroom party, a neighborhood potluck, or just a spooky movie night at home, these fit right in.
- Crowd-Pleaser : Kids go absolutely wild for them. Adults pretend they’re above it, then eat three. I’ve seen it happen.
- Unbelievably Delicious : The flaky, buttery dough wrapped around a juicy hot dog with that little pop of melted cheese in the middle? It’s comfort food at its most ridiculous and wonderful.
What makes this version different from other mummy dog recipes I’ve seen is the cheese eyes. Most versions just stick candy eyeballs on top after baking, which is cute but they fall off. By embedding a small piece of cheese behind the eye, the candy eyeball has something to stick to, and the cheese melts into this little gooey surprise when you bite into it. It’s a tiny detail, but it makes a big difference.
This recipe isn’t just good—it’s the kind that makes you close your eyes after the first bite. It’s Halloween fun reimagined: faster, easier, but with the same soul-soothing satisfaction as your favorite childhood snack.
What Ingredients You Will Need
This recipe uses simple, everyday ingredients to deliver maximum fun and flavor without any special shopping trips. Here’s what you’ll need to grab:
For the Mummies:
- 8 hot dogs (I prefer beef hot dogs for better flavor, but any variety works)
- 1 can (8 oz) refrigerated crescent roll dough (Pillsbury is my go-to, but store brands work fine too)
- 4 slices cheddar cheese (use the thin sandwich slices for easier cutting)
- 16 candy eyeballs (available at most grocery stores in the baking aisle or online)
- Yellow mustard (for piping bandages and adding detail)
Ingredient Selection Tips:
For the hot dogs, look for ones that are all-beef if you can swing it—they have a better snap and richer flavor. I’ve tried turkey dogs and they work, but they’re a little softer and don’t hold up as well when wrapped. If you’re feeding a crowd, the regular-sized hot dogs are easier to work with than the jumbo ones, which take too long to bake through.
The crescent roll dough is the secret weapon here. I’ve tried making homemade dough, and honestly, it’s not worth the effort for this recipe. The refrigerated stuff gives you that perfect flaky texture that makes these taste like little savory pastries. Just make sure you get the original crescent rolls, not the seamless sheets—the perforated triangles are exactly what you need for wrapping.
For the cheese eyes, here’s the trick: use thin slices of cheddar and cut them into small circles or squares about the size of a nickel. You’ll place one behind each candy eyeball. The cheese acts like edible glue, holding the eyeball in place while also melting into a delicious surprise. If you can’t find candy eyeballs, you can substitute sliced olives (black or green) or even small dots of ketchup, but the candy version is way more fun.
Substitution Guidance:
- Use turkey or chicken hot dogs for a lighter option
- Swap cheddar with mozzarella or pepper jack for different flavor profiles
- Try gluten-free crescent roll dough if needed (check the freezer section)
- For a dairy-free version, use vegan cheese slices and skip the candy eyeballs (use olive slices instead)
Equipment Needed
You don’t need much for this recipe, which is part of the beauty of it. Here’s what I use:
- Baking sheet (a standard half-sheet pan works perfectly)
- Parchment paper (trust me on this—it makes cleanup so much easier)
- Sharp knife or pizza cutter (for cutting cheese and dough strips)
- Small bowl (for separating candy eyeballs so they don’t roll away)
- Pastry brush (optional, for brushing with egg wash if you want extra golden results)
- Toothpicks (for adjusting eyeballs without burning your fingers)
If you don’t have a pizza cutter, a sharp knife works just fine. I’ve even used kitchen scissors to cut the dough strips in a pinch—it’s not elegant, but it gets the job done. For the baking sheet, any rimmed pan will work. Just avoid using a cookie sheet without sides, because the hot dogs can release some grease as they bake.
One tip from experience: line your baking sheet with parchment paper, not aluminum foil. The dough sticks to foil sometimes, and you’ll end up with mummies that lose their bottoms. Parchment paper gives you that perfect release every time.
Preparation Method
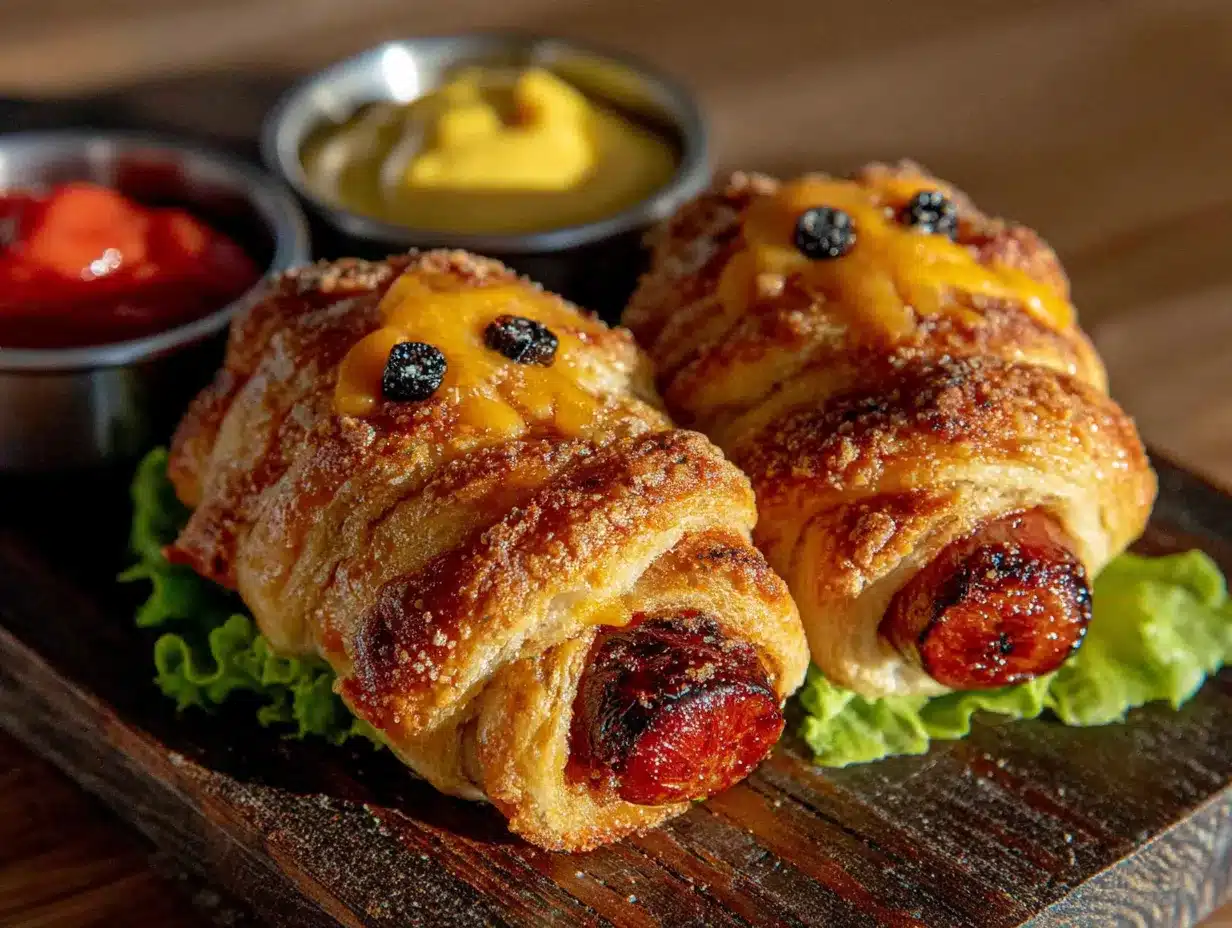
Alright, let’s make some mummies! I’ve broken this down step by step so even if you’ve never wrapped a hot dog in your life, you’ll end up with something that looks legitimately spooky.
- Preheat your oven to 375°F (190°C). Line a baking sheet with parchment paper and set it aside.
- Prepare your cheese eyes. Take your four slices of cheddar and cut each one into four small squares or circles, about 1 inch (2.5 cm) each. You’ll need 16 pieces total—one for each candy eyeball. Set these aside on a small plate.
- Open the crescent roll dough. Carefully unroll the tube—it’ll pop open with that satisfying sound. Separate the dough along the perforated lines so you have eight triangles. Using a sharp knife or pizza cutter, cut each triangle lengthwise into three long, thin strips. You should end up with 24 strips total.
- Wrap the hot dogs. Take one hot dog and start wrapping a strip of dough around it, slightly overlapping as you go. Leave a small gap at the top (about 1 inch or 2.5 cm) where the eyes will go. The dough should look like bandages wrapped around a mummy—don’t worry if it’s not perfect, that’s part of the charm. Repeat with the remaining hot dogs. Each hot dog gets three strips of dough.
- Place on baking sheet. Arrange the wrapped hot dogs on your prepared baking sheet, leaving about 1 inch (2.5 cm) of space between each one. They’ll expand a little as they bake, so don’t crowd them.
- Add the cheese eyes. Take one of your small cheese squares and press it gently onto the exposed section of the hot dog at the top. Then place a candy eyeball on top of the cheese, pressing lightly so it sticks. The cheese will act as glue during baking. Repeat for all 16 mummies.
- Bake for 12-15 minutes. Pop the baking sheet into the preheated oven and bake until the dough is golden brown and flaky, and the hot dogs are heated through. The cheese should be melted and slightly bubbly around the edges of the candy eyeballs.
- Add the mustard bandages. Once the mummies come out of the oven, let them cool for about 2 minutes. Then use a squeeze bottle of yellow mustard to pipe small lines or X shapes across the dough to look like bandages. You can also add a tiny dot of mustard on the candy eyeballs to make them look bloodshot—if you’re feeling extra spooky.
- Serve immediately. These are best eaten warm, right when the dough is still flaky and the cheese is gooey. Arrange them on a platter and watch them disappear.
Pro tip from my third batch: Don’t overthink the wrapping. The first time I made these, I tried to make every strip perfectly even and symmetrical. They looked fine, but they took forever. Now I just wrap them loosely and let the imperfections show—it actually makes them look more like real mummies. The uneven bandages are part of the charm.
Cooking Tips & Techniques
After making these about six times (and ruining a batch or two), I’ve picked up a few tricks that make the process smoother and the results better.
The dough temperature matters. Crescent roll dough is easiest to work with when it’s cold. If it gets too warm, it becomes sticky and tears easily. If your kitchen is warm, pop the dough in the fridge for 10 minutes before you start cutting the strips. I learned this the hard way when my first batch turned into a sticky, torn mess because I left the dough out while I was chopping cheese.
Don’t wrap too tightly. The dough needs room to expand as it bakes. If you wrap it too tightly around the hot dog, it’ll tear or look deflated after baking. Leave a little breathing room—think of it like loosely wrapping a bandage, not like you’re trying to restrain someone.
The cheese eye placement is crucial. Make sure the cheese piece is directly on the hot dog, not on the dough. If the cheese is on the dough, it might slide off during baking. Press the candy eyeball firmly onto the cheese, but not so hard that it sinks into the cheese completely. You want it to look like an eyeball, not a cheese pimple.
Watch the baking time. Ovens vary, so start checking at 12 minutes. You want the dough to be golden brown, not dark brown. If the edges of the dough start browning too quickly, tent the baking sheet loosely with aluminum foil for the last few minutes. I’ve had batches where the candy eyeballs started to melt because I left them in too long, so keep an eye on those little guys.
Let them rest before serving. I know they smell amazing right out of the oven, but let them cool for at least 2 minutes. The cheese inside will be molten hot, and nobody wants a burned tongue. Plus, the mustard bandages will set better on slightly cooled dough.
Variations & Adaptations
One of the best things about this recipe is how easy it is to customize. Here are some variations I’ve tried and loved:
Spicy Mummy Dogs: Use spicy Italian sausages instead of hot dogs, and add a thin slice of pepper jack cheese under the eyes. The heat from the sausage pairs beautifully with the cool candy eyeballs. I made these for a Halloween party last year, and they were gone in 10 minutes.
Veggie Mummies: For a vegetarian version, use veggie dogs or even cheese-stuffed jalapeños (if you’re feeling brave). The wrapping technique is exactly the same, but you might need to adjust the baking time slightly since veggie dogs heat through faster.
Breakfast Mummies: Swap the hot dogs for breakfast sausages and use pancake batter instead of crescent roll dough. Cook them on a griddle like pancakes, and serve with maple syrup for dipping. It’s a fun Halloween morning surprise for the kids.
Mini Mummy Bites: Cut the hot dogs into thirds before wrapping, and use smaller strips of dough. These are perfect for appetizers or for little hands. Adjust the baking time to about 10 minutes since they’re smaller.
Gluten-Free Option: Use gluten-free crescent roll dough (available in the freezer section of most grocery stores) or make your own gluten-free pastry. The texture will be slightly different, but the flavor is still fantastic.
My personal favorite variation is the spicy version. I’m a sucker for anything with a kick, and the contrast between the spicy sausage and the sweet, buttery dough is just perfect. Plus, the red pepper flakes in the pepper jack cheese look a little creepy when they melt, which adds to the spooky vibe.
Serving & Storage Suggestions
These mummy hot dogs are best served warm, right out of the oven. Arrange them on a platter with a spooky name card (I use a little tombstone-shaped sign that says “Mummy Dogs”) and watch people smile. They’re perfect for:
- Halloween parties (obviously)
- Movie nights (try them with Hocus Pocus or The Nightmare Before Christmas)
- Classroom celebrations (just check for allergy policies first)
- Game day snacks (the mummy theme works year-round if you’re creative)
For dipping, I recommend ketchup, mustard, or even a little ranch dressing. The coolness of ranch actually contrasts beautifully with the warm, flaky dough. One of my friends dips them in marinara sauce, which sounds weird but is surprisingly good.
Storage: If you somehow have leftovers (unlikely, but possible), store them in an airtight container in the refrigerator for up to 3 days. The dough will soften slightly, but they’re still delicious. To reheat, pop them in a 350°F (175°C) oven for 5-7 minutes, or until heated through. The microwave works in a pinch, but the dough will be softer and less flaky.
Freezer Instructions: You can freeze the unbaked mummies! Assemble them completely (including the cheese and candy eyeballs), then place them on a baking sheet and freeze until solid. Transfer to a freezer bag and store for up to 2 months. When you’re ready to bake, add 2-3 minutes to the baking time—no need to thaw first. This is a lifesaver for last-minute Halloween parties.
One thing I’ve noticed is that the flavors actually meld together a bit if you let them sit for a few hours after baking. The mustard soaks into the dough slightly, and the cheese gets more integrated. They’re still best fresh, but day-old mummies have their own charm.
Nutritional Information & Benefits
Let’s be real—these are a treat, not a health food. But here’s the breakdown if you’re curious:
Per serving (2 mummies):
- Calories: 380-420
- Protein: 14g
- Fat: 24g
- Carbohydrates: 28g
- Fiber: 1g
- Sugar: 6g
- Sodium: 980mg
The hot dogs provide a decent amount of protein, and the crescent roll dough gives you quick energy from carbohydrates. The cheese adds calcium and a little extra protein. Is this a balanced meal? No. Is it a fun, occasional treat that brings people together? Absolutely.
If you’re watching your sodium, look for low-sodium hot dogs and use reduced-sodium cheese. You can also skip the mustard to cut a little more salt. For a lower-calorie version, use turkey hot dogs and light crescent roll dough.
I personally believe that food doesn’t have to be “healthy” to be worthwhile. These mummy hot dogs are about joy, creativity, and sharing something fun with the people you love. And honestly, that’s good for your soul, even if it’s not in the nutrition facts.
Conclusion
These spooky mummy hot dogs with cheese eyes are everything I want in a Halloween recipe: fun, fast, and ridiculously delicious. They take almost no effort, use ingredients you probably already have, and they make people genuinely happy. What more could you ask for?
I love that this recipe has become a tradition in my house. Every October, my niece asks if we’re making “the mummy dogs,” and we spend an afternoon wrapping and giggling and sneaking candy eyeballs when nobody’s looking. It’s not fancy, and it’s not complicated, but it’s ours.
I’d love to hear how yours turn out! Try different variations, experiment with the wrapping, and make them your own. Drop a comment below and let me know what spooky creations you come up with. And if you’re looking for more Halloween fun, check out our Halloween pizza mummies recipe—they’re the perfect companion to these hot dogs.
Happy Halloween, and happy cooking!
Frequently Asked Questions
Can I make these ahead of time for a party?
Absolutely! You can assemble the mummies up to 24 hours in advance and keep them covered in the refrigerator. Just add 2-3 minutes to the baking time since they’ll be cold from the fridge. You can also freeze them unbaked for up to 2 months.
What if I can’t find candy eyeballs?
No worries! You can use sliced black olives, green olives, or even small dots of ketchup or mustard. For a fun twist, try using small pieces of bell pepper or carrot slices. The eyes don’t have to be perfect—they just need to look vaguely eyeball-ish.
Can I use a different type of dough?
Yes! While crescent roll dough works best, you can use puff pastry (cut into strips), pizza dough, or even refrigerated biscuit dough flattened into strips. Each will give a slightly different texture, but they all work. Just adjust the baking time based on the dough you choose.
How do I keep the candy eyeballs from falling off during baking?
The trick is using a small piece of cheese as “glue” between the hot dog and the candy eyeball. The cheese melts and holds the eyeball in place. Make sure the cheese is directly on the hot dog, not on the dough, and press the eyeball firmly but gently onto the cheese.
Can I make these in an air fryer?
Definitely! Preheat your air fryer to 350°F (175°C) and cook the mummies for 8-10 minutes, or until the dough is golden brown and the hot dogs are heated through. You might need to work in batches depending on the size of your air fryer. The texture will be even crispier than oven-baked!
Pin This Recipe!
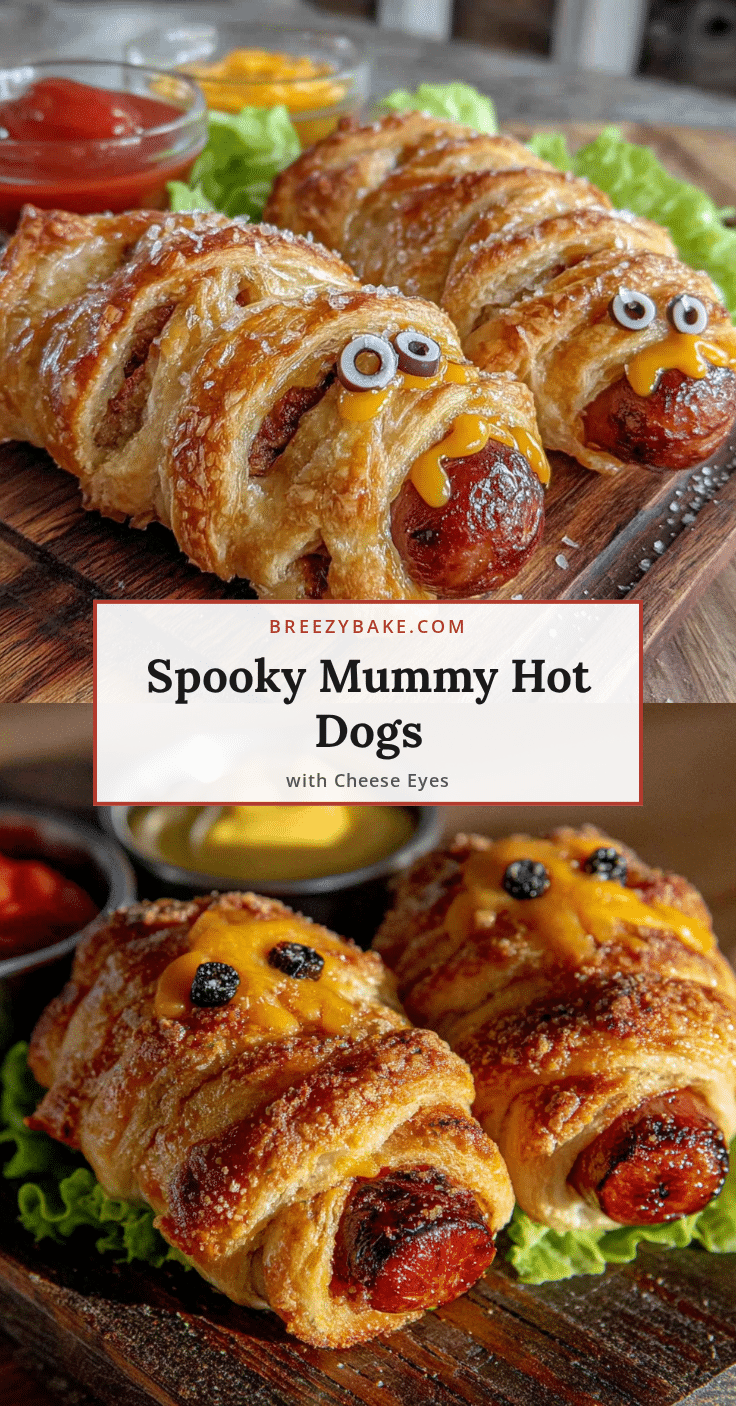
Easy Spooky Mummy Hot Dogs with Cheese Eyes
These spooky mummy hot dogs with cheese eyes are a fun, fast, and ridiculously delicious Halloween treat. Made with just five simple ingredients, they’re perfect for parties, movie nights, and classroom celebrations.
- Prep Time: 10 minutes
- Cook Time: 15 minutes
- Total Time: 25 minutes
- Yield: 8 servings (2 mummies per serving) 1x
- Category: Appetizer
- Cuisine: American
Ingredients
- 8 hot dogs (preferably beef)
- 1 can (8 oz) refrigerated crescent roll dough
- 4 slices cheddar cheese (thin sandwich slices)
- 16 candy eyeballs
- Yellow mustard (for piping bandages)
Instructions
- Preheat your oven to 375°F (190°C). Line a baking sheet with parchment paper and set it aside.
- Prepare your cheese eyes. Take your four slices of cheddar and cut each one into four small squares or circles, about 1 inch (2.5 cm) each. You’ll need 16 pieces total—one for each candy eyeball. Set these aside on a small plate.
- Open the crescent roll dough. Carefully unroll the tube—it’ll pop open with that satisfying sound. Separate the dough along the perforated lines so you have eight triangles. Using a sharp knife or pizza cutter, cut each triangle lengthwise into three long, thin strips. You should end up with 24 strips total.
- Wrap the hot dogs. Take one hot dog and start wrapping a strip of dough around it, slightly overlapping as you go. Leave a small gap at the top (about 1 inch or 2.5 cm) where the eyes will go. The dough should look like bandages wrapped around a mummy—don’t worry if it’s not perfect, that’s part of the charm. Repeat with the remaining hot dogs. Each hot dog gets three strips of dough.
- Place on baking sheet. Arrange the wrapped hot dogs on your prepared baking sheet, leaving about 1 inch (2.5 cm) of space between each one. They’ll expand a little as they bake, so don’t crowd them.
- Add the cheese eyes. Take one of your small cheese squares and press it gently onto the exposed section of the hot dog at the top. Then place a candy eyeball on top of the cheese, pressing lightly so it sticks. The cheese will act as glue during baking. Repeat for all 16 mummies.
- Bake for 12-15 minutes. Pop the baking sheet into the preheated oven and bake until the dough is golden brown and flaky, and the hot dogs are heated through. The cheese should be melted and slightly bubbly around the edges of the candy eyeballs.
- Add the mustard bandages. Once the mummies come out of the oven, let them cool for about 2 minutes. Then use a squeeze bottle of yellow mustard to pipe small lines or X shapes across the dough to look like bandages. You can also add a tiny dot of mustard on the candy eyeballs to make them look bloodshot—if you’re feeling extra spooky.
- Serve immediately. These are best eaten warm, right when the dough is still flaky and the cheese is gooey. Arrange them on a platter and watch them disappear.
Notes
Don’t overthink the wrapping—uneven bandages add to the mummy charm. For best results, keep the crescent roll dough cold while working. The cheese acts as edible glue for the candy eyeballs; make sure it’s directly on the hot dog, not on the dough. Let mummies cool for 2 minutes before adding mustard bandages. Can be assembled up to 24 hours in advance and refrigerated, or frozen unbaked for up to 2 months.
Nutrition
- Serving Size: 2 mummies
- Calories: 400
- Sugar: 6
- Sodium: 980
- Fat: 24
- Saturated Fat: 8
- Carbohydrates: 28
- Fiber: 1
- Protein: 14
Keywords: Halloween, mummy hot dogs, spooky snacks, easy Halloween recipe, hot dog appetizers, crescent roll recipes, party food


