I was standing in line at the DMV, of all places, waiting to renew my license on a gray Tuesday afternoon. The fluorescent lights were doing nobody any favors, and I was mentally calculating how much of my life I’d lost in this particular waiting room. That’s when the woman behind me—maybe seventy, wearing a cardigan with little embroidered daisies on it—started talking about cake.
“My grandson’s turning six next week,” she said to no one in particular. “And I’m making him the same cake I’ve made for every birthday since his mother was little.” She pulled a worn recipe card from her wallet, the edges soft and fuzzy from decades of use. “It’s nothing fancy. Just a perfect classic birthday cake with sprinkle buttercream.”
Honestly, I wasn’t expecting baking advice from a stranger at the DMV, but there I was, listening to her describe how she creams the butter until it’s practically white, how she always uses room temperature eggs even when she’s in a hurry, and how the sprinkles on top are non-negotiable. She told me the secret is in the buttermilk—and that her grandmother taught her that trick when she was nine years old. I mean, you can’t make this stuff up.
I scribbled notes on the back of an envelope I found in my bag. The woman, whose name was Margaret, laughed and said I looked like a reporter covering a breaking story. “It’s just cake, honey,” she said. But it wasn’t just cake to her. It was tradition. It was love. It was the smell of vanilla and butter filling up a kitchen every year without fail.
I’ve made this perfect classic birthday cake with sprinkle buttercream at least a dozen times since that day. Every single time, I think about Margaret and her grandson and that little embroidered daisy on her cardigan. Maybe you’ve been there—finding a recipe in the most unexpected place and knowing immediately it’s going to become part of your life. That’s what this cake is for me. And now, I’m passing it along to you.
Why You’ll Love This Recipe
This isn’t just another birthday cake recipe. I’ve tested this one more times than I can count, tweaking the ratios, adjusting the bake time, and perfecting that buttercream until it’s exactly right. Here’s why this cake stands out from every other recipe you’ll find online:
- Incredibly Moist: The buttermilk and oil combination creates a crumb that stays tender for days. No dry cake here, I promise.
- Simple Ingredients: You probably have most of these in your pantry right now. No weird extracts or hard-to-find specialty items.
- Perfect for Birthdays: This is the cake that gets requested year after year. Kids love the sprinkles, adults love the flavor, and everyone loves how it looks on the table.
- Easy Buttercream: No fancy piping skills required. The sprinkle-studded buttercream hides imperfections beautifully—perfect for beginner bakers.
- Make-Ahead Friendly: The cake layers freeze beautifully, and the buttercream keeps in the fridge for weeks. Stress-free party planning!
What makes this version different is the technique. Creaming the butter and sugar until it’s truly light and fluffy—I’m talking a full five minutes—makes all the difference. And the sprinkle buttercream? It’s not just stirred in at the end. You fold the sprinkles in gently so they don’t bleed their color everywhere. Little details like that turn a good cake into a perfect classic birthday cake with sprinkle buttercream.
This is the kind of cake that makes people close their eyes after the first bite. It’s comfort food in its purest form—familiar, joyful, and absolutely delicious.
What Ingredients You Will Need
This recipe uses simple, wholesome ingredients to create a cake that’s tender, flavorful, and absolutely unforgettable. Most of these are pantry staples, which makes this perfect for those last-minute birthday emergencies.
For the Cake Layers
- All-purpose flour, 3 cups (360g) — spooned and leveled, never scooped directly from the bag
- Granulated sugar, 2 cups (400g) — adds sweetness and helps create that tender crumb
- Unsalted butter, 1 cup (226g), softened — I use Kerrygold for the best flavor, but any good-quality butter works
- Vegetable oil, 1/2 cup (120ml) — keeps the cake moist even after refrigeration
- Large eggs, 4, at room temperature — cold eggs won’t emulsify properly into the batter
- Buttermilk, 1 cup (240ml), at room temperature — the acidity tenderizes the gluten for a softer crumb
- Vanilla extract, 2 teaspoons — pure, not imitation, if you can swing it
- Baking powder, 2 teaspoons — for lift and structure
- Baking soda, 1/2 teaspoon — works with the buttermilk for extra tenderness
- Salt, 1 teaspoon — balances the sweetness and enhances flavor
- Unsalted butter, 2 cups (452g), softened — this is the star of the show, so use good butter
- Powdered sugar, 5 cups (600g), sifted — sifting prevents lumps in your frosting
- Heavy cream, 3-4 tablespoons (45-60ml) — for the perfect spreading consistency
- Vanilla extract, 2 teaspoons — again, pure is best
- Salt, 1/4 teaspoon — cuts the sweetness and brings out the vanilla
- Rainbow sprinkles, 1/2 cup (80g) — use jimmies, not nonpareils, which bleed color
- Extra sprinkles, 1/4 cup (40g) — for the sides and top of the cake
- Optional: Birthday candles, because it’s not a birthday cake without them
- Three 8-inch round cake pans — you can use two 9-inch pans if that’s what you have, just adjust the bake time by a few minutes
- Stand mixer or hand mixer — a stand mixer makes creaming the butter easier, but a hand mixer works just fine
- Large mixing bowls — at least two, for wet and dry ingredients
- Whisk and rubber spatula — for combining ingredients and scraping down the bowl
- Parchment paper — cut into circles to line the bottom of your pans for easy release
- Cooling rack — wire racks let air circulate so your cakes cool evenly
- Offset spatula — makes frosting so much easier, but a butter knife works in a pinch
- Cake stand or serving plate — something pretty to show off your masterpiece
- Preheat and prep. Preheat your oven to 350°F (175°C). Grease three 8-inch round cake pans and line the bottoms with parchment paper circles. Dust the sides with flour and tap out the excess. This step saves you from the heartbreak of stuck cake layers.
- Whisk dry ingredients. In a medium bowl, whisk together 3 cups flour, 2 teaspoons baking powder, 1/2 teaspoon baking soda, and 1 teaspoon salt. Set this aside while you work on the wet ingredients.
- Cream butter and sugar. In the bowl of your stand mixer fitted with the paddle attachment, beat 1 cup softened butter and 2 cups granulated sugar on medium speed for 5 full minutes. Yes, set a timer. It should look light, fluffy, and almost pale in color. Scrape down the sides and bottom of the bowl halfway through.
- Add oil and eggs. With the mixer on medium speed, drizzle in 1/2 cup vegetable oil. Then add the 4 room temperature eggs one at a time, beating well after each addition. The batter might look a little curdled at this point—that’s totally normal. Add 2 teaspoons vanilla extract and mix until combined.
- Alternate dry and wet. Reduce mixer speed to low. Add the flour mixture in three additions, alternating with the buttermilk in two additions. Start and end with the flour. Mix just until combined—overmixing will make your cake tough. Use your spatula to give the batter a few final folds from the bottom up.
- Divide and bake. Divide the batter evenly among the three prepared pans. Bake for 22-28 minutes, or until a toothpick inserted in the center comes out clean or with a few moist crumbs. The tops should be golden and spring back when lightly touched.
- Cool completely. Let the cakes cool in their pans for 10 minutes, then turn them out onto a wire rack. Remove the parchment paper and let them cool completely—this is crucial. Warm cake will melt your buttercream into a sad puddle.
- Make the buttercream. While the cakes cool, beat 2 cups softened butter in your mixer on medium speed for 3 minutes until smooth and creamy. Gradually add the sifted powdered sugar, 1 cup at a time, beating on low speed. Add 3 tablespoons heavy cream, 2 teaspoons vanilla, and 1/4 teaspoon salt. Increase speed to medium-high and beat for 3-4 minutes until light and fluffy. If it’s too thick, add the remaining tablespoon of cream.
- Fold in sprinkles. Gently fold 1/2 cup rainbow jimmies into the buttercream using your spatula. Fold just until distributed—overmixing will cause the colors to bleed.
- Assemble the cake. Place one cake layer on your serving plate. Spread about 3/4 cup of buttercream evenly on top. Repeat with the second and third layers. Apply a thin crumb coat (a very thin layer of frosting that traps any loose crumbs) and refrigerate for 20 minutes. Then apply the final layer of buttercream, smoothing the top and sides with your offset spatula.
- Decorate. Press extra sprinkles onto the sides of the cake using your hands. Sprinkle more on top. Stand back and admire your work—you just made a perfect classic birthday cake with sprinkle buttercream!
- Room temperature ingredients matter. Cold butter won’t cream properly, and cold eggs can cause your batter to separate. Take everything out of the fridge about an hour before you start baking. I’ve forgotten this step and tried to rush it—trust me, it’s not worth it.
- Don’t overmix the batter. Once you add the flour, mix just until you can’t see any more white streaks. Overmixing develops gluten, which makes your cake dense and tough instead of light and tender.
- Use a kitchen scale. I know it’s an extra step, but measuring your flour by weight (360g) is way more accurate than using measuring cups. Too much flour is the number one reason cakes turn out dry.
- Level your cake layers. If your cakes domed in the center, use a serrated knife to trim the tops flat. This makes stacking and frosting so much easier. I’ve definitely skipped this step before, and my cakes looked like the Leaning Tower of Pisa.
- Chill between coats. That 20-minute chill after the crumb coat is non-negotiable. It sets the frosting so your final layer goes on smooth and crumb-free. I learned this one after a particularly disastrous birthday cake that looked like it had been through a food fight.
- Warm your offset spatula. Run it under hot water, dry it off, and use it to smooth your final layer of buttercream. The warmth melts the frosting just enough to create a perfectly smooth finish.
- Calories: 580
- Fat: 32g
- Saturated Fat: 18g
- Carbohydrates: 70g
- Sugar: 52g
- Protein: 5g
- Sodium: 310mg
For the Sprinkle Buttercream
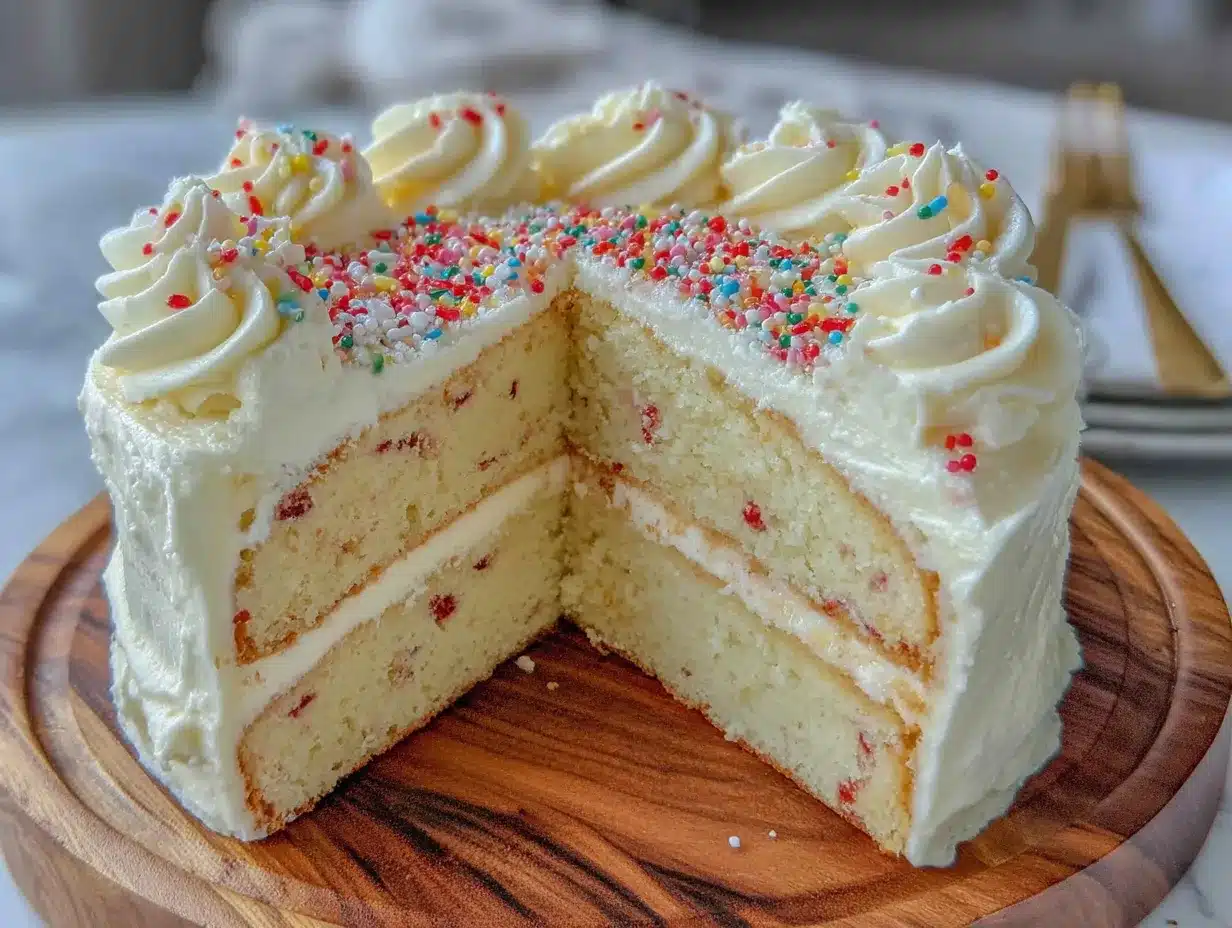
For Decoration
When it comes to sprinkles, I’ve learned the hard way that not all sprinkles are created equal. Jimmies—those little rod-shaped ones—hold their color and shape perfectly in buttercream. Nonpareils (the tiny round ones) will turn your frosting into a sad, gray mess. Trust me on this one.
Equipment Needed
You don’t need a professional bakery setup to make this cake. Here’s what you’ll actually use:
I picked up my offset spatula at a restaurant supply store for about five bucks, and it’s one of my most-used tools. If you’re just starting out, don’t stress about having fancy equipment. I’ve frosted plenty of cakes with a regular butter knife, and they tasted just as good.
Preparation Method
Take your time with this one. Rushing leads to dense cake and lumpy frosting. Give yourself about 30 minutes of active prep time, plus cooling time.
Cooking Tips & Techniques
I’ve made this cake more times than I can count, and I’ve learned a few things the hard way. Here are my best tips for success:
Variations & Adaptations
One of the best things about this perfect classic birthday cake with sprinkle buttercream is how easily it adapts to different tastes and dietary needs. Here are some variations I’ve tried and loved:
Chocolate Birthday Cake
Swap 1/2 cup of the flour with 1/2 cup of unsweetened cocoa powder. Add an extra 1/4 cup of buttermilk to compensate for the dry cocoa. You’ll get a rich, chocolatey cake that pairs beautifully with the vanilla sprinkle buttercream. My nephew requests this version every year without fail.
Gluten-Free Version
Use a high-quality 1:1 gluten-free flour blend that contains xanthan gum. I’ve had great results with King Arthur’s Measure for Measure flour. The texture is slightly more delicate, so handle the layers gently when stacking. Let the cake rest for about 20 minutes after frosting to allow the flavors to meld.
Lemon Birthday Cake
Add the zest of two lemons to the sugar and rub it in with your fingers before creaming with the butter. Replace 2 tablespoons of the buttermilk with fresh lemon juice. The bright citrus flavor cuts through the richness of the buttercream perfectly. This version is my go-to for spring birthdays.
Smaller Batch
Halve all the ingredients and bake in two 6-inch pans. The bake time will be slightly shorter—start checking at 20 minutes. Perfect for a small family celebration or when you don’t want a huge cake sitting on your counter tempting you.
Dairy-Free Adaptation
Use a high-quality vegan butter stick (not the spreadable kind in a tub) and substitute the buttermilk with 1 cup of unsweetened almond milk mixed with 1 tablespoon of apple cider vinegar. The texture won’t be quite as tender, but it’s still delicious. I’ve made this for dairy-free friends and they always ask for the recipe.
Serving & Storage Suggestions
This cake is best served at room temperature. Take it out of the fridge about 30 minutes before you plan to serve it—the buttercream softens slightly and the cake becomes incredibly tender. It’s the perfect centerpiece for any birthday celebration, and it pairs beautifully with a tall glass of cold milk or a scoop of vanilla ice cream.
For storage, keep the cake in an airtight cake carrier at room temperature for up to 3 days. If your kitchen is warm, you can refrigerate it, but let slices come to room temperature before serving for the best texture. The flavors actually develop and deepen over the first 24 hours, so this cake tastes even better on day two.
To freeze, place the unfrosted cake layers on a baking sheet and freeze until solid, then wrap each layer tightly in plastic wrap and foil. They’ll keep for up to 3 months. The buttercream freezes beautifully too—just thaw it in the fridge overnight and give it a good whip before using. I always keep a batch of this buttercream in my freezer for last-minute birthday emergencies.
A word of caution: don’t store this cake in the fridge uncovered. The buttercream will absorb any odors from your fridge, and nobody wants their birthday cake to taste like last night’s garlic chicken. Trust me on this one.
Nutritional Information & Benefits
Let’s be real—this is a celebration cake, not a health food. But here’s the estimated nutritional breakdown per slice (based on 16 servings):
That said, there are a few redeeming qualities. The buttermilk provides calcium and probiotics (yes, really), and the eggs contribute high-quality protein. And honestly? There’s something to be said for the mental health benefits of sharing a beautiful, homemade cake with people you love. Food is about more than just nutrients—it’s about connection, celebration, and joy.
This recipe contains dairy, eggs, and gluten. For allergen-friendly alternatives, check out the variations section above.
Conclusion
This perfect classic birthday cake with sprinkle buttercream is more than just a recipe—it’s a tradition waiting to happen. Whether you’re making it for a six-year-old who wants rainbow sprinkles on everything, or for a grown-up who secretly still loves the magic of a birthday cake, this one delivers every single time.
I think about Margaret every time I make this cake. I wonder if her grandson ever realized how much love went into that simple birthday cake year after year. Maybe he did. Maybe that’s the whole point—passing down something good, something reliable, something that tastes like home.
Now it’s your turn. Make this cake for someone you love. Customize it, make it your own, and don’t forget to save a slice for yourself. When you do, come back and tell me about it in the comments. I’d love to hear how your perfect classic birthday cake with sprinkle buttercream turned out—and who you shared it with.
Frequently Asked Questions
Can I use milk instead of buttermilk?
You can, but the cake won’t be as tender. Buttermilk’s acidity helps break down gluten and activates the baking soda for a softer crumb. If you’re in a pinch, make a quick buttermilk substitute by adding 1 tablespoon of lemon juice or white vinegar to 1 cup of milk and letting it sit for 5 minutes.
Why did my buttercream turn out grainy?
Grainy buttercream usually means your powdered sugar wasn’t sifted, or your butter wasn’t soft enough. Make sure to sift your powdered sugar before adding it, and beat the butter alone for a full 3 minutes until it’s smooth and creamy before adding the sugar.
Can I make this cake in advance?
Absolutely! The cake layers can be baked, cooled, wrapped tightly, and frozen for up to 3 months. The buttercream can be made ahead and stored in the fridge for up to 2 weeks. Just let it come to room temperature and rewhip before using.
How do I keep the sprinkles from bleeding in the buttercream?
Use jimmies (the rod-shaped sprinkles) instead of nonpareils (the tiny round ones). Fold them in gently at the very end, and don’t overmix. Also, make sure your buttercream is fully prepared before adding the sprinkles—any excess moisture can cause the colors to bleed.
Can I use this recipe for cupcakes?
Yes! This batter makes about 30 standard cupcakes. Fill the liners about 2/3 full and bake at 350°F (175°C) for 16-20 minutes. The sprinkle buttercream is perfect for piping on top. This is actually my go-to for classroom birthday celebrations.
Perfect Classic Birthday Cake with Easy Sprinkle Buttercream
A tender, moist vanilla cake with buttermilk and a sprinkle-studded buttercream, perfect for birthdays and celebrations. This recipe is a tradition in the making, passed down from a chance encounter at the DMV.
- Prep Time: 30 minutes
- Cook Time: 25 minutes
- Total Time: 55 minutes
- Yield: 16 servings 1x
- Category: Dessert
- Cuisine: American
Ingredients
- 3 cups (360g) all-purpose flour, spooned and leveled
- 2 cups (400g) granulated sugar
- 1 cup (226g) unsalted butter, softened
- 1/2 cup (120ml) vegetable oil
- 4 large eggs, at room temperature
- 1 cup (240ml) buttermilk, at room temperature
- 2 teaspoons vanilla extract
- 2 teaspoons baking powder
- 1/2 teaspoon baking soda
- 1 teaspoon salt
- 2 cups (452g) unsalted butter, softened (for buttercream)
- 5 cups (600g) powdered sugar, sifted
- 3–4 tablespoons (45-60ml) heavy cream
- 2 teaspoons vanilla extract (for buttercream)
- 1/4 teaspoon salt (for buttercream)
- 1/2 cup (80g) rainbow sprinkles (jimmies)
- 1/4 cup (40g) extra sprinkles for decoration
Instructions
- Preheat oven to 350°F (175°C). Grease three 8-inch round cake pans and line bottoms with parchment paper. Dust sides with flour and tap out excess.
- In a medium bowl, whisk together flour, baking powder, baking soda, and salt. Set aside.
- In a stand mixer with paddle attachment, beat 1 cup softened butter and 2 cups granulated sugar on medium speed for 5 minutes until light and fluffy. Scrape down bowl halfway through.
- With mixer on medium speed, drizzle in vegetable oil. Add eggs one at a time, beating well after each. Add vanilla extract and mix until combined.
- Reduce mixer speed to low. Add flour mixture in three additions, alternating with buttermilk in two additions, starting and ending with flour. Mix just until combined. Fold batter a few times with a spatula.
- Divide batter evenly among prepared pans. Bake for 22-28 minutes, until a toothpick inserted in center comes out clean or with a few moist crumbs. Cool in pans for 10 minutes, then turn out onto wire rack. Remove parchment and cool completely.
- For buttercream: Beat 2 cups softened butter on medium speed for 3 minutes until smooth. Gradually add sifted powdered sugar, 1 cup at a time, on low speed. Add 3 tablespoons heavy cream, 2 teaspoons vanilla, and 1/4 teaspoon salt. Increase speed to medium-high and beat for 3-4 minutes until light and fluffy. Add remaining tablespoon of cream if needed.
- Gently fold 1/2 cup rainbow jimmies into buttercream until just distributed.
- Assemble cake: Place one layer on serving plate. Spread about 3/4 cup buttercream on top. Repeat with remaining layers. Apply thin crumb coat and refrigerate for 20 minutes. Apply final layer of buttercream, smoothing top and sides.
- Press extra sprinkles onto sides and top of cake. Serve at room temperature.
Notes
Use jimmies (rod-shaped sprinkles) not nonpareils to prevent color bleeding. Room temperature ingredients are crucial for proper emulsification. For best results, chill cake after crumb coat for 20 minutes. Cake layers can be frozen for up to 3 months; buttercream can be refrigerated for up to 2 weeks.
Nutrition
- Serving Size: 1 slice (1/16 of cak
- Calories: 580
- Sugar: 52
- Sodium: 310
- Fat: 32
- Saturated Fat: 18
- Carbohydrates: 70
- Protein: 5
Keywords: birthday cake, sprinkle buttercream, classic cake, vanilla cake, buttermilk cake, celebration cake


