My neighbor Sarah wasn’t trying to impress anyone. I’d stopped by to return her hedge clippers — the ones I’d borrowed three weeks ago and kept meaning to give back — and the smell hit me before I even got through the screen door. Cinnamon, ginger, nutmeg, and something else. Something warm and creamy and completely distracting.
“What is that?” I asked, probably sounding a little too desperate.
She looked up from the pan she was pulling out of the oven, completely nonchalant. “Oh, just some pumpkin bars. I had a can of pumpkin in the pantry and a package of gingersnaps that were about to go stale.” Just some pumpkin bars. Like it was nothing. Like she hadn’t just created the exact thing I’d been craving for weeks without even knowing it.
I stood there in her kitchen, hedge clippers still in hand, watching her cool these gorgeous layered bars on the counter. The gingersnap crust was pressed into the pan with the kind of casual confidence that only comes from someone who’s made something a hundred times. She didn’t have a recipe written down. She just knew.
Honestly, that’s the best kind of cooking, isn’t it? When you’ve made something so many times that your hands just know what to do? Maybe you’ve been there — making a dish that’s become second nature, not realizing how special it is until someone else walks in and gets completely stopped in their tracks.
I asked for the recipe, of course. She shrugged and told me the ingredients over her shoulder while she washed the mixing bowl. A few gingersnaps, some butter, cream cheese, pumpkin puree, eggs, sugar, spices. That was it. She made it sound so simple that I almost didn’t believe it would be as good as it smelled.
But let me tell you — it was. And that’s why I’ve been making these Quick Pumpkin Cheesecake Bars with Gingersnap Crust ever since. Because sometimes the best recipes come from someone who isn’t even trying to impress you.
Why You’ll Love This Recipe
Let’s be real for a second. Weeknight cooking is hard enough without adding complicated dessert recipes to the mix. You’re tired, you’re hungry, and the last thing you want is a baking project that takes two hours and leaves your kitchen looking like a flour bomb went off. These pumpkin cheesecake bars are the opposite of that.
- Quick & Easy : From start to finish, these bars take about 45 minutes of active time. The hardest part is waiting for them to chill. I’ve made these on a Tuesday night after work and had dessert on the table before 8 PM. That’s my kind of baking.
- Simple Ingredients : No fancy grocery trips needed. You likely already have most of these ingredients in your pantry and fridge. Cream cheese, pumpkin puree, eggs, sugar, and a package of store-bought gingersnaps. That’s really all it takes.
- Perfect for Weeknights : These bars are ideal for those nights when you want something special but don’t have the energy for a full-blown baking session. They’re also great for potlucks, Thanksgiving dessert tables, or just because it’s Tuesday.
- Crowd-Pleaser : Every single time I’ve brought these somewhere, people ask for the recipe. Kids love them. Adults love them. Even people who say they don’t like pumpkin desserts have gone back for seconds.
- Unbelievably Delicious : The combination of spicy gingersnap crust and creamy pumpkin cheesecake filling is honestly next-level. The texture is smooth, the flavors are perfectly balanced, and it all comes together in a way that feels way more impressive than the effort you put in.
What makes this recipe different from all the other pumpkin cheesecake bars out there? It’s the crust. Most recipes use graham crackers, which are fine, but gingersnaps bring a whole other level of warmth and spice that complements the pumpkin filling perfectly. Plus, the crust comes together in about 5 minutes — no rolling, no chilling, no fuss.
This is the kind of dessert that makes you close your eyes after the first bite. It’s comfort food at its finest — easy enough for a random Tuesday, special enough for a holiday gathering. And honestly, that’s exactly what we all need sometimes.
What Ingredients You Will Need
This recipe uses simple, wholesome ingredients to deliver bold flavor and satisfying texture without the fuss. Most of these are pantry staples, which means you can probably make these bars right now without a trip to the store.
For the Gingersnap Crust
- 2 cups crushed gingersnap cookies (about 8 ounces, or one standard package) — I recommend Nabisco or Anna’s brand for consistent texture. You can crush them in a food processor or put them in a zip-top bag and go at them with a rolling pin. Both work fine.
- 5 tablespoons unsalted butter, melted — Salted butter works too, just reduce the added salt if you’re using it. The butter binds the crumbs together and adds richness to the crust.
- 2 tablespoons granulated sugar — This is optional, honestly. Gingersnaps are already sweet, but I like a tiny bit of extra sugar to help the crust hold together.
- Pinch of salt — Just a tiny pinch to balance the sweetness. Skip this if you’re using salted butter.
For the Pumpkin Cheesecake Filling
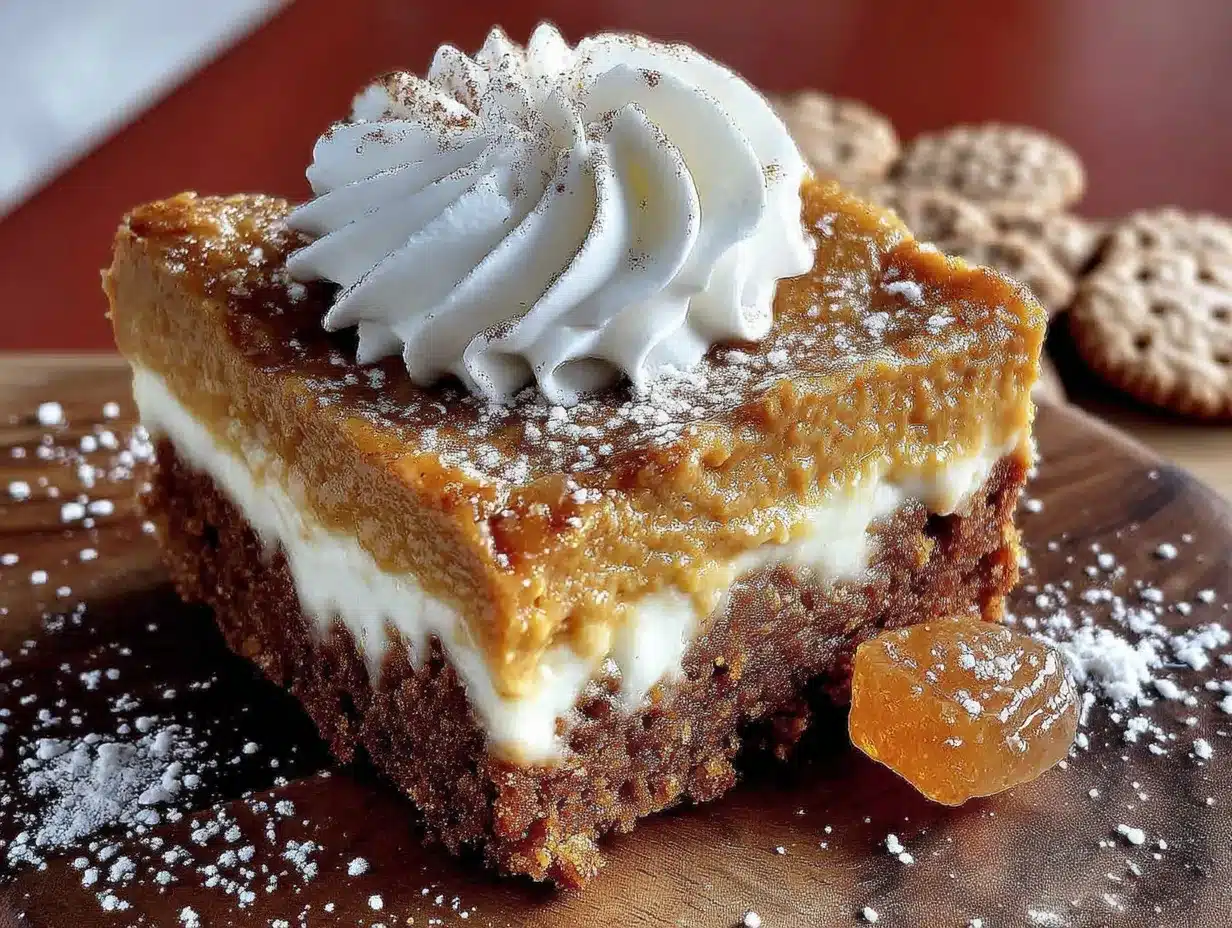
- 16 ounces cream cheese, softened (two standard blocks) — Full-fat cream cheese gives the best texture. I’ve tried reduced-fat versions and they work, but the filling isn’t quite as creamy. Let it sit on the counter for about 30 minutes before you start so it blends smoothly.
- 1 cup granulated sugar — Regular white sugar works perfectly here. You could try coconut sugar or a sugar substitute, but I haven’t tested those variations myself.
- 1 cup pumpkin puree — Not pumpkin pie filling. Make sure you grab the plain pumpkin puree. Libby’s is my go-to brand because it’s consistently thick and not watery.
- 3 large eggs, room temperature — Room temperature eggs blend into the filling more smoothly. If you forgot to take them out ahead of time, place them in a bowl of warm water for 5 minutes.
- 1 teaspoon vanilla extract — Pure vanilla extract is worth the splurge here. The flavor really comes through in the finished bars.
- 1 teaspoon ground cinnamon — This is the backbone of the pumpkin spice flavor. Use fresh cinnamon if you have it — it makes a difference.
- ½ teaspoon ground ginger — Adds warmth and a little kick. This complements the gingersnap crust beautifully.
- ¼ teaspoon ground nutmeg — Freshly grated nutmeg is amazing if you have it, but pre-ground works fine.
- ¼ teaspoon ground cloves — Just a tiny amount. Cloves are strong, so don’t go overboard.
- Pinch of salt — Enhances all the other flavors and balances the sweetness.
Optional Toppings
- Whipped cream — Homemade or store-bought. A dollop on top of each bar makes it feel extra special.
- Caramel sauce — Drizzle over the top before serving for a decadent touch.
- Extra crushed gingersnaps — Sprinkle on top for added crunch.
Equipment Needed
You don’t need a professional bakery setup for these bars. Here’s what you’ll need:
- 9×9-inch baking pan — This is the perfect size for these bars. An 8×8-inch pan works too, but the bars will be slightly thicker and may need a few extra minutes of baking time.
- Parchment paper — Line your pan with parchment paper, leaving some overhang on two sides. This makes lifting the bars out incredibly easy. Trust me on this one.
- Food processor or zip-top bag and rolling pin — For crushing the gingersnaps. I prefer the food processor because it gives a more even crumb, but the bag-and-rolling-pin method works in a pinch.
- Medium mixing bowl — For the crust ingredients.
- Large mixing bowl — For the cheesecake filling. A stand mixer or hand mixer works best here, but you can mix by hand if your arm needs a workout.
- Electric mixer — Hand mixer or stand mixer. Cream cheese needs to be beaten until smooth, and doing that by hand is a pain. I’ve done it. I don’t recommend it.
- Spatula — For scraping down the bowl and spreading the filling evenly.
- Measuring cups and spoons — Standard set. Nothing fancy.
- Knife — For cutting the bars after they’ve chilled. A sharp chef’s knife works best.
One thing I wish someone had told me earlier: invest in a good 9×9-inch pan. Cheap pans can warp in the oven, which leads to uneven baking and sad, lopsided bars. I’ve been using a USA Pan for years and it’s been worth every penny. But honestly, any pan you already have will work — just keep an eye on the baking time.
Preparation Method
Alright, let’s get to the good part. Here’s how to make these Quick Pumpkin Cheesecake Bars with Gingersnap Crust step by step.
- Preheat your oven to 350°F (175°C). Line your 9×9-inch baking pan with parchment paper, leaving about 2 inches of overhang on two opposite sides. This will be your handle for lifting the bars out later. Lightly spray the parchment with non-stick cooking spray just to be safe.
- Make the crust. Place 2 cups of crushed gingersnap cookies in a medium bowl. Add 5 tablespoons of melted butter, 2 tablespoons of sugar, and a pinch of salt. Stir with a fork until all the crumbs are evenly moistened. The mixture should look like wet sand and hold together when you press it between your fingers. If it seems too dry, add another tablespoon of melted butter. If it seems too wet, add a few more crushed cookies.
- Press the crust into the pan. Dump the crust mixture into your prepared pan. Use the bottom of a measuring cup or a flat-bottomed glass to press it down firmly and evenly. Don’t skip this step — a firmly pressed crust holds together much better when you cut the bars later. Make sure the crust goes all the way to the edges and into the corners. Bake the crust for 10 minutes, then set it aside to cool slightly while you make the filling.
- Beat the cream cheese. In a large mixing bowl, beat 16 ounces of softened cream cheese with an electric mixer on medium speed until it’s smooth and creamy, about 2 minutes. Scrape down the sides of the bowl with a spatula. This is important — nobody wants lumps of cream cheese in their cheesecake filling.
- Add the sugar. Add 1 cup of granulated sugar to the cream cheese and beat on medium speed until combined, about 1 minute. Scrape down the bowl again.
- Add the pumpkin and vanilla. Add 1 cup of pumpkin puree and 1 teaspoon of vanilla extract. Beat on low speed until just combined. Don’t overmix here — you don’t want to incorporate too much air into the filling.
- Add the eggs one at a time. Add 3 room-temperature eggs, one at a time, beating on low speed after each addition until just combined. Overbeating at this stage can cause the cheesecake to crack as it bakes. Trust me, I’ve learned this the hard way. Scrape down the bowl after the last egg.
- Add the spices. Add 1 teaspoon cinnamon, ½ teaspoon ginger, ¼ teaspoon nutmeg, ¼ teaspoon cloves, and a pinch of salt. Beat on low speed until everything is evenly distributed. Give the bowl one final scrape with your spatula and give it a few stirs by hand to make sure everything is incorporated.
- Pour the filling over the crust. Pour the pumpkin cheesecake filling over the pre-baked crust. Use your spatula to spread it evenly all the way to the edges. Give the pan a gentle tap on the counter to release any air bubbles.
- Bake the bars. Place the pan in the preheated oven and bake for 35-40 minutes. The edges should look set and slightly puffed, but the center should still have a slight jiggle when you gently shake the pan. That jiggle is your friend — it means the bars will be creamy, not dry. If the center looks completely firm, you’ve overbaked them.
- Cool completely. Place the pan on a wire rack and let the bars cool to room temperature. This usually takes about 1-2 hours. Don’t rush this step. If you put the bars in the refrigerator while they’re still warm, condensation will form on top and make them soggy.
- Chill for at least 4 hours. Once the bars are at room temperature, cover the pan with plastic wrap and refrigerate for at least 4 hours, but overnight is better. This is the hardest part of the whole recipe — the waiting. But I promise it’s worth it. The bars need time to set properly so they cut cleanly.
- Cut and serve. When you’re ready to serve, lift the bars out of the pan using the parchment paper overhang. Place them on a cutting board and use a sharp knife to cut them into squares. Wipe the knife clean between cuts for the neatest edges. I usually cut mine into 16 bars (4 rows by 4 rows), but you can make them bigger or smaller depending on your crowd.
A few notes from personal experience: if your cream cheese isn’t fully softened, you’ll end up with lumps in your filling. Microwave it in 10-second bursts if you’re short on time. And if your eggs are cold, place them in a bowl of warm water for 5 minutes before using them. Room temperature ingredients really do make a difference in the final texture.
Cooking Tips & Techniques
After making these bars more times than I can count, I’ve picked up a few tricks that make the process smoother and the results better. Here’s what I wish I’d known from the start.
Don’t overmix the filling. This is the number one mistake I see people make. Once you add the eggs, mix on low speed and stop as soon as everything is combined. Overmixing incorporates too much air, which can cause the cheesecake to puff up in the oven and then crack as it cools. I learned this after making a batch that looked like the surface of the moon. They still tasted great, but they weren’t pretty.
Use a water bath if you want extra creamy bars. I don’t always do this because it’s an extra step, but if you want the silkiest texture possible, place your baking pan inside a larger roasting pan and pour hot water into the roasting pan until it reaches about halfway up the sides of the baking pan. The steam from the water bath creates a gentle, even heat that prevents the cheesecake from cracking. Just make sure your baking pan is tightly wrapped in foil first so water doesn’t seep in.
Let the bars cool gradually. After the bars are done baking, turn off the oven and crack the door open. Let the bars sit in the cooling oven for about 30 minutes before you take them out. This gradual cooling helps prevent the top from cracking. I started doing this after a particularly disastrous batch that cracked so badly it looked like a dried-up riverbed.
Chill overnight for the best texture. I know 4 hours is the minimum, but if you can wait 8-12 hours, the bars will be significantly better. The flavors meld together, the texture becomes perfectly creamy, and the bars cut much more cleanly. I usually make these the night before I plan to serve them.
Use a hot knife for clean cuts. Run your knife under hot water and dry it off before each cut. The heat helps the knife glide through the cheesecake without dragging or sticking. This is a game-changer for getting those picture-perfect squares.
Variations & Adaptations
One of the best things about this recipe is how easy it is to adapt. Here are some variations I’ve tried and loved.
Gluten-Free Version: Use gluten-free gingersnap cookies for the crust. There are several good brands available now, including Mi-Del and Kinnikinnick. The rest of the ingredients are naturally gluten-free, so this is an easy swap. I made this version for a friend with celiac disease and she couldn’t tell the difference.
Dairy-Free Version: Use dairy-free cream cheese and a plant-based butter substitute. I’ve tried this with Kite Hill cream cheese and Miyoko’s butter and it worked well. The texture is slightly less creamy, but the flavor is still excellent. Just make sure your dairy-free cream cheese is softened before you start.
Pumpkin Spice Latte Bars: Add 1 tablespoon of instant espresso powder dissolved in 1 tablespoon of hot water to the filling. This gives the bars a subtle coffee flavor that pairs beautifully with the pumpkin and spices. I made these for a fall brunch and they disappeared in minutes.
Chocolate-Pumpkin Bars: Melt 4 ounces of semi-sweet chocolate and swirl it into the filling before baking. Use a knife to create a marbled effect. The chocolate and pumpkin combination is surprisingly good — the bitterness of the chocolate balances the sweetness of the filling.
Mini Cheesecake Bites: Instead of using a 9×9-inch pan, press the crust into a mini muffin tin and fill each cup with the cheesecake mixture. Bake for about 15-18 minutes. These are perfect for parties or when you want a smaller portion. Just make sure to line the muffin tin with paper liners for easy removal.
I’ve also tried adding a layer of caramel sauce between the crust and the filling, which was amazing but made the bars a bit messy to cut. If you try this, chill the bars for at least 8 hours before cutting.
Serving & Storage Suggestions
These bars are incredibly versatile when it comes to serving. Here’s how I like to do it.
Serving Temperature: I prefer these bars cold, straight from the refrigerator. The filling is firmer and the flavors are more pronounced. But if you like a softer, creamier texture, let them sit at room temperature for about 15 minutes before serving. Both ways are delicious — it’s really a matter of personal preference.
Presentation Ideas: Arrange the bars on a platter and top each one with a dollop of whipped cream and a light dusting of cinnamon. Drizzle with caramel sauce for an extra touch of decadence. For a fall-themed presentation, place them on a wooden board with some small pumpkins and cinnamon sticks.
What to Serve With Them: These bars are fantastic on their own, but they pair beautifully with a cup of coffee, a latte, or a glass of cold milk. For a dessert spread, serve them alongside apple cider donuts, pumpkin bread, or a simple vanilla ice cream. They also work great as part of a Thanksgiving dessert table — they’re less fussy than a full pumpkin pie but just as satisfying.
Storage Instructions: Store the bars in an airtight container in the refrigerator for up to 5 days. Layer them between sheets of parchment paper to prevent sticking. I’ve found that they actually taste better on day two after the flavors have had time to meld together.
Freezing Instructions: These bars freeze beautifully. Place the fully chilled and cut bars on a baking sheet and freeze until solid, about 2 hours. Then transfer them to a freezer-safe container or zip-top bag, separating layers with parchment paper. They’ll keep for up to 3 months. To thaw, transfer them to the refrigerator overnight. Don’t thaw them at room temperature — they’ll get soggy.
Reheating: Honestly, I don’t recommend reheating these bars. They’re meant to be served cold or at room temperature. But if you absolutely want a warm dessert, microwave a single bar for about 10 seconds. The filling will soften slightly, but the crust might lose some of its crunch.
Nutritional Information & Benefits
Let’s be honest — these are dessert bars, not health food. But they do have some redeeming qualities worth mentioning.
Estimated Nutritional Values (per bar, based on 16 servings):
- Calories: 285
- Total Fat: 17g
- Saturated Fat: 10g
- Cholesterol: 85mg
- Sodium: 220mg
- Total Carbohydrates: 30g
- Dietary Fiber: 1g
- Sugars: 22g
- Protein: 5g
Health Benefits: Pumpkin is packed with vitamin A, which supports eye health and immune function. It’s also a good source of fiber and antioxidants. The cream cheese provides calcium and protein, while the eggs add additional protein and essential nutrients. The ginger in the crust has anti-inflammatory properties and can aid digestion.
Dietary Considerations: This recipe can be made gluten-free and dairy-free with simple substitutions (see the Variations section). It’s not suitable for vegan diets as written, but you could experiment with vegan cream cheese and egg substitutes. The bars are relatively low in fiber, so consider serving them with a fiber-rich fruit like apples or pears.
Potential Allergens: This recipe contains dairy (cream cheese, butter), eggs, and gluten (gingersnaps). If you’re serving these to a crowd, make sure to label them clearly if any of these allergens are a concern.
From my perspective, these bars are a perfect example of how dessert can be both indulgent and made with real, recognizable ingredients. There’s nothing artificial here — just good food that happens to taste amazing. I don’t stress about the nutritional numbers because I know that a balanced diet includes room for treats. And honestly, a homemade dessert made with real ingredients is always going to be better than something processed from a box.
Conclusion
These Quick Pumpkin Cheesecake Bars with Gingersnap Crust have become a staple in my kitchen for good reason. They’re easy enough for a random Tuesday, impressive enough for a holiday gathering, and delicious enough to make you forget about all those complicated recipes you’ve been saving on Pinterest.
The gingersnap crust is the secret weapon here — it adds a warmth and depth that graham crackers just can’t match. And the pumpkin cheesecake filling is perfectly balanced: creamy, spicy, and not too sweet. Every time I make these, I think back to that afternoon in Sarah’s kitchen, standing there with hedge clippers in my hand, completely captivated by the smell coming from her oven.
I hope you’ll give these bars a try. Don’t be afraid to make them your own — swap in different spices, try a different crust, or add your favorite toppings. That’s the beauty of a simple recipe like this. It’s a starting point, not a rulebook.
When you make them, I’d love to hear how they turn out. Drop a comment below and let me know if you tried any variations, or tag me in your photos on social media. There’s nothing that makes my day quite like seeing someone else fall in love with a recipe I’ve shared.
Happy baking, friends. And remember — sometimes the best recipes come from the most unexpected moments.
Frequently Asked Questions
Can I use fresh pumpkin instead of canned?
Yes, you can use fresh pumpkin puree. Just make sure to strain it well after pureeing to remove excess moisture. Fresh pumpkin tends to be more watery than canned, which can make the filling too soft. Roast your pumpkin, puree it, then let it drain in a cheesecloth-lined strainer for about an hour before using.
Why did my cheesecake bars crack on top?
Cracks usually happen from overmixing the filling or overbaking. Mix on low speed once you add the eggs, and stop as soon as everything is combined. Also, remove the bars from the oven while the center still has a slight jiggle — it will continue to set as it cools. A water bath can also help prevent cracking by providing gentle, even heat.
Can I make these bars without a food processor?
Absolutely. Place the gingersnap cookies in a sturdy zip-top bag and crush them with a rolling pin or the bottom of a heavy pan. It takes a few extra minutes and you might get some uneven pieces, but it works perfectly fine. I’ve done it many times when my food processor was already dirty.
How do I know when the bars are done baking?
The edges should look set and slightly puffed, but the center should still jiggle when you gently shake the pan. If the center looks completely firm and doesn’t move, you’ve overbaked them. The residual heat will continue to cook the center as the bars cool, so that slight jiggle is exactly what you want.
Can I use a different crust?
Yes, you can substitute graham crackers, vanilla wafers, or even shortbread cookies for the gingersnaps. The flavor profile will change, but the bars will still be delicious. If using graham crackers, consider adding an extra teaspoon of cinnamon and ginger to the crust to maintain some of that warm spice flavor.
PrintQuick Pumpkin Cheesecake Bars Recipe (Easy Gingersnap Crust)
These Quick Pumpkin Cheesecake Bars feature a spicy gingersnap crust and a creamy pumpkin cheesecake filling. They’re easy enough for a weeknight and impressive enough for holiday gatherings.
- Prep Time: 20 minutes
- Cook Time: 40 minutes
- Total Time: 5 hours (includes chilling)
- Yield: 16 bars 1x
- Category: Dessert
- Cuisine: American
Ingredients
- 2 cups crushed gingersnap cookies (about 8 ounces)
- 5 tablespoons unsalted butter, melted
- 2 tablespoons granulated sugar
- Pinch of salt
- 16 ounces cream cheese, softened
- 1 cup granulated sugar
- 1 cup pumpkin puree
- 3 large eggs, room temperature
- 1 teaspoon vanilla extract
- 1 teaspoon ground cinnamon
- ½ teaspoon ground ginger
- ¼ teaspoon ground nutmeg
- ¼ teaspoon ground cloves
- Pinch of salt
- Whipped cream (optional, for serving)
- Caramel sauce (optional, for serving)
- Extra crushed gingersnaps (optional, for serving)
Instructions
- Preheat your oven to 350°F (175°C). Line a 9×9-inch baking pan with parchment paper, leaving overhang on two sides. Lightly spray with non-stick cooking spray.
- Make the crust: In a medium bowl, combine 2 cups crushed gingersnap cookies, 5 tablespoons melted butter, 2 tablespoons sugar, and a pinch of salt. Stir until all crumbs are evenly moistened.
- Press the crust mixture firmly and evenly into the prepared pan. Bake for 10 minutes, then set aside to cool slightly.
- Beat the cream cheese: In a large bowl, beat 16 ounces softened cream cheese with an electric mixer on medium speed until smooth and creamy, about 2 minutes. Scrape down the sides.
- Add 1 cup sugar and beat on medium speed until combined, about 1 minute. Scrape down the bowl.
- Add 1 cup pumpkin puree and 1 teaspoon vanilla extract. Beat on low speed until just combined.
- Add 3 room-temperature eggs, one at a time, beating on low speed after each addition until just combined. Scrape down the bowl after the last egg.
- Add 1 teaspoon cinnamon, ½ teaspoon ginger, ¼ teaspoon nutmeg, ¼ teaspoon cloves, and a pinch of salt. Beat on low speed until evenly distributed. Stir by hand to ensure everything is incorporated.
- Pour the filling over the pre-baked crust and spread evenly. Tap the pan gently on the counter to release air bubbles.
- Bake for 35-40 minutes, until edges are set and slightly puffed but the center still jiggles slightly.
- Cool completely on a wire rack (about 1-2 hours).
- Cover with plastic wrap and refrigerate for at least 4 hours, preferably overnight.
- Lift bars out using parchment overhang, cut into squares with a sharp knife (wiping clean between cuts), and serve.
Notes
For best results, use room temperature cream cheese and eggs. Don’t overmix the filling once eggs are added. Chill overnight for cleanest cuts. Use a hot knife for neat squares.
Nutrition
- Serving Size: 1 bar
- Calories: 285
- Sugar: 22
- Sodium: 220
- Fat: 17
- Saturated Fat: 10
- Carbohydrates: 30
- Fiber: 1
- Protein: 5
Keywords: pumpkin cheesecake bars, gingersnap crust, easy pumpkin dessert, fall dessert, Thanksgiving dessert, quick dessert


