The snap. Not the crunch—the snap. That clean, sharp break when you bite into a thin sheet of chocolate, and it shatters into neat little shards against your teeth. That’s the whole point of this Spooky Spiderweb Chocolate Bark with Candy Eyes. Everything else—the glossy dark chocolate, the ghostly white web, the tiny eyes staring back at you—is just a bonus. But that snap? That’s what I made this for.
I first made this bark for a Halloween party that I honestly didn’t want to attend. I was tired, the store-bought candy aisle looked sad, and I needed something that felt festive without requiring me to break out a mixer. So I grabbed a couple of chocolate bars I had stashed for emergencies (don’t judge), a bag of candy eyes left over from a crispy chicken wing bites platter I’d made earlier that week, and decided to just wing it. The spiderweb effect turned out way better than I expected—like, actually looked intentional. And the candy eyes gave it this goofy, slightly unsettling charm that made everyone at the party laugh.
It stuck with me because it’s one of those rare recipes that looks like you tried really hard when you actually just melted chocolate and dragged a toothpick through it. That’s my kind of cooking. No fuss, no stress, just a little bit of kitchen magic and a whole lot of candy eyes.
Why You’ll Love This Recipe
This Spooky Spiderweb Chocolate Bark with Candy Eyes isn’t just another Halloween dessert. It’s the kind of treat that makes people stop, stare, and then grab three pieces before you can say “trick or treat.” Here’s why it works:
- Quick & Easy: Comes together in under 20 minutes of active time. No baking, no complicated steps—just melt, swirl, and chill.
- Simple Ingredients: You probably already have chocolate in your pantry. The candy eyes are the only special addition, and they’re easy to find online or at any craft store.
- Perfect for Halloween Parties: This bark is a showstopper on dessert tables, snack boards, or even as a fun activity to make with kids. It fits right in with spooky celebrations.
- Crowd-Pleaser: Kids love the creepy eyes, adults love the rich chocolate, and everyone loves how easy it is to grab a piece and keep mingling.
- Unbelievably Delicious: The combination of smooth dark chocolate and creamy white chocolate creates a flavor contrast that’s hard to beat. The candy eyes add a subtle crunch that makes every bite interesting.
What makes this recipe different from the rest is the technique. Instead of just drizzling white chocolate on top, you actually drag it into a web pattern using a toothpick. It sounds simple because it is—but the result looks like something from a fancy bakery. Plus, I’ve tested this with different chocolate brands and found that using good-quality chocolate (like Ghirardelli or Lindt) gives you that perfect snap I mentioned earlier. Cheap chocolate tends to get soft and bendy, which just isn’t as satisfying.
Honestly, this recipe is the kind that makes you close your eyes after the first bite. It’s comfort food reimagined for a spooky season—rich, indulgent, and just a little bit creepy. Perfect for impressing guests without any stress, or turning a simple Halloween gathering into something memorable.
What Ingredients You Will Need
This Spooky Spiderweb Chocolate Bark with Candy Eyes uses just a handful of simple ingredients to deliver that perfect snap and spooky look. Most of these are pantry staples, and the candy eyes are easy to find online or at craft stores. Here’s what you’ll need:
- Dark chocolate chips or bars (12 oz / 340 g) – I prefer Ghirardelli 60% cacao for that deep, rich flavor and satisfying snap. You can also use semi-sweet if you prefer a milder taste.
- White chocolate chips or bars (6 oz / 170 g) – This creates the web pattern. Use good-quality white chocolate (like Lindt or Guittard) because cheaper brands can seize up when melted.
- Candy eyes (about 30–40 pieces) – These are the stars of the show. You can find them at craft stores, baking supply shops, or online. I like the ones with black pupils for maximum creepiness.
- Optional: Coconut oil or vegetable shortening (1 teaspoon, for thinning the white chocolate) – This helps the white chocolate flow smoothly when you’re making the web. Not strictly necessary, but it makes the process easier.
- Flaky sea salt (optional, for garnish) – A light sprinkle adds a nice contrast to the sweetness. I use Maldon sea salt because the flakes are delicate and don’t overpower the chocolate.
Ingredient Selection Tips: When choosing your chocolate, look for bars or chips that don’t contain added stabilizers or vegetable oils. These can affect how the chocolate melts and sets. For the white chocolate, avoid “white morsels” that are actually candy coating—they won’t melt as smoothly and can leave a waxy texture.
Substitution Guidance: If you’re dairy-free, use dairy-free dark chocolate and a dairy-free white chocolate alternative (like Enjoy Life brand). The candy eyes are usually made from sugar and starch, so they’re naturally gluten-free and vegan-friendly. For a sugar-free version, use sugar-free chocolate chips and skip the white chocolate web (or use a sugar-free white chocolate alternative, though these can be harder to find).
Equipment Needed
You don’t need fancy equipment for this Spooky Spiderweb Chocolate Bark with Candy Eyes. Here’s what I use:
- Baking sheet (13×18 inch / 33×46 cm) – A standard half-sheet pan works perfectly. Line it with parchment paper for easy removal.
- Parchment paper – Essential for preventing the chocolate from sticking. Don’t use wax paper—it can melt and leave residue.
- Small microwave-safe bowls (2 bowls) – One for dark chocolate, one for white chocolate. Glass or ceramic works best.
- Spatula or offset spatula – For spreading the dark chocolate evenly. An offset spatula gives you more control, but a regular spatula works fine.
- Toothpicks or skewers – This is your web-drawing tool. Toothpicks are easier to handle, but skewers work for larger webs.
- Piping bag or small zip-top bag – For drizzling the white chocolate. A zip-top bag with a tiny corner snipped off works perfectly and is easier to clean.
- Refrigerator space – You’ll need about 20–30 minutes of chill time. Make sure your baking sheet fits flat on a shelf.
Budget-Friendly Options: If you don’t have a piping bag, a plastic sandwich bag works just as well. No offset spatula? Use the back of a spoon to spread the chocolate—it’ll be a little uneven, but that adds to the homemade charm. I’ve made this recipe with just a bowl, a spoon, and a toothpick, and it turned out great.
Preparation Method
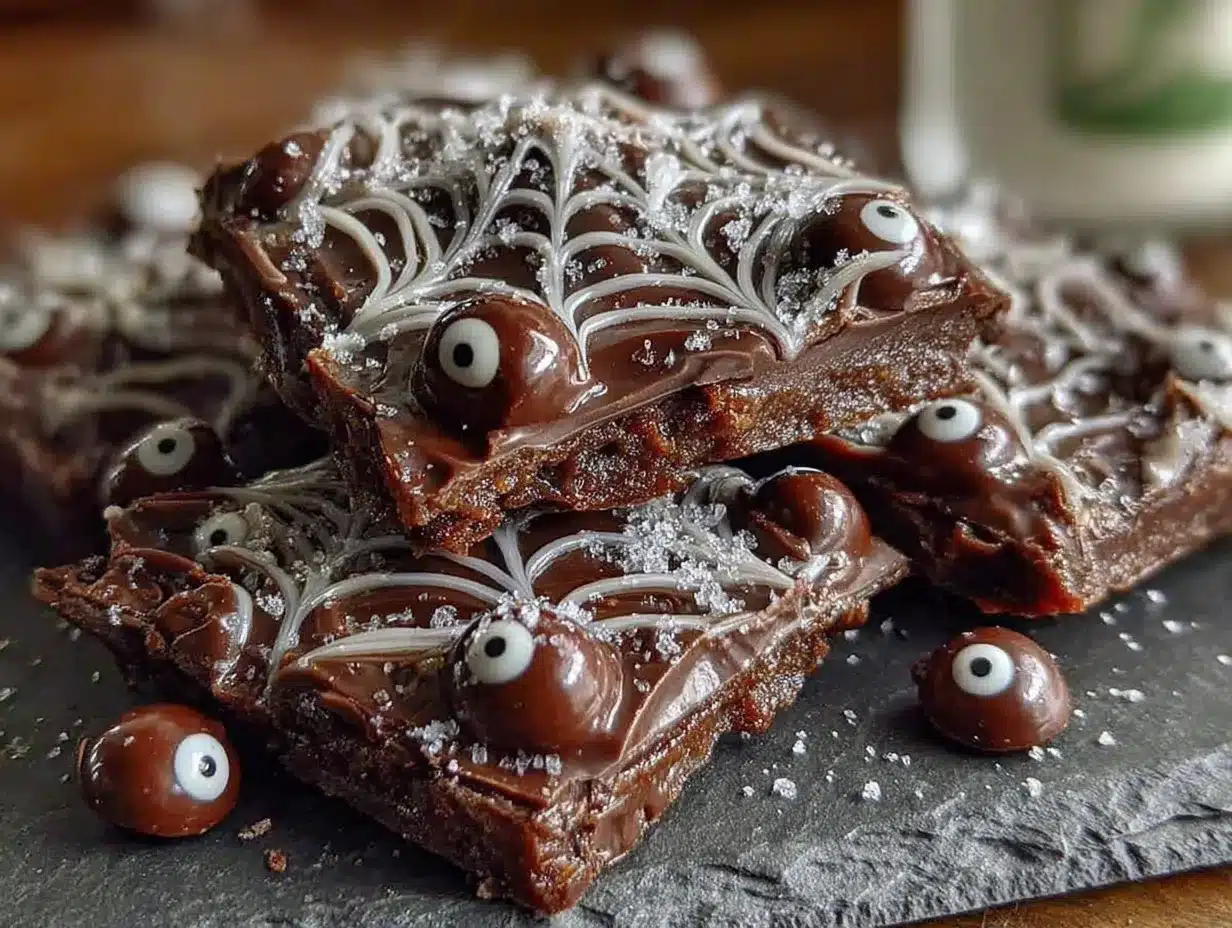
- Prep your baking sheet. Line a 13×18 inch baking sheet with parchment paper. Make sure the paper is smooth and flat—any wrinkles will show up in the chocolate. Set aside.
- Melt the dark chocolate. Place 12 oz (340 g) of dark chocolate chips in a microwave-safe bowl. Microwave in 30-second intervals, stirring after each interval, until fully melted and smooth. This usually takes about 2–3 minutes total. Be careful not to overheat—chocolate can burn easily and become grainy. If you prefer, you can use a double boiler on the stovetop.
- Spread the dark chocolate. Pour the melted dark chocolate onto the prepared baking sheet. Use a spatula or offset spatula to spread it into an even layer about ¼ inch thick. Don’t worry if it’s not perfectly rectangular—bark is supposed to look rustic. The chocolate should cover most of the sheet, leaving about 1–2 inches of space around the edges.
- Melt the white chocolate. While the dark chocolate is still warm (not set), melt 6 oz (170 g) of white chocolate chips in a separate microwave-safe bowl. Use the same 30-second interval method. If the white chocolate seems too thick, stir in 1 teaspoon of coconut oil or vegetable shortening to thin it out.
- Fill a piping bag. Transfer the melted white chocolate to a small piping bag or a zip-top bag. If using a zip-top bag, snip off a tiny corner—about ⅛ inch wide. You want a thin stream for the web pattern.
- Create the web pattern. Pipe parallel lines of white chocolate across the dark chocolate layer, about 1–2 inches apart. Then pipe perpendicular lines to create a grid pattern. Working quickly while the dark chocolate is still warm, drag a toothpick or skewer through the white chocolate lines in one continuous motion—first in one direction, then the opposite direction. This creates the classic spiderweb effect. The lines will feather out and form delicate webs.
- Add the candy eyes. While the chocolate is still soft, gently press candy eyes into the bark. Place them in clusters near the “webs” or scatter them randomly for a creepy-crawly effect. Press them in just enough so they stick—don’t push them all the way through to the bottom.
- Chill the bark. Transfer the baking sheet to the refrigerator and chill for 20–30 minutes, or until the chocolate is completely firm and set. The bark should feel solid to the touch and lift easily from the parchment paper.
- Break into pieces. Once set, lift the parchment paper off the baking sheet. Break the bark into irregular pieces with your hands. Don’t use a knife—the uneven edges are part of the charm. Aim for pieces about 2–3 inches wide.
- Serve or store. Arrange the bark pieces on a platter and serve immediately. If you’re not serving right away, store in an airtight container in a cool, dry place (not the refrigerator, unless it’s very warm).
Sensory Cues: When the dark chocolate is properly melted, it should be glossy and runny, like thick syrup. When you drag the toothpick through the white chocolate, you should see the lines feather out into delicate webs almost immediately. The bark should snap cleanly when you break it—if it bends, it needs more chill time.
Cooking Tips & Techniques
I’ve made this Spooky Spiderweb Chocolate Bark with Candy Eyes more times than I can count, and I’ve learned a few things the hard way. Here are my best tips:
- Don’t overheat the chocolate. This is the number one mistake. Chocolate can go from perfectly melted to scorched in seconds. Always use 30-second intervals and stir between each one. If you see any steam rising from the bowl, you’ve gone too far—start over.
- Work quickly with the white chocolate. Once you pipe the white chocolate onto the dark chocolate, you have about 30–60 seconds to drag the toothpick before the chocolate starts to set. If the white chocolate gets too thick, pop it back in the microwave for 10 seconds to loosen it up.
- Use a light hand with the toothpick. You don’t need to press hard. Just gently drag the toothpick through the white chocolate lines—the weight of the toothpick is enough. Pressing too hard will mix the chocolates together and muddy the web pattern.
- Keep the candy eyes handy. Have the candy eyes ready in a small bowl before you start piping the white chocolate. You don’t want to be fumbling for them while the chocolate is setting.
- If the chocolate seizes. If your white chocolate turns grainy or clumpy, you’ve added moisture or overheated it. Stir in 1 teaspoon of vegetable shortening or coconut oil to help smooth it out. If that doesn’t work, start fresh with new chocolate.
- Room temperature matters. If your kitchen is very warm (above 75°F / 24°C), the chocolate will take longer to set and may get soft. Work in a cooler room if possible, or pop the baking sheet in the refrigerator sooner rather than later.
I once tried to make this bark on a humid summer day, and the chocolate refused to set properly. It stayed tacky and the web pattern blurred into a mess. Lesson learned—save this recipe for cooler weather or turn on the air conditioning.
Variations & Adaptations
One of the best things about this Spooky Spiderweb Chocolate Bark with Candy Eyes is how easy it is to customize. Here are some variations I’ve tried:
- Dark Chocolate Base with Orange Zest: Add the zest of one orange to the melted dark chocolate before spreading. The citrus pairs beautifully with the dark chocolate and adds a subtle Halloween-y twist. I made this version for a friend who loves chocolate oranges, and it was a hit.
- White Chocolate Web on Milk Chocolate: Swap the dark chocolate for milk chocolate if you prefer a milder, creamier base. The web pattern will still show up beautifully, and the candy eyes pop against the lighter background.
- Spooky Sprinkle Edition: Before the chocolate sets, sprinkle the bark with Halloween-themed sprinkles (like orange and black jimmies or edible glitter). This version is especially fun for kids’ parties.
- Peppermint Bark Twist: Add ½ teaspoon of peppermint extract to the dark chocolate and crush a few candy canes over the top before chilling. This turns the bark into a winter holiday treat that still looks spooky.
- Nutty Spiderweb Bark: Sprinkle chopped almonds, pecans, or walnuts over the dark chocolate before adding the white chocolate web. The nuts add a nice crunch and make the bark feel more substantial.
- Vegan Version: Use dairy-free dark chocolate and a vegan white chocolate alternative (like Enjoy Life brand). The technique is exactly the same, and the result is just as delicious.
Dietary Adaptations: For a gluten-free version, double-check that your chocolate and candy eyes are certified gluten-free (most are). For a low-sugar version, use sugar-free chocolate chips and skip the white chocolate web—or use a sugar-free white chocolate alternative (though these can be harder to find and may not melt as smoothly).
Serving & Storage Suggestions
This Spooky Spiderweb Chocolate Bark with Candy Eyes is best served at room temperature. The chocolate snaps perfectly when it’s not too cold, and the candy eyes stay firmly in place. Here’s how I like to serve it:
- On a Halloween dessert table: Arrange the bark pieces on a dark platter or a wooden board. Add a few fake spiderwebs (the stretchy kind from the store) around the edges for extra creepiness. I’ve done this for a Halloween party, and guests couldn’t stop taking photos.
- As a party favor: Place individual pieces in small cellophane bags tied with orange or black ribbon. They make adorable, budget-friendly favors for Halloween gatherings.
- With a hot drink: Serve alongside hot chocolate, pumpkin spice lattes, or even a dark coffee. The bitterness of the coffee balances the sweetness of the bark perfectly.
Storage Instructions: Store the bark in an airtight container at room temperature for up to 2 weeks. Do not refrigerate unless your kitchen is very warm—refrigeration can cause condensation, which makes the chocolate soft and sticky. If you must refrigerate, let the bark come to room temperature before serving. You can also freeze the bark for up to 3 months. Place it in a freezer-safe bag or container, and thaw at room temperature before serving.
Flavor Development: The bark actually tastes better after a day or two. The flavors meld together, and the chocolate develops a deeper, more complex taste. I’ve made batches a week ahead of time, and they were just as good (if not better) on the day of the party.
Nutritional Information & Benefits
Here’s an approximate nutritional breakdown for one serving (about 1 ounce / 28 g, or roughly 2–3 pieces of bark):
- Calories: 150–170
- Total Fat: 10–12 g
- Saturated Fat: 6–8 g
- Carbohydrates: 16–18 g
- Sugar: 14–16 g
- Protein: 2–3 g
- Fiber: 1–2 g
Health Benefits: Dark chocolate is rich in antioxidants called flavonoids, which can help reduce inflammation and improve heart health. It also contains iron, magnesium, and copper. The white chocolate is more of a treat (it’s mostly sugar and cocoa butter), but it adds that beautiful web effect. The candy eyes are purely for fun—they’re made from sugar and starch, so they don’t add much nutritionally.
Dietary Considerations: This recipe is gluten-free (check labels to be sure) and can be made vegan with dairy-free chocolate. It contains dairy (unless you use alternatives) and sugar. If you’re watching your sugar intake, consider using sugar-free chocolate chips and skipping the white chocolate web.
Personally, I think this bark is a perfect example of how a little indulgence can fit into a balanced diet. It’s not something you eat every day, but it’s a fun, festive treat that brings people together. And honestly, the joy it brings is worth every calorie.
Conclusion
This Spooky Spiderweb Chocolate Bark with Candy Eyes is the kind of recipe that proves you don’t need fancy skills or expensive ingredients to make something truly impressive. It’s quick, it’s fun, and it’s guaranteed to get oohs and aahs from anyone who sees it. Plus, it tastes amazing—that rich dark chocolate with the creamy white chocolate web is a combination that never gets old.
I hope you give this recipe a try, whether you’re hosting a Halloween party, looking for a fun activity to do with kids, or just want to treat yourself to something spooky and delicious. And if you do make it, I’d love to hear how it turned out! Leave a comment below and let me know what variations you tried, or share a photo of your bark on social media and tag me. There’s nothing better than seeing your creations come to life.
Happy Halloween, friends. Stay spooky, stay sweet, and keep snapping that chocolate.
Frequently Asked Questions
Can I use milk chocolate instead of dark chocolate?
Absolutely! Milk chocolate works perfectly as a base. It’s sweeter and creamier than dark chocolate, which some people prefer. The web pattern will still show up beautifully, and the candy eyes pop against the lighter background. Just keep in mind that milk chocolate can be softer than dark chocolate, so it may not have quite the same snap when you break it.
How do I prevent the white chocolate from seizing?
White chocolate is more sensitive to heat and moisture than dark chocolate. To prevent seizing, make sure all your tools are completely dry, and never add water to the chocolate. If the white chocolate seems too thick, stir in 1 teaspoon of coconut oil or vegetable shortening—this helps thin it out without affecting the flavor. Also, avoid overheating: use 30-second intervals and stir thoroughly between each one.
Can I make this recipe ahead of time?
Yes! This bark actually tastes better after a day or two, as the flavors meld together. You can make it up to 2 weeks in advance and store it in an airtight container at room temperature. If you’re making it for a party, I recommend making it 2–3 days ahead so the chocolate has time to fully set and develop that perfect snap.
What if I don’t have candy eyes?
No worries! You can substitute with other decorations like Halloween sprinkles, edible glitter, crushed candy canes, or even small chocolate chips. If you want to keep the spooky theme, try using black sesame seeds or mini chocolate chips arranged to look like spider eggs. The bark will still look festive and taste delicious.
Can I freeze this bark?
Yes, you can freeze this bark for up to 3 months. Place the pieces in a freezer-safe bag or container, separating layers with parchment paper to prevent sticking. When you’re ready to serve, let the bark thaw at room temperature for about 15–20 minutes. Don’t thaw it in the refrigerator—condensation can make the chocolate soft and sticky.
Pin This Recipe!
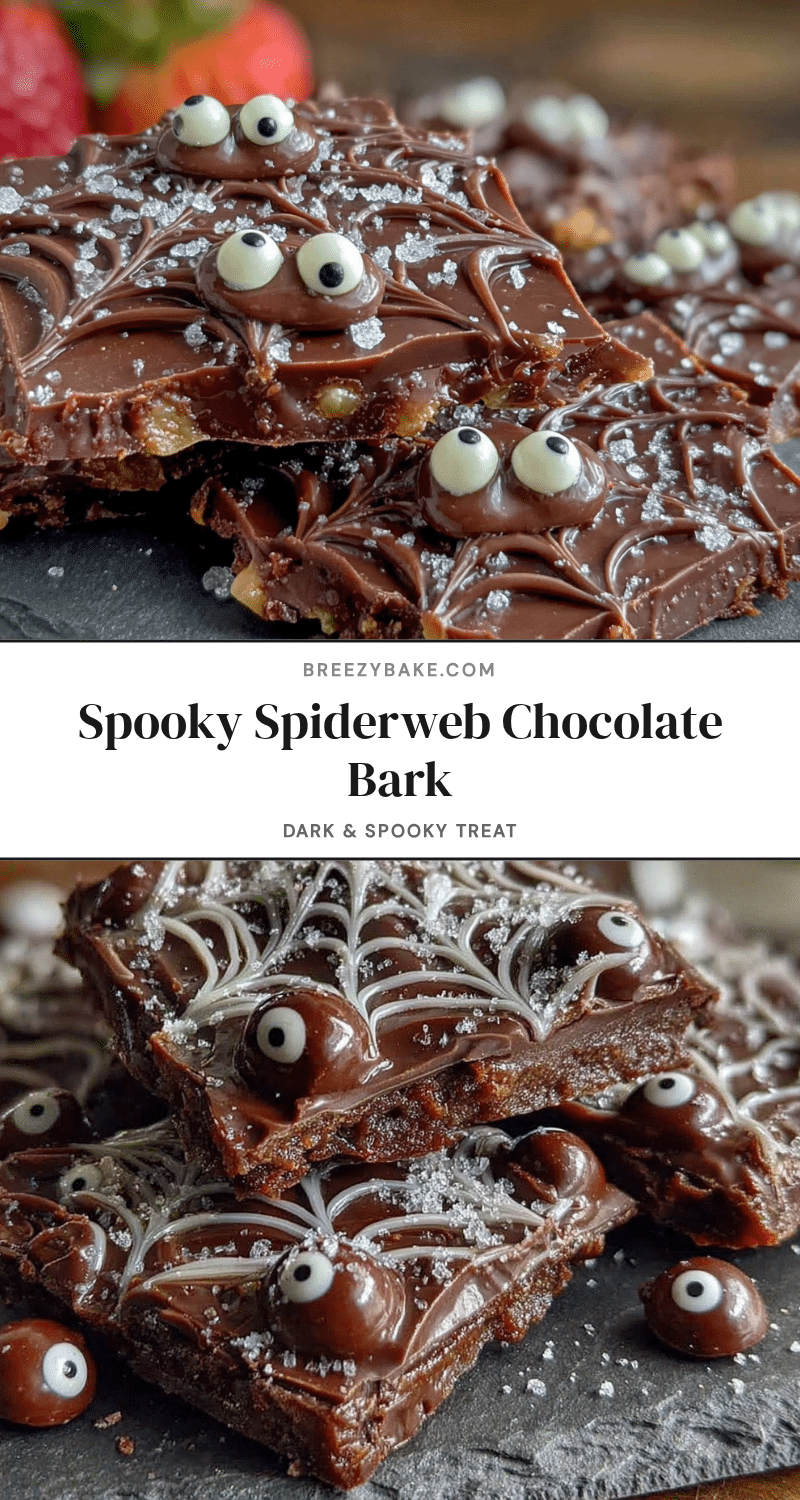
Spooky Spiderweb Chocolate Bark with Perfect Candy Eyes

This Spooky Spiderweb Chocolate Bark with Candy Eyes is a quick and easy Halloween treat that looks impressively festive. With a perfect snap, a ghostly white web, and googly candy eyes, it’s a crowd-pleaser that comes together in under 20 minutes of active time.
- Prep Time: 15 minutes
- Cook Time: 5 minutes
- Total Time: 40 minutes (including 20-30 minutes chill time)
- Yield: 12 servings 1x
- Category: Dessert
- Cuisine: American
Ingredients
- 12 oz (340 g) dark chocolate chips or bars (e.g., Ghirardelli 60% cacao)
- 6 oz (170 g) white chocolate chips or bars (e.g., Lindt or Guittard)
- 30–40 candy eyes
- 1 teaspoon coconut oil or vegetable shortening (optional, for thinning white chocolate)
- Flaky sea salt (optional, for garnish)
Instructions
- Prep your baking sheet. Line a 13×18 inch baking sheet with parchment paper. Make sure the paper is smooth and flat—any wrinkles will show up in the chocolate. Set aside.
- Melt the dark chocolate. Place 12 oz (340 g) of dark chocolate chips in a microwave-safe bowl. Microwave in 30-second intervals, stirring after each interval, until fully melted and smooth. This usually takes about 2–3 minutes total. Be careful not to overheat—chocolate can burn easily and become grainy. If you prefer, you can use a double boiler on the stovetop.
- Spread the dark chocolate. Pour the melted dark chocolate onto the prepared baking sheet. Use a spatula or offset spatula to spread it into an even layer about ¼ inch thick. Don’t worry if it’s not perfectly rectangular—bark is supposed to look rustic. The chocolate should cover most of the sheet, leaving about 1–2 inches of space around the edges.
- Melt the white chocolate. While the dark chocolate is still warm (not set), melt 6 oz (170 g) of white chocolate chips in a separate microwave-safe bowl. Use the same 30-second interval method. If the white chocolate seems too thick, stir in 1 teaspoon of coconut oil or vegetable shortening to thin it out.
- Fill a piping bag. Transfer the melted white chocolate to a small piping bag or a zip-top bag. If using a zip-top bag, snip off a tiny corner—about ⅛ inch wide. You want a thin stream for the web pattern.
- Create the web pattern. Pipe parallel lines of white chocolate across the dark chocolate layer, about 1–2 inches apart. Then pipe perpendicular lines to create a grid pattern. Working quickly while the dark chocolate is still warm, drag a toothpick or skewer through the white chocolate lines in one continuous motion—first in one direction, then the opposite direction. This creates the classic spiderweb effect. The lines will feather out and form delicate webs.
- Add the candy eyes. While the chocolate is still soft, gently press candy eyes into the bark. Place them in clusters near the ‘webs’ or scatter them randomly for a creepy-crawly effect. Press them in just enough so they stick—don’t push them all the way through to the bottom.
- Chill the bark. Transfer the baking sheet to the refrigerator and chill for 20–30 minutes, or until the chocolate is completely firm and set. The bark should feel solid to the touch and lift easily from the parchment paper.
- Break into pieces. Once set, lift the parchment paper off the baking sheet. Break the bark into irregular pieces with your hands. Don’t use a knife—the uneven edges are part of the charm. Aim for pieces about 2–3 inches wide.
- Serve or store. Arrange the bark pieces on a platter and serve immediately. If you’re not serving right away, store in an airtight container in a cool, dry place (not the refrigerator, unless it’s very warm).
Notes
Work quickly with the white chocolate once piped; you have about 30-60 seconds to drag the toothpick before it sets. Use a light hand with the toothpick to avoid muddying the web pattern. If the chocolate seizes, stir in 1 teaspoon of vegetable shortening or coconut oil. Room temperature matters—avoid making this in a very warm kitchen (above 75°F / 24°C). The bark actually tastes better after a day or two as flavors meld.
Nutrition
- Serving Size: 1 ounce (28 g), roug
- Calories: 150170
- Sugar: 1416
- Sodium: 5
- Fat: 1012
- Saturated Fat: 68
- Carbohydrates: 1618
- Fiber: 12
- Protein: 23
Keywords: Halloween, chocolate bark, spiderweb, candy eyes, easy dessert, no-bake, spooky, party treat


