Homemade Honey Elderberry Gummies: The Best Immune Boosting Snack
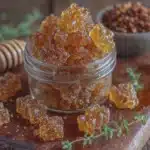
These homemade honey elderberry gummies are a naturally sweetened, immune-boosting treat with a soft, pillowy jiggle that kids love. Made with simple, clean ingredients like dried elderberries, raw honey, and gelatin, they’re perfect for lunchboxes, travel, or a fun kitchen project with the family.
- Prep Time: 15 minutes
- Cook Time: 30 minutes
- Total Time: 45 minutes
- Yield: 4 servings 1x
- Category: Snack
- Cuisine: American
Ingredients
- ½ cup dried elderberries
- 2 cups water
- ¼ cup raw honey
- ¼ cup gelatin (about 4 tablespoons)
- 1 teaspoon vitamin C powder (optional)
- 1 tablespoon fresh lemon juice
Instructions
- Make the elderberry syrup: Combine the dried elderberries and 2 cups of water in a medium saucepan. Bring to a boil over medium-high heat, then reduce the heat to low and let it simmer, uncovered, for about 30 minutes. The liquid will reduce by about half and turn a deep, dark purple.
- Strain the berries: Place a fine-mesh strainer over a bowl or liquid measuring cup. Carefully pour the mixture through the strainer, pressing on the berries with the back of a spoon to extract all the liquid. Discard the berries. You should have about 1 cup of concentrated elderberry syrup. Let it cool for 5-10 minutes until it’s warm but not hot.
- Bloom the gelatin: While the syrup cools, pour ¼ cup of the warm elderberry syrup into a small bowl. Sprinkle the gelatin evenly over the top. Do not stir yet. Let it sit for 5-10 minutes until the gelatin absorbs the liquid and looks like a thick, jiggly paste.
- Combine everything: Pour the remaining ¾ cup of warm elderberry syrup back into the saucepan. Add the honey, lemon juice, and vitamin C powder if using. Warm over low heat, whisking gently, until the honey dissolves completely. Do not let it boil.
- Incorporate the bloomed gelatin: Remove the saucepan from the heat. Add the bloomed gelatin and whisk gently but thoroughly until it’s completely dissolved. You should see no streaks or lumps.
- Fill the molds: Carefully pour the mixture into a liquid measuring cup with a spout (or use a dropper). Fill each cavity of your silicone molds to the top. Work quickly, as the mixture will start to set as it cools.
- Refrigerate to set: Place the filled molds on a flat tray or plate. Refrigerate for at least 2-3 hours, or until the gummies are firm to the touch. I usually leave them overnight for the best texture.
- Unmold and store: Once set, gently pop the gummies out of the molds. They should release easily. If they stick, let them sit at room temperature for a few minutes, then try again. Store in an airtight container in the refrigerator.
Notes
Don’t skip the blooming step for a smooth texture. Ensure the syrup is warm but not hot when adding gelatin to avoid weakening its setting power. For vegan version, substitute gelatin with 2 tablespoons agar agar powder. Gummies can be stored in the refrigerator for up to 2-3 weeks or frozen for up to 3 months.
Nutrition
- Serving Size: 6-8 gummies
- Calories: 4560
- Sugar: 810
- Carbohydrates: 1012
- Protein: 23
Keywords: elderberry gummies, honey gummies, immune boosting gummies, homemade gummies, healthy gummies, kid-friendly gummies, natural gummies